

How do you keep your desk organized? Do you have pencil holders? Boxes? I have a desk organizer, this one if you want to have a look at, but I still have plenty of pens, pencils, sharpies lying around my desk… crafty mess, you know what I mean! So maybe sorting and organizing them into boxes will help.
[ This post probably contains affiliates links, our full disclosure policy is really boring, but you can read it HERE ]
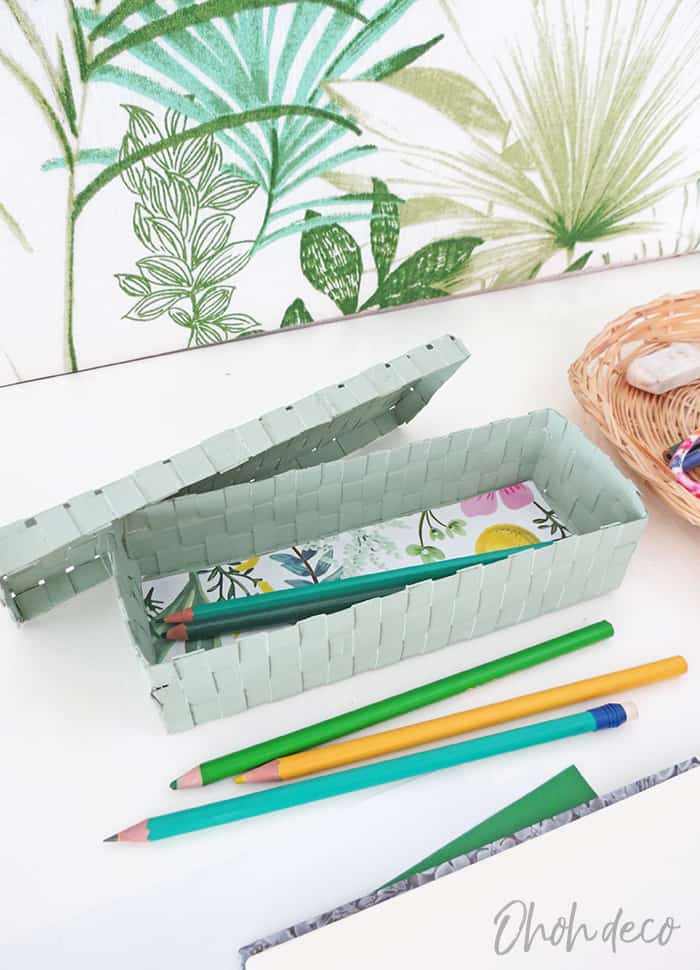
I decided to give a try, and recycle a cereal box into a weaved pencil case. It turns out quite pretty, and I’m sure no one can tell it was made out of a cereal box, Would you have guessed?
My favorite part about recycled craft is that it costs almost nothing! You will find the frugal material list below. Don’t hesitate to watch the video a the end of the step by step tutorial if you want some extra explanation. Let’s start crafting!
RELATED: How to sew a leather pencil case
RELATED: Easy to make a desk organizer caddy
* * *
¿Cómo mantienes tu escritorio organizado? ¿Tienes porta lápices? Cajas? Tengo un organizador de escritorio, aqui lo puedes ver si quieres, pero aun con eso tengo muchos bolígrafos, lápices, y plumones tirados sobre mi escritorio … ¡El lío de hacer manualidades, sabes a lo que me refiero! Así que tal vez si los organizo en cajas ayudará.
Decidí intentarlo y reciclar una caja de cereal en una caja bonita lapicera tejida. Resulto bastante linda, y estoy segura de que nadie puede decir que fue hecho con una caja de cereal, ¿Lo habrías adivinado?
Mi parte favorita de las manualidades recicladas es que no cuestan nada. Encontrarás la lista de materiales aquí debajo. No dudes en ver el video al final del paso a paso si desea una explicación adicional. ¡Vamos a comenzar!

DIY recycled pencil box
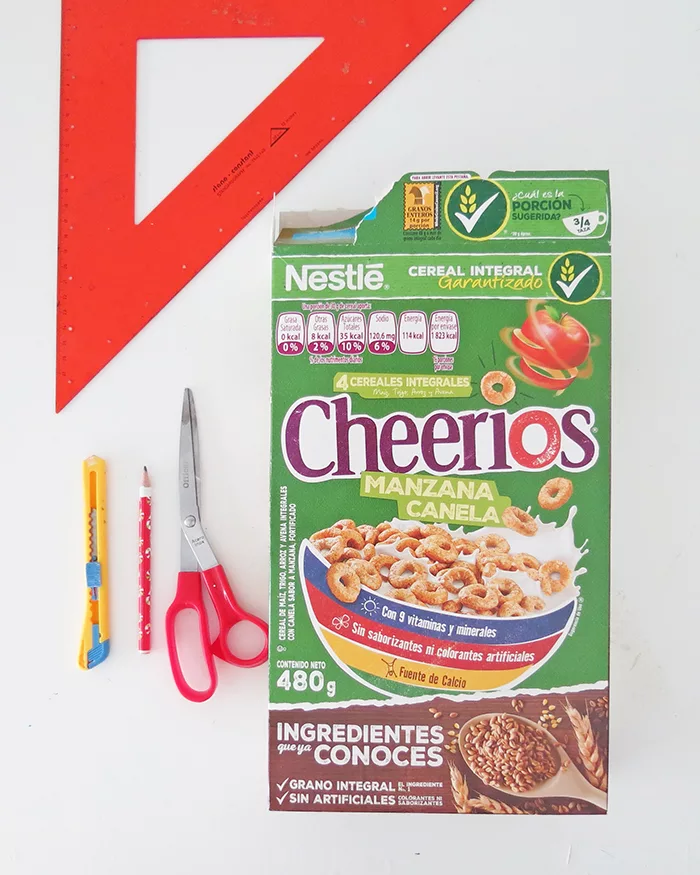
Supplies you will need to make this craft:
- A cereal box
- A pencil
- A ruler (this one is super practical for this craft)
- A pair of scissors
- Glue (silicon or stick)
- Tape
- Paint and paintbrush
I like to use paint samples for my craft projects, but you can also use this acrylic set (don’t you agree they have lovely colors?)
* * *
Material que necesitarás para realizar esta lapicera reciclada:
- Una caja de cereales
- Un lápiz
- Una regla
- Un par de tijeras
- Pegamento (silicon o bara)
- Cinta
- Pintura y pincel
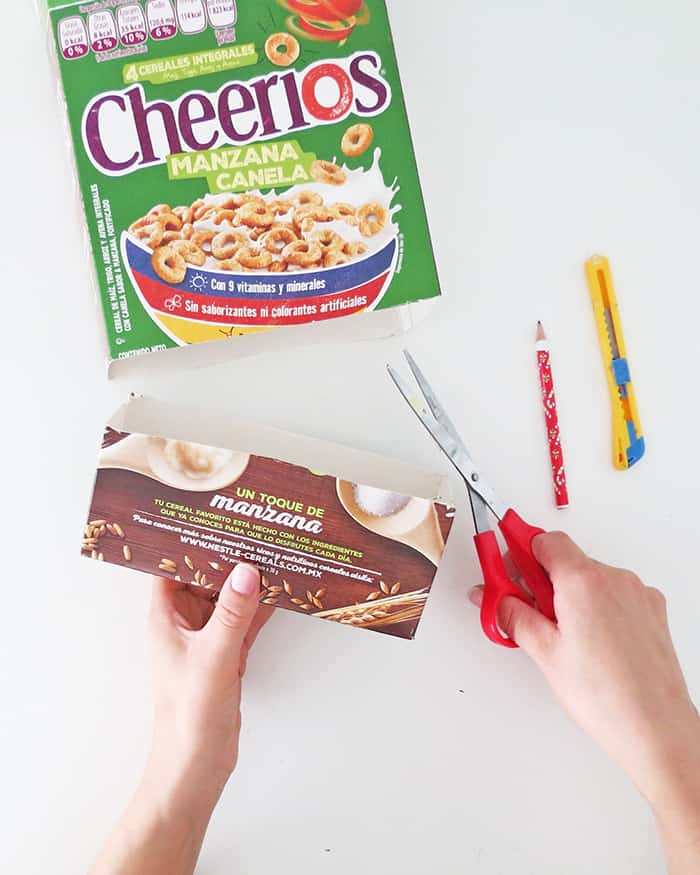
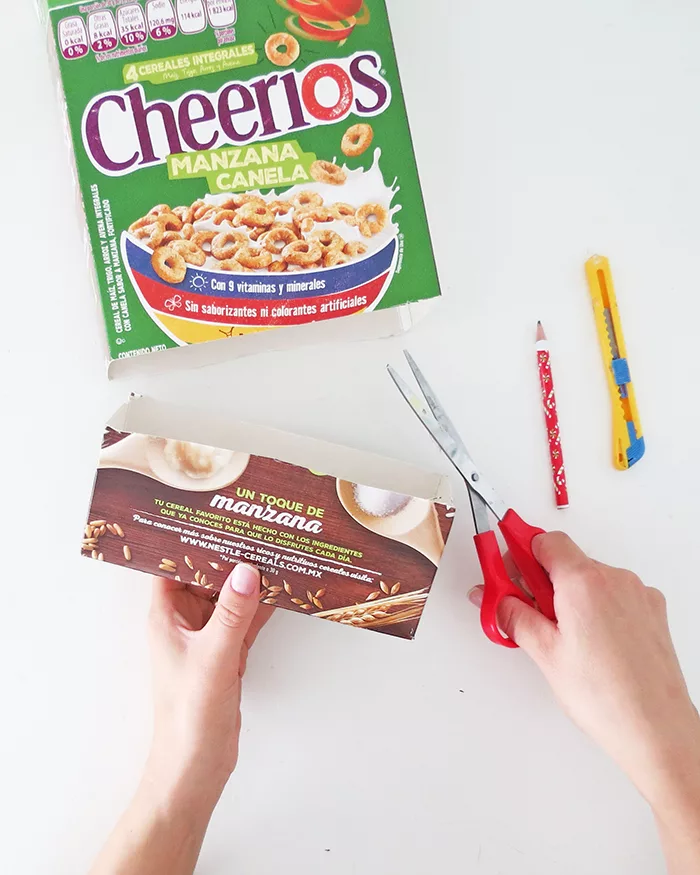
Cut the bottom of the cereal box, try to cut straight. The sides must be about 4 inches high. Keep the upper part of the box on the side, you will use it later.
* * *
Cortas el fondo de la caja de cereales, intenta cortar en línea recta. Los lados deben tener aproximadamente 10 cm de alto. Guarda la parte superior de la caja, la usarás más tarde.
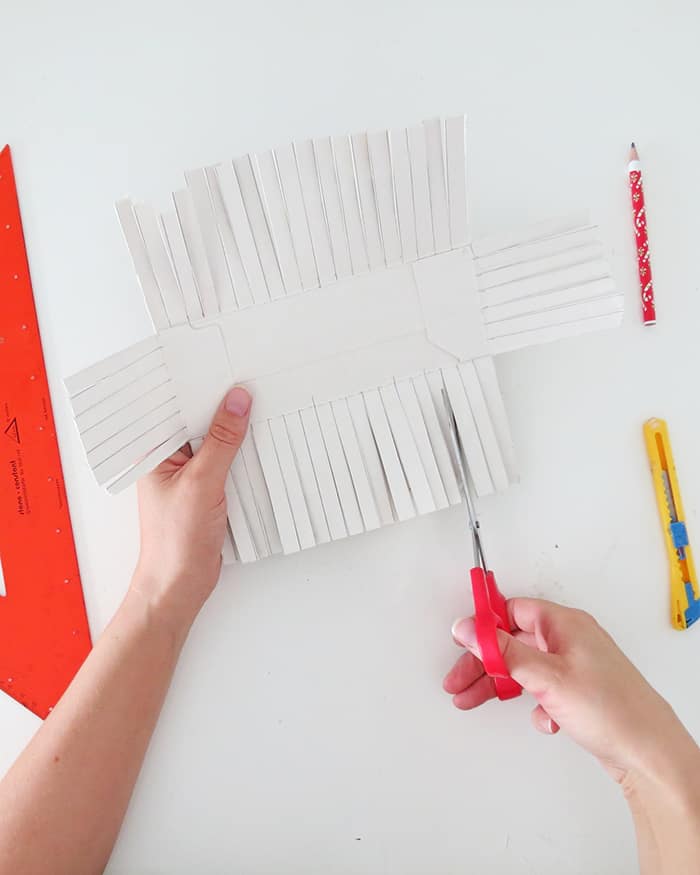

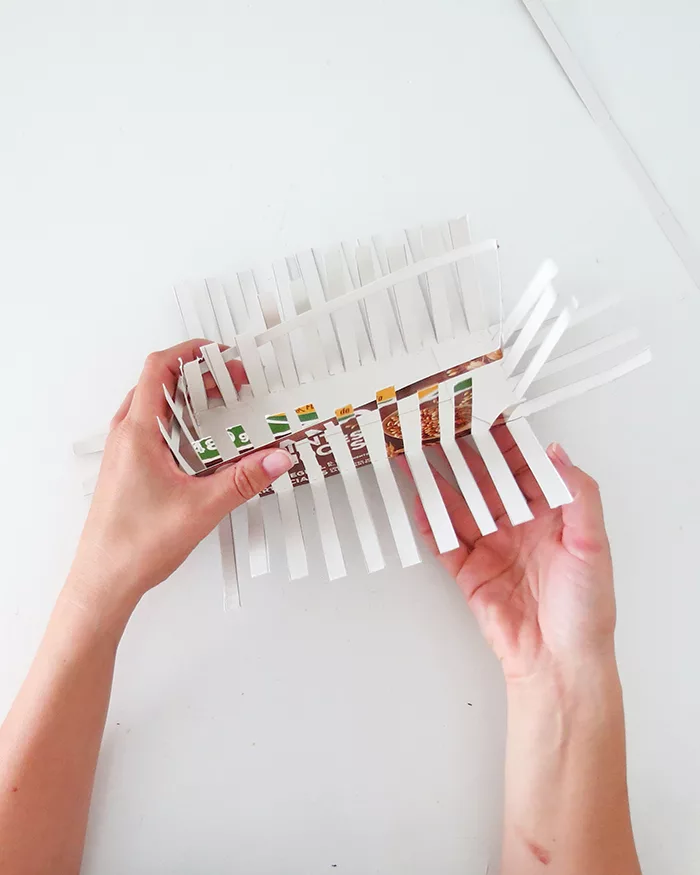
Open the box cutting along each corner. Now that the box sides are open and flat, draw lines every 1/2 inch and cut them out. Don’t cut into the bottom, only the sides.
* * *
Abra la caja cortando a lo largo de cada esquina. Ahora que los lados de la caja están abiertos y planos, dibujas líneas cada centimetro y recórtalas. No cortes el fondo, solo los lados.
Take the upper part of the box and open it to have a flat piece of cardboard. Try to detach the flap where the cereal box was glued.
It’s important you keep that flap and avoid cutting through the box to open it. You will use the flap later to assemble the pencil case together.
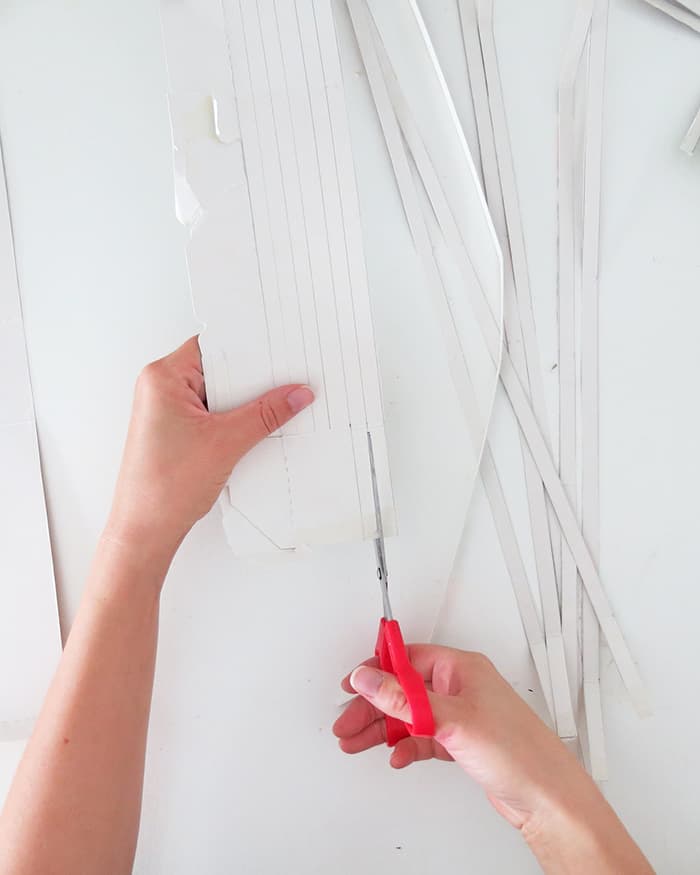
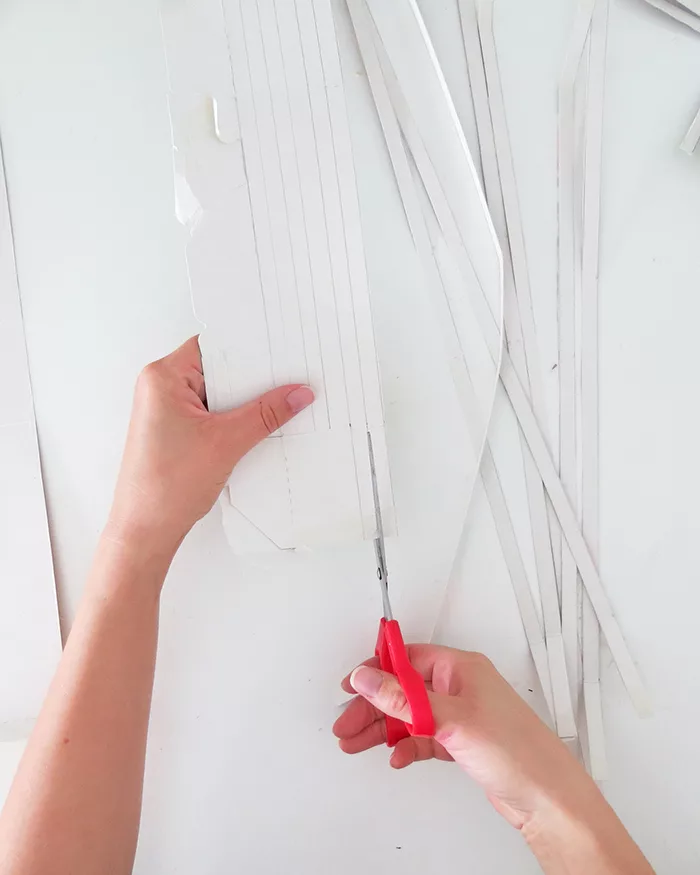
Once the box is open and flat, draw lines every 1/2 inch and cut them in straps. You will need 3 cardboard straps to make the box.
I cut all the cardboard in straps because I will use them later to make the box lid.
* * *
Tomes la parte superior de la caja y ábrala para tener un pedazo plano de cartón. Intentes despegar la sopla que sirve para pegar la caja de cereales. Es importante que mantengas esa solapa y evites cortar la caja para abrirla. La usarás más tarde para armar la caja de lápices.
Una vez que la caja esté abierta y plana, dibujas líneas cada 1 cm y recortas las tiras. Necesitarás 3 tiras de cartón para hacer la caja. Corté toda la pieza de cartón en tiras porque las usé luego para hacer la tapa de la lapicera.

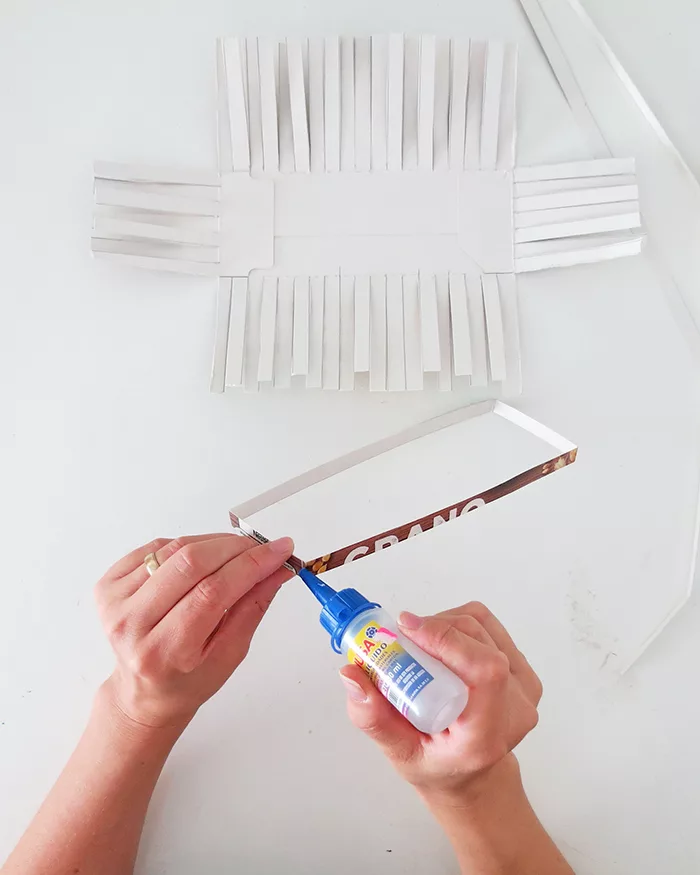
Take one of the long cardboard straps, fold it back following the cereal box shape, and glue the flap back in place. If you couldn’t take off the flap, no worries, glue two straps end to end.
Fold them so that they have the same rectangular shape as the box and glue the ends together. You may have to cut out the extra length. The point here is to have a rectangle shape you can slide around the box to weave the sides.
* * *
Agarras una tira de carton y dóbla la siguiendo lo pliegues orginales de la caja de cereal y pegue la solapa en su lugar. Si no pudíste despegar la solapa, no te preocupes, pegues dos tiras punta a punta.
Luego dobla la para que tengan la misma forma rectangular que la caja y pega los extremos juntos. Es posible que tengas que recortar la tira un poco para ajustarla. El punto aquí es tener una forma de rectángulo que puedas deslizar sobre la caja para tejer los lados de esta.

Slide the rectangle shape around the box. To create the weaving effect, alternate the straps position, one strap inside, one outside, one inside, one outside…and so on. Slide the rectangle the closer you can from the box bottom.
Hold the rectangle with a few pieces of tape on each corner, if possible, use masking tape as it’s easy to remove.
* * *
Deslices la forma de rectángulo alrededor de la caja. Para crear el efecto de tejido, alternas la posición de las tiras, una tira al interior, una al exterior, una al interior, otra al exterior … y así sucesivamente. Deslices el rectángulo lo más cerca que puedas de la base de la caja.
Sostenga el rectángulo con unos cuantos trozos de cinta en cada esquina, si es posible, es mejor usar cinta masking porque que es fácil de quitar.
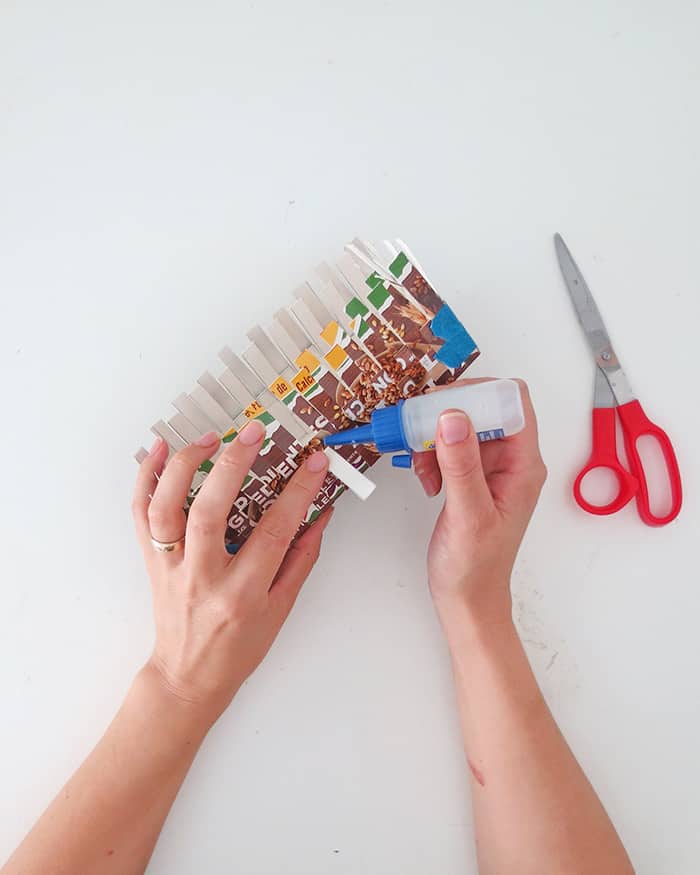
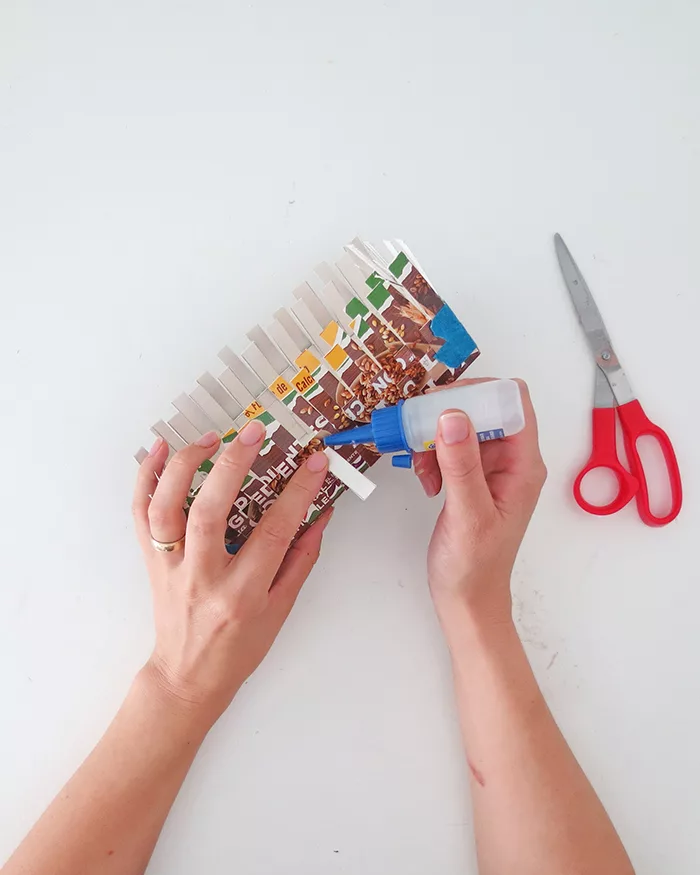
Repeat the previous steps to slide two more rectangles and make the box sides. You have to alternate the straps that are in and out to create the weaving. Hold the pieces with some masking tape.
Once the third piece is in place, fix it with each strap adding glue. The top edge of the box must be glue. Let the glue dry.
* * *
Repita los pasos anteriores para deslizar dos rectángulos y hacer los lados de la caja. Tienes que alternar las tiras que están dentro y fuera para crear el tejido. Sostén las piezas con cinta adhesiva.
Una vez que la tercera pieza esté en su lugar, fíjela con cada tira agregando pegamento. Todo el borde superior de la caja debe estar pegado. Deja secar el pegamento.

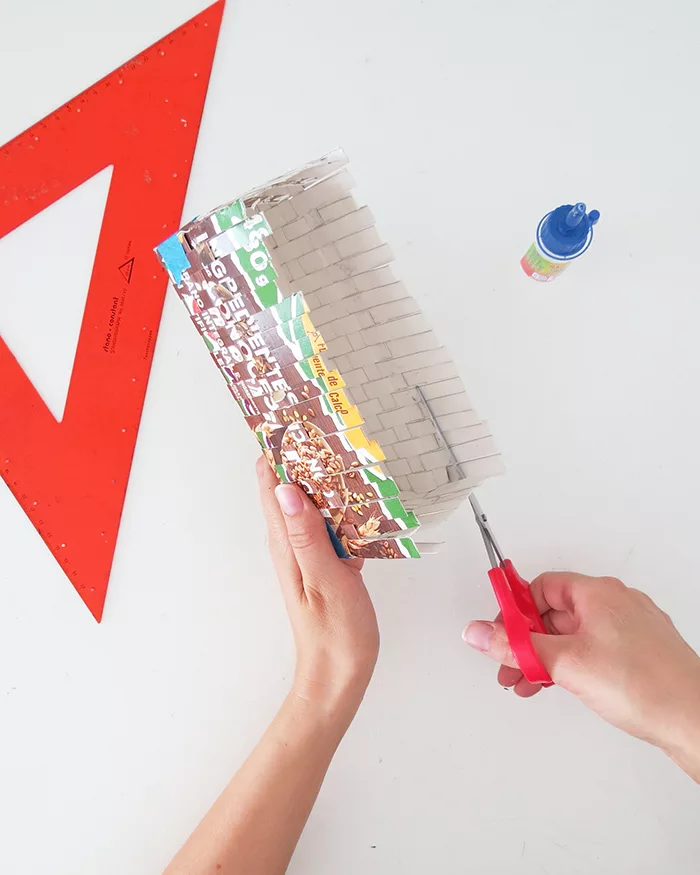
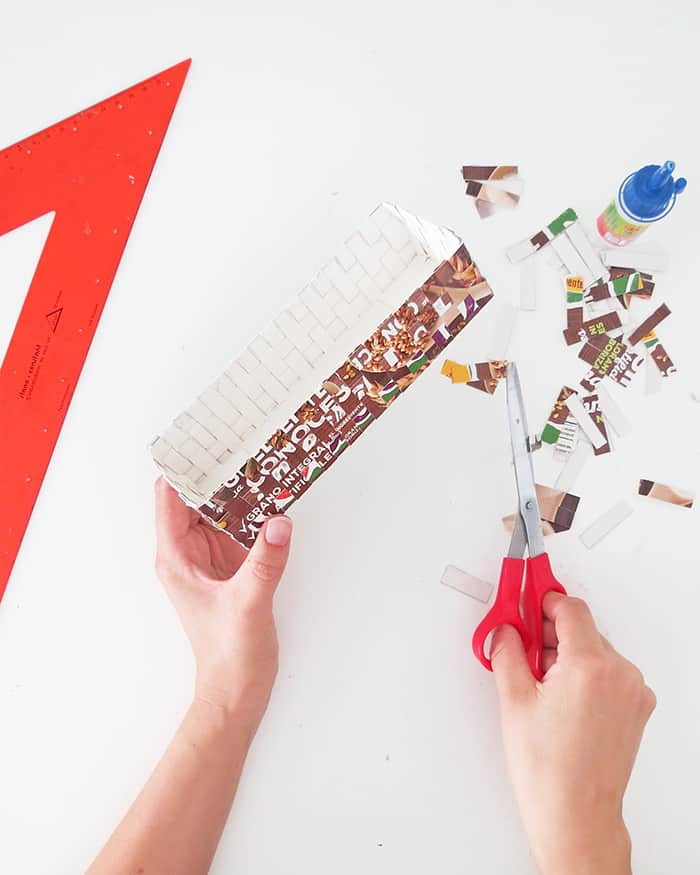
Cut out the straps extra length, and add some more glue if necessary.
* * *
Cortas las tiras que sobresalen y puedes añadir un poco más de pegamento donde hace falta.
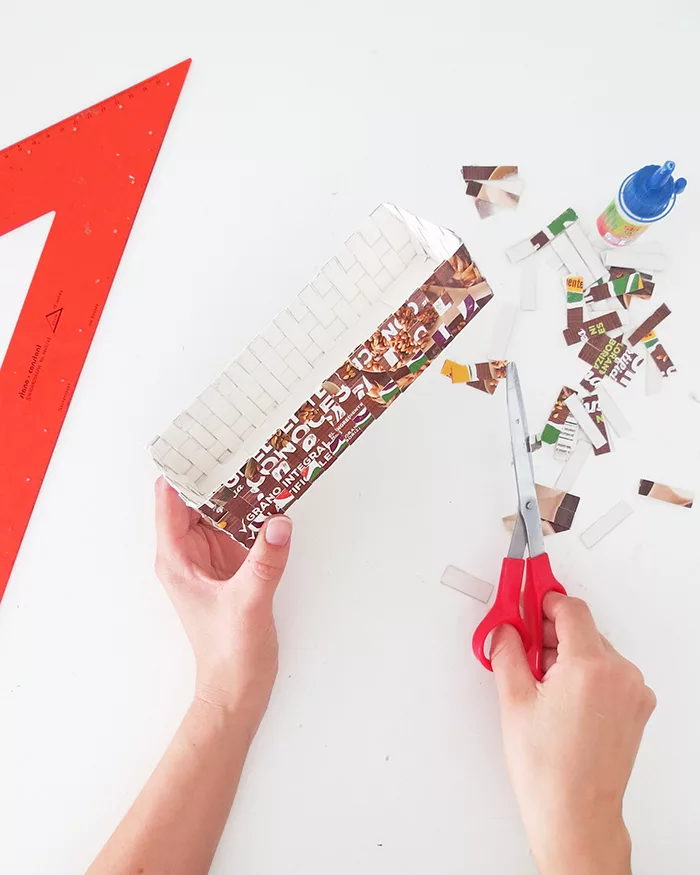
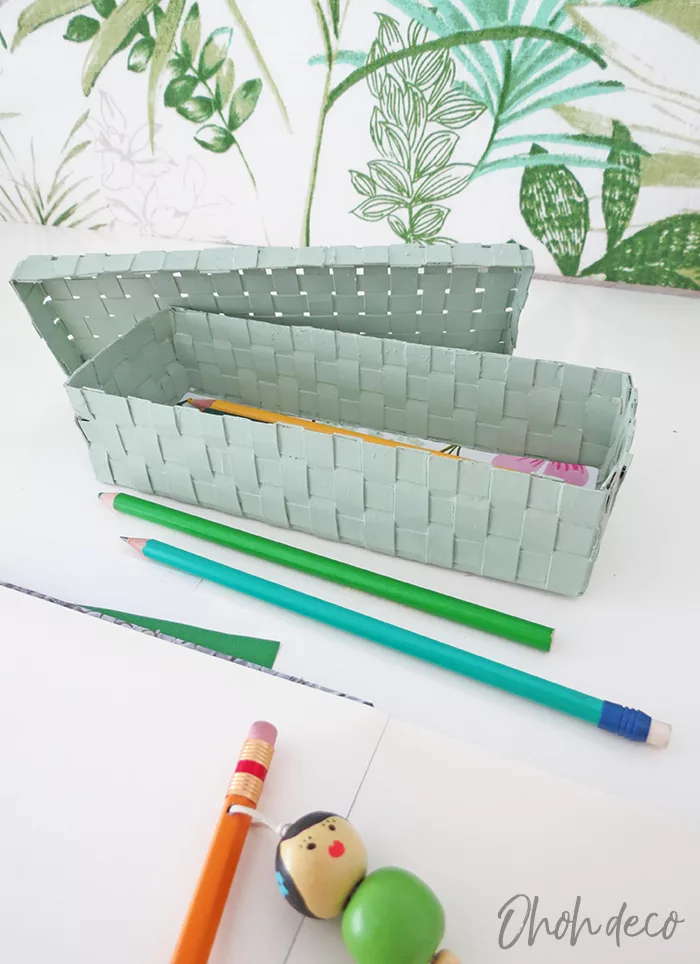
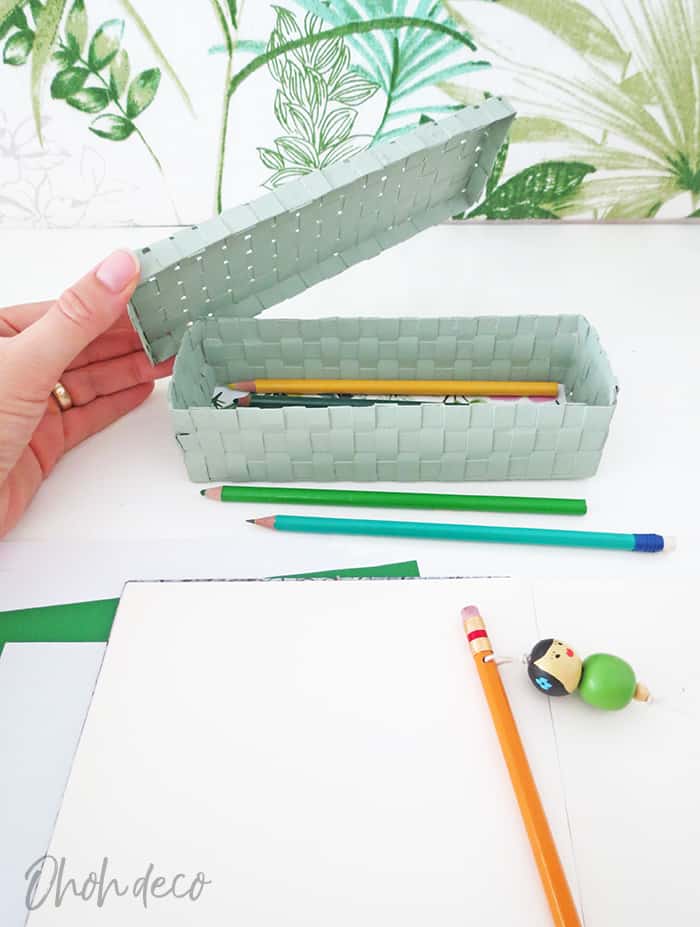
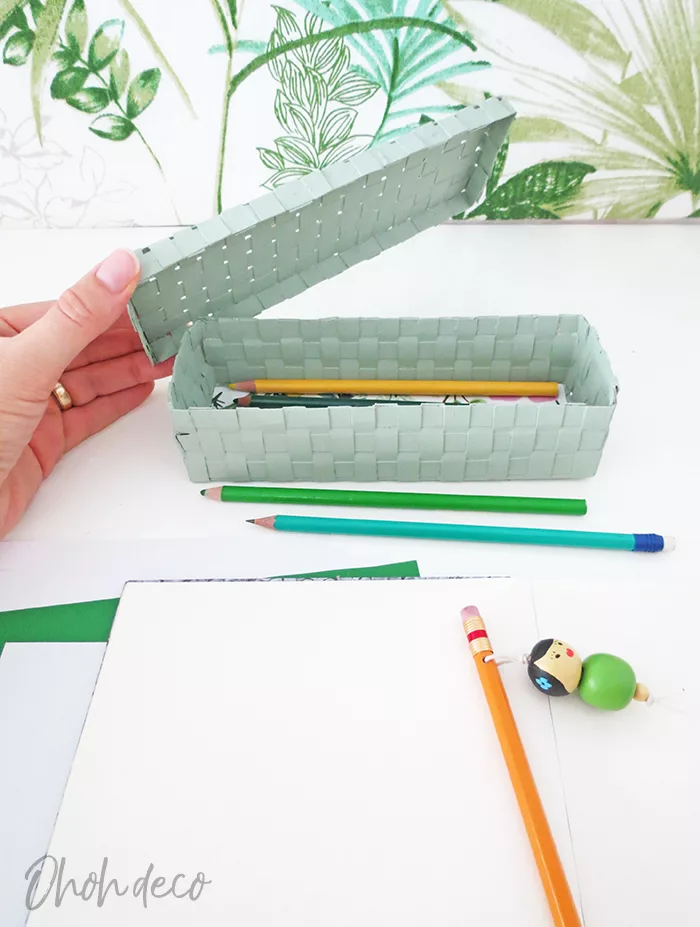
And, tadam! You just finished the first part of your pencil box. It’s so nice to see the weaving, don’t you think so?
* * *
Y, voila! Acabas de terminar la primera parte de tu caja para lápices. Me gusta el tejido, ¿Y a ti?
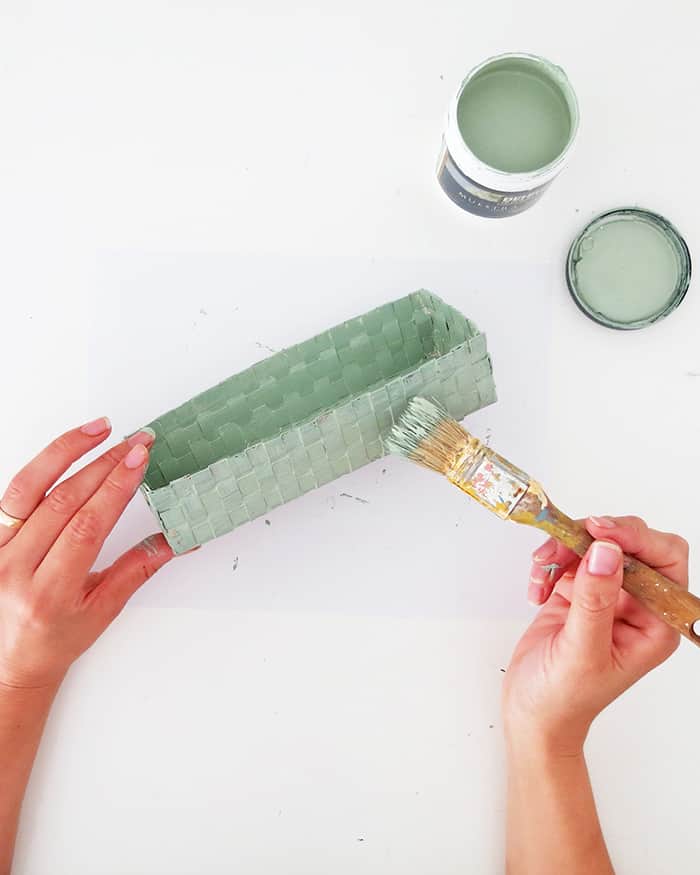

Pick a nice color paint and apply it on the box, inside and out. Apply several thin layers.
* * *
Elige un color de pintura de tu gusto y aplícala en la caja, por dentro y por fuera. Aplica varias capas delgadas.


Even if I painted the box bottom, I thought it will look nice to add a pretty paper.
Cut a rectangle into a scrap paper, the same dimension as your box, and glue it into the box.
* * *
Incluso si pinté la parte inferior de la caja, pensé que se vería bien con un bonito papel.
Corte un rectángulo en el papel, de la misma dimensión que la caja, y lo pégue en el fondo de la caja.
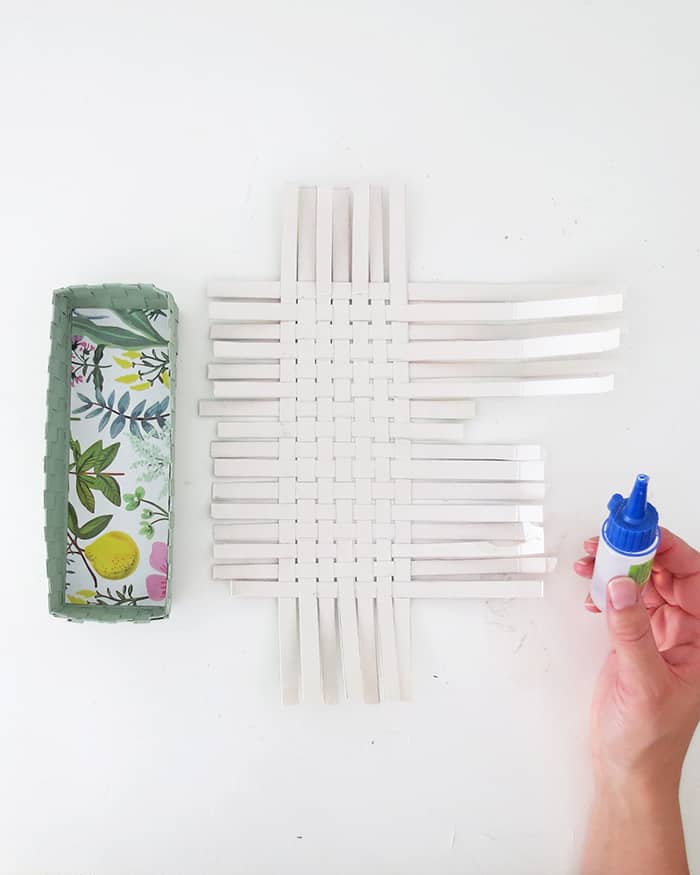
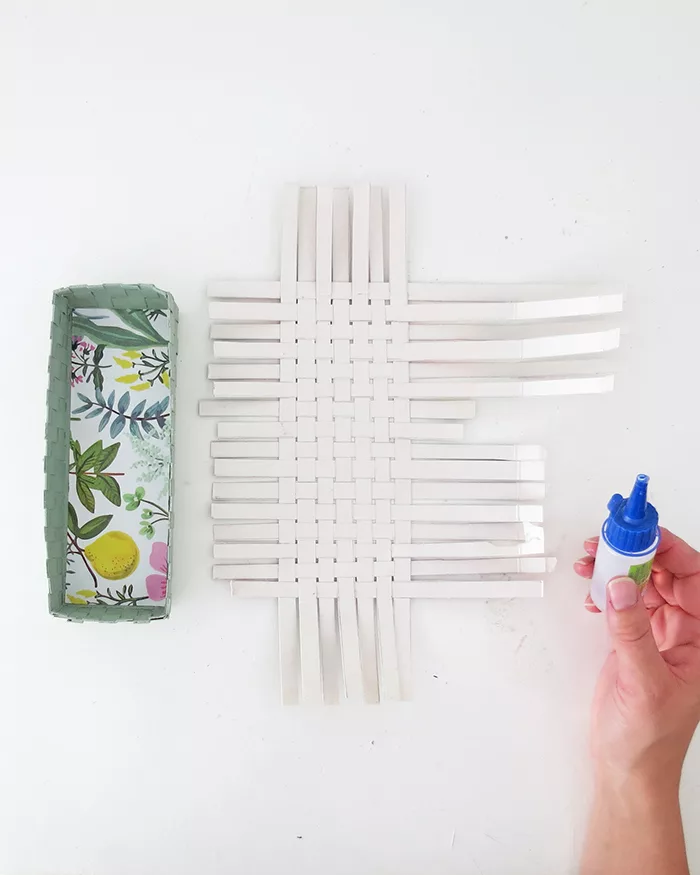
Now, let’s make the box lid. You will use the extra straps you cut previously. If you didn’t have any, just cut them out of the left over cardboard.
Weave them to create a rectangle that is slightly bigger than your box. Place it on top of the box to check the size before gluing.
Glue the straps between each other to keep them in place.
* * *
Ahora, vamos a hacer la tapa de la caja. Usarás las tiras adicionales que cortaste previamente. Si no tenes ninguna, simplemente córta las del cartón sobrante.
Teje las tiras para crear un rectángulo que sea un poco más grande que tu caja. Colóqua lo en la parte superior de la caja para verificar el tamaño antes de pegar.
Pegue las tiras entre sí para mantenerlas en su lugar.
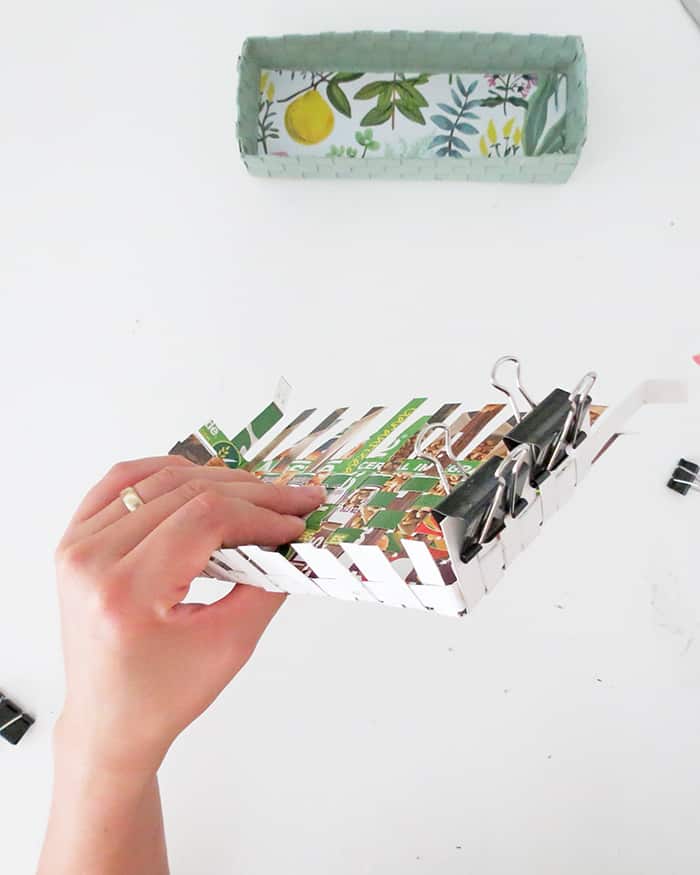
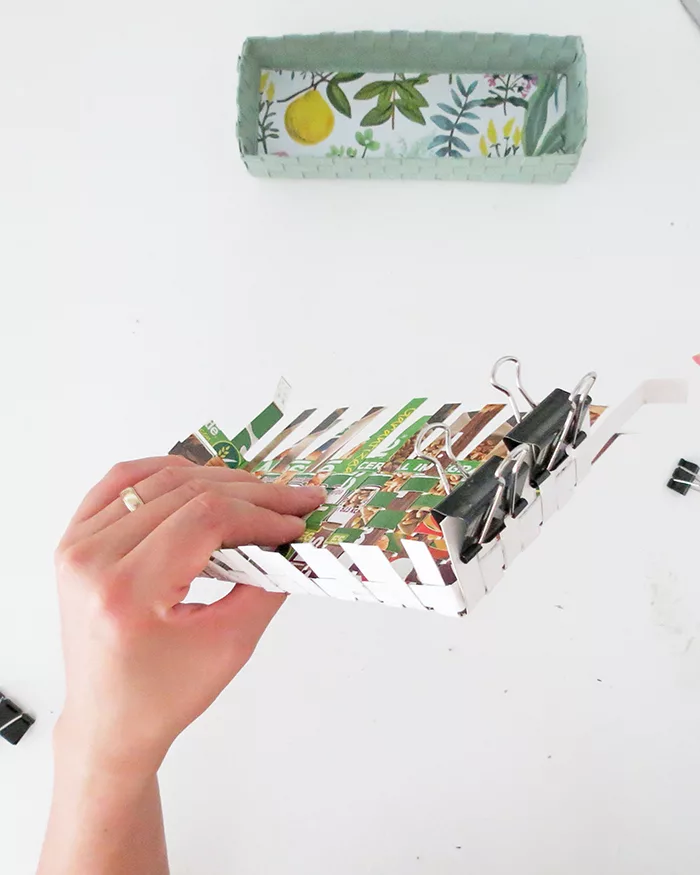
Once the top of the lid is made and the glue dry, fold the straps to make the lid edge. Take a long strap (or two straps that you have glue end to end) and weave it with the lid edge. Glue the pieces together. Hold with clips while the glue dry if necessary.
* * *
Una vez que terminas la parte superior de la tapa y que se seca el pegamento, doblas las tiras para hacer el borde de la tapa. Toma un tira largo (o dos tras que pegamentas punta a punta) y tejelo para hacer el borde de la tapa. Pegue las piezas entre si. Sosten las con clips mientras se seca el pegamento si es necesario.

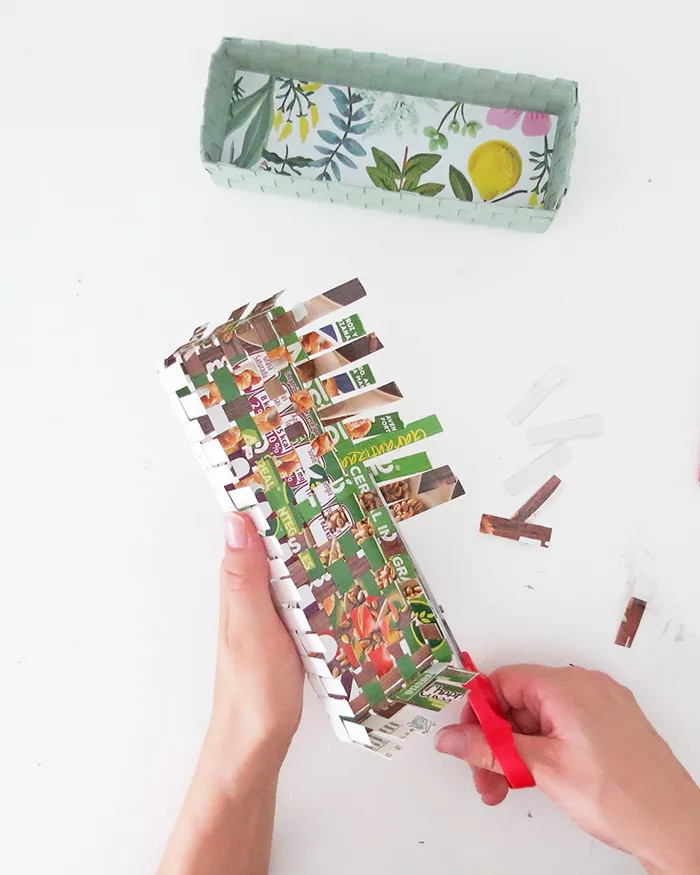
Once the glue is dry, cut out the extra strap length. Paint the lid the same color of the box.
* * *
Una vez que el pegamento esté seco, recortas las tiras. Pintas la tapa del mismo color de la caja.
Watch the video tutorial to make a DIY Recycled pencil box
Follow Ohoh deco on Youtube and be the first to find out about the new DIY.

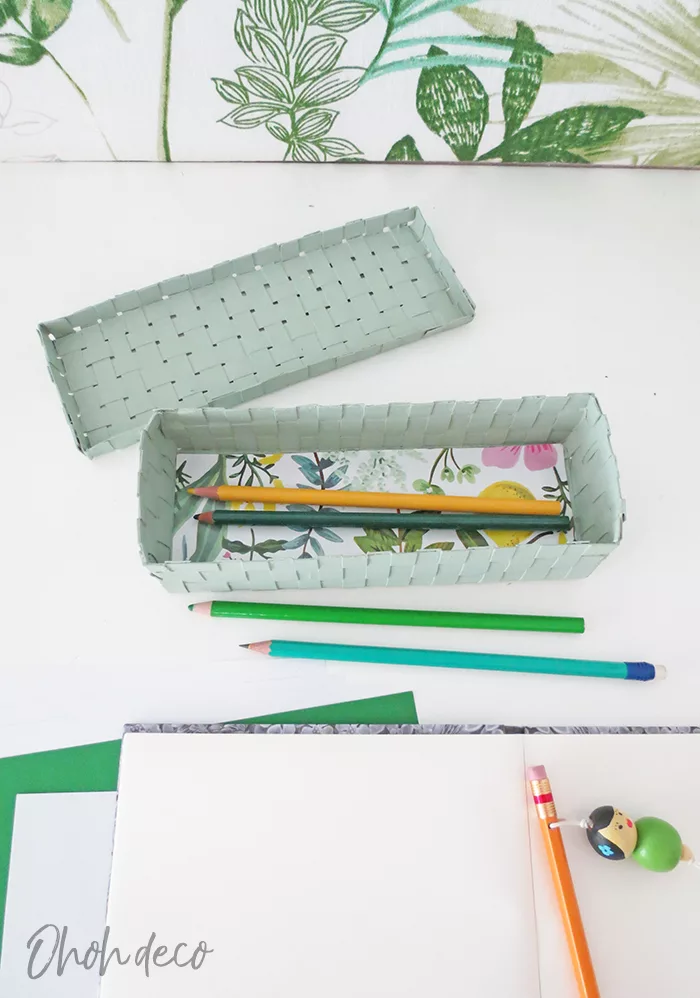
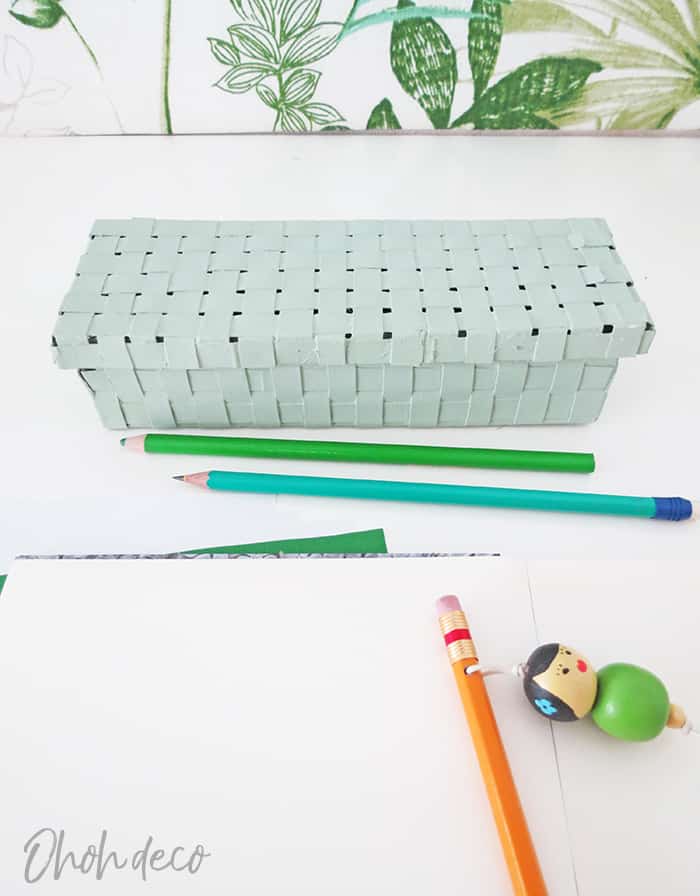
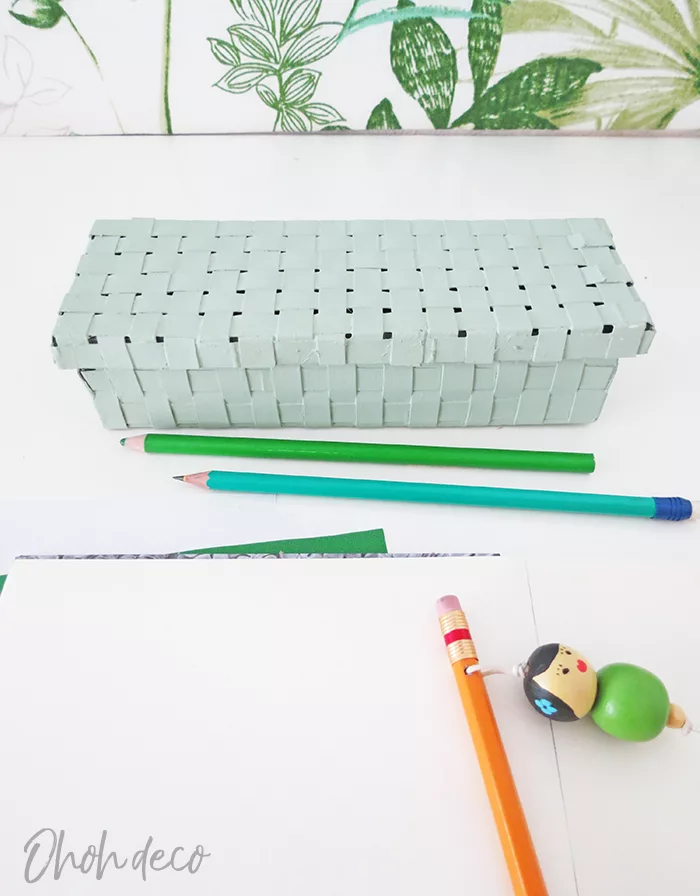
And done! You just made some pretty pencil storage out of a cereal box! I will let mine on my desk, but if you want to carry it around just slide an elastic strap around to hold the lid on the box.
* * *
¡Y listo! ¡Acabas de hacer un lindo almacenamiento para lápices con una caja de cereal! Dejaré el mío en mi escritorio, pero si quieres llevarlo solo dpon una correa elástica para sostener la tapa sobre la caja.

What do you think of this craft? I love the openwork lid, it looks like cane work. It’s quite an improvement for a cereal box, don’t you think so? Tell me, in which color would you like to paint yours?
I have some other great desk organization projects to share with you. Did you already see the tutorial to make a Leather pencil case? So easy, I’m sure you will enjoy it!
Or maybe you want to make one of these Beads doll pencil Charm you see in the picture? Aren’t they cute? I customized them for my kids, find out the details in the post.
If you need more ideas, I also found a great round-up post about DIY pencil and pencil cases, I thought you may enjoy it as much as I did!
* * *
¿Qué opinas de esta manualidad? Me encanta la tapa de calado, parece trabajo de caña. Que gran cambio para una caja de cereales, ¿No te parece? Dime, ¿En qué color te gustaría pintar tu lapicera?
Want to remember it? Pin this DIY Recycled Pencil Box in your favorite Pinterest board.


You will find all the tutorials featured in the video on my “Best DIY” page.
Amaryllis
Kathryn Sprowl
Saturday 25th of January 2020
Very cute and creative! I have pinned this to try some time. Thanks for sharing this with us.
amaryllis
Monday 27th of January 2020
Thanks Kathryn. I can't wait to see your pencil box, have fun crafting!