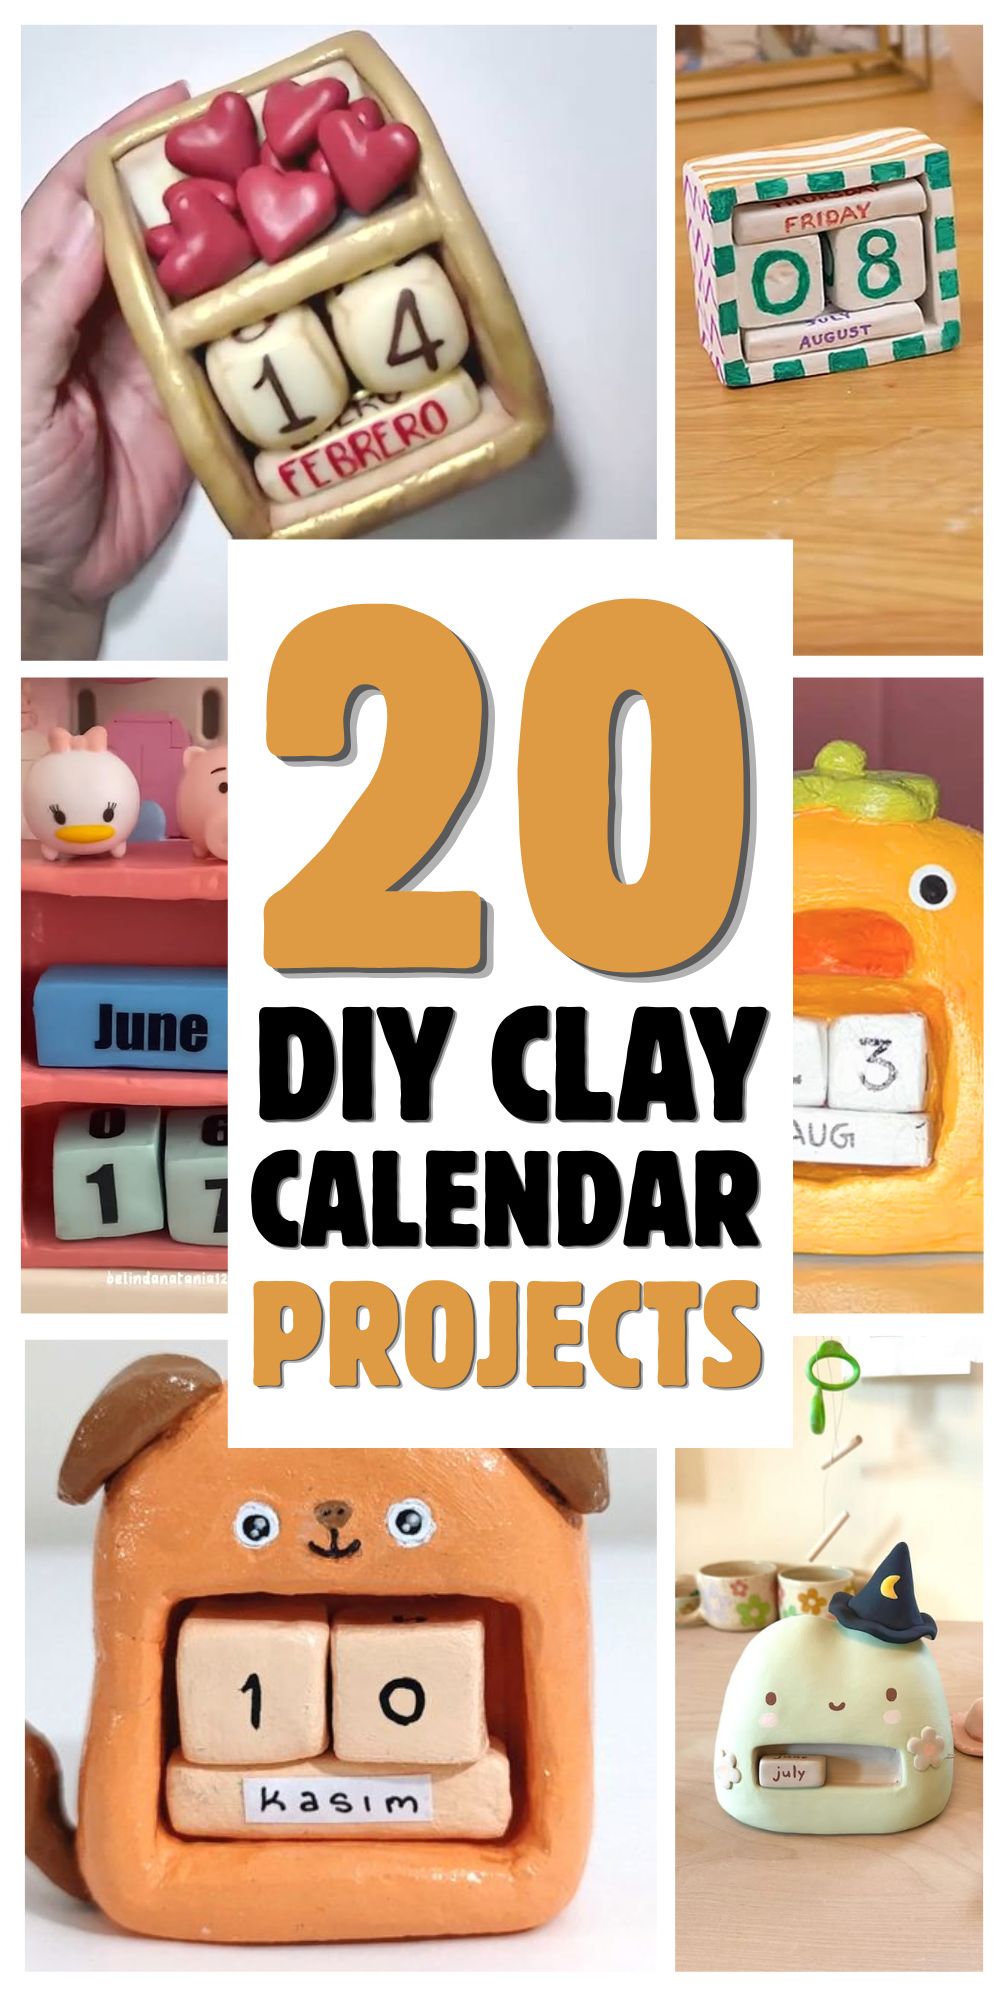
Have you ever wanted a desk accessory that is both beautiful and practical? A DIY clay calendar is a charming little project that brings personality to your workspace while staying useful year after year.
Unlike disposable paper calendars, a perpetual version never goes out of date, which makes it an eco-friendly choice for anyone who loves making things that last.
It is also wonderfully customizable — you can keep it minimal and modern, make it playful and colorful, or design it to match your home office, kitchen, or craft room.
That flexibility is what makes it such a lovely handmade gift too, especially for birthdays, holidays, teachers, coworkers, or anyone who appreciates thoughtful decor.
The best part is that air dry clay is beginner-friendly, so you do not need a kiln, fancy tools, or a professional studio to get started.
With a few simple materials and a little creativity, you can shape a calendar that feels personal, polished, and surprisingly easy to make.
[ This post probably contains affiliate links; our full disclosure policy is boring, but you can read it HERE ]
Why Make a DIY Clay Calendar?
A DIY clay calendar is one of those projects that looks decorative, but also earns its place on your desk or shelf.
Because it is perpetual, you can reuse it forever instead of replacing dated paper versions every year.
It also gives you complete freedom to personalize the shape, color, style, and finish so it feels truly your own.
It is also a cost-effective project, since the materials are simple and easy to find, even for beginners.
Essential Materials for Your DIY Clay Calendar
| Material | Recommended Options | Notes |
| Air Dry Clay | DAS — smooth and reliable; Crayola Air Dry — budget-friendly and beginner-friendly; Jovi — fine texture with easy shaping; Activa Plus — stronger feel with lower shrinkage | Choose a clay that holds edges well and dries evenly for calendar pieces, number tiles, or small sculpted stands. |
| Rolling Pin or Clay Roller | Acrylic roller; wooden rolling pin; PVC pipe | Use for flattening slabs to a consistent thickness so your calendar pieces dry more evenly. |
| Cutting Tools | Craft knife; cookie cutters; clay cutting tools | Helpful for trimming clean edges, cutting number shapes, and creating repeatable calendar components. |
| Sandpaper | 120-grit; 220-grit | 120-grit smooths rougher edges, while 220-grit gives a finer finish before painting or sealing. |
| Paint | Acrylics — bold, durable, and opaque. Gouache — matte and soft but less water-resistant. | Acrylic paint is usually the most practical choice for a calendar because it is vibrant and long-lasting. |
| Brushes | Detail brushes, foam brushes, assorted sizes such as fine, medium, and flat. | Small detail brushes are ideal for numbers and outlines, while foam brushes help apply base coats smoothly. |
| Varnish/Sealer | Mod Podge — available in matte, gloss, and satin. Acrylic sealer spray — quick and even. Polyurethane — durable with gloss or satin. Water-based varnish — low odor and available in matte, satin, or gloss. | Sealing helps protect paint and reduce wear; finish choice depends on whether you want a soft matte look or a polished shine. |
| Stamps/Stencils | Optional number stamps; alphabet stencils; decorative pattern stencils. | Great for consistent numbering, labeling months, or adding decorative texture to the calendar pieces. |
| Wooden Blocks or Stands | Simple wooden Rolling Pin Guides. | These help you to roll the clay evenly. |
| Stylus | Clay stylus tool; toothpick. | Useful for adding tiny details, marking guides, or refining impressions before the clay dries. |
| Clear Working Surface | Craft mat, silicone mat, parchment paper. | A smooth surface prevents sticking and makes cleanup much easier during shaping and assembly. |
Best Air Dry Clay for Calendar Projects
When you are making a calendar, the clay you choose can change how clean the final pieces look and how easy they are to shape.
DAS Air Hardening Clay is a favorite for its smooth texture, clean white finish, and minimal cracking, which makes it a strong choice for neat, polished calendar pieces.
Crayola Air Dry Clay is one of the most affordable options and is especially beginner-friendly, though it can be a little softer and may need extra care when forming sharp edges.
Jovi Air Dry Clay has a fine texture that works well for detailed lettering and smaller components, making it a nice option if you want crisp numbers or delicate embellishments.
Activa Plus is known for being strong and having less shrinkage, so it is helpful when you want sturdier pieces or calendar parts that need to fit together precisely.
In general, drying times vary by thickness, but most air dry clays need about 24 to 72 hours to dry fully, with thicker pieces taking longer.
Shrinkage is usually low to moderate, though smoother clays tend to hold their shape better if you avoid overworking them with too much water.
For detailed work, smoother clays like DAS and Jovi are often the easiest to refine.
For chunkier, more sculptural designs, Activa Plus and Crayola can be excellent choices because they are easy to build up and shape.
Choosing the Right Paint for Your DIY Clay Calendar
Acrylic paint is the best overall choice for a DIY clay calendar because it gives vibrant color, dries quickly, and becomes water-resistant once fully dry.
It is also the most beginner-friendly option, since it is easy to layer, touch up, and blend without needing special techniques.
Popular brands like Apple Barrel, DecoArt, and Amsterdam offer reliable acrylic formulas in a wide range of shades.
Gouache creates a smooth matte finish with beautiful flat colors, which can look especially stylish on modern calendar pieces.
It does need sealing after it dries, because it is less resistant to moisture and wear than acrylic paint.
Acrylic markers and paint pens are excellent for writing numbers, outlining shapes, and adding fine details with clean precision.
For this type of work, Posca paint pens are a popular choice because they are opaque, easy to control, and work well on dried clay.
If you want the most durable and forgiving option, acrylic paint is still the strongest all-around pick for most calendar projects.
Varnish & Sealer Options: Protecting Your Calendar
| Sealer Type | Finish Options | Best For | Application Method |
| Mod Podge | Matte, Satin, Gloss | General sealing, decoupage | Brush-on, 2-3 coats |
| Acrylic Sealer Spray | Matte, Satin, Gloss | Even coverage, quick | Spray 6-8 inches away, light coats |
| Polyurethane | Matte, Satin, Gloss | Maximum durability | Brush-on, thin coats |
| Triple Thick Glaze | High gloss only | Glass-like finish | Brush-on, self-leveling |
| Liquitex Varnish | Matte, Satin, Gloss | Archival quality | Brush-on, removable |
20+ Easy DIY Clay Calendar Ideas to Try
From clean and minimalist to colorful and decorative, there are so many ways to turn a simple clay calendar into something special.
You can keep the design subtle for a modern desk accessory or add texture, color, and pattern for a more expressive handmade piece.
The ideas below are a great starting point for experimenting with different styles, finishes, and materials.
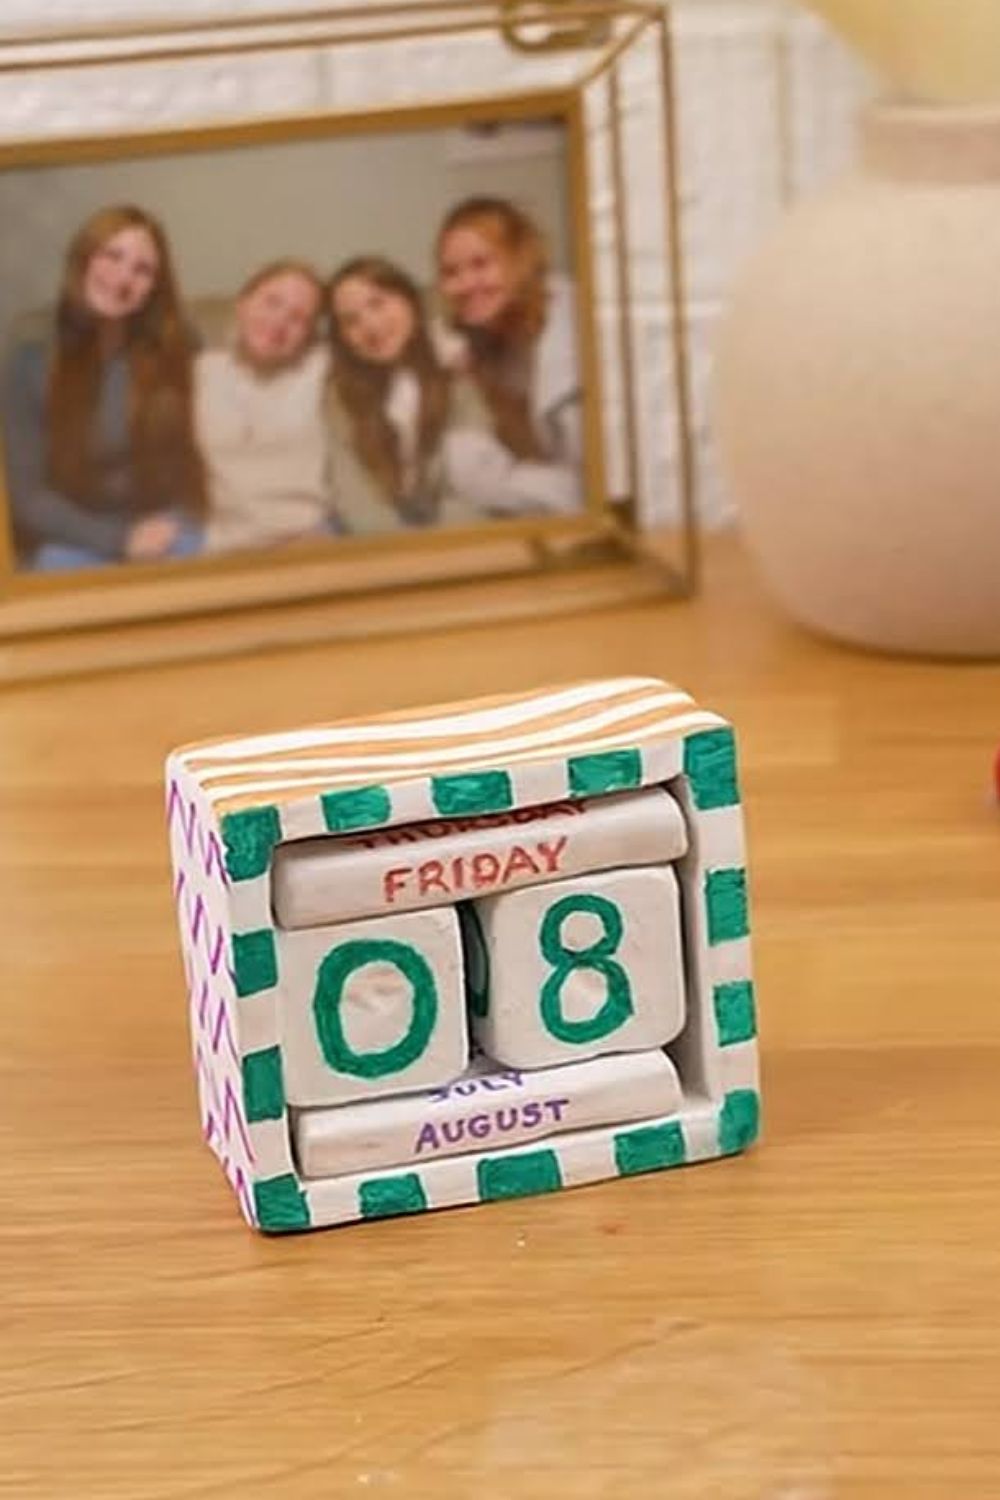
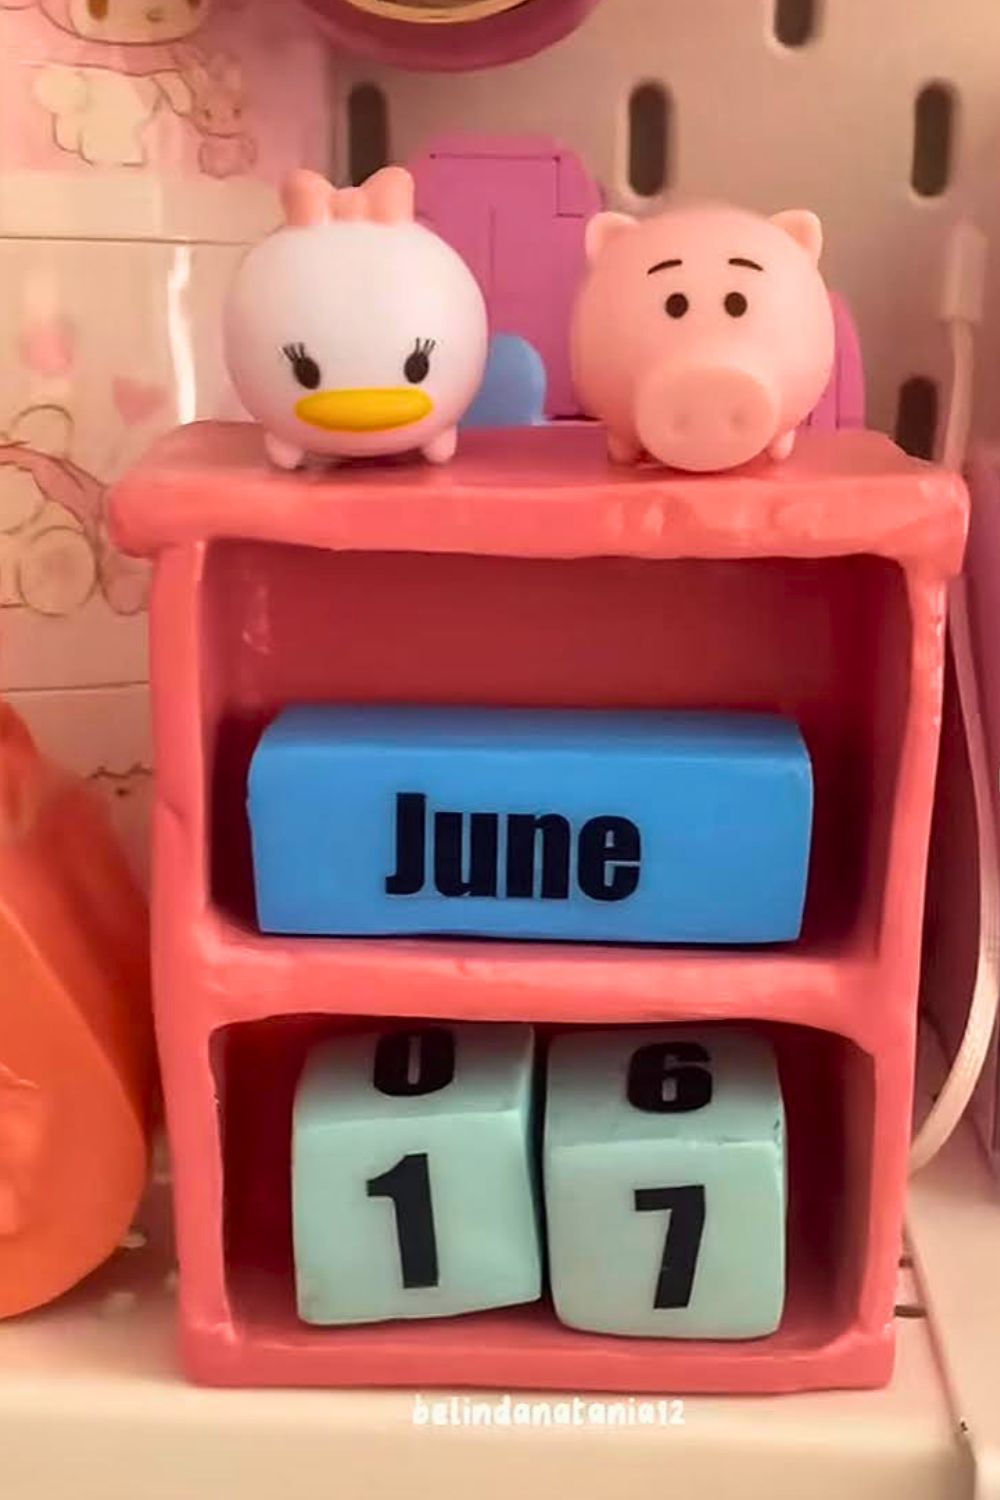
Simple Cube Calendar
This version uses simple white cubes shapes with crisp black numbers for a clean, modern look.
It pairs beautifully with minimal decor and works especially well on uncluttered desks or shelves.
For the smoothest finish, DAS clay is a great choice, and acrylic paint keeps the numbers bold and easy to read.
Seal the finished pieces with a matte varnish to preserve the understated aesthetic.
Tip: use stencils for perfectly aligned numbers that look polished and professional.
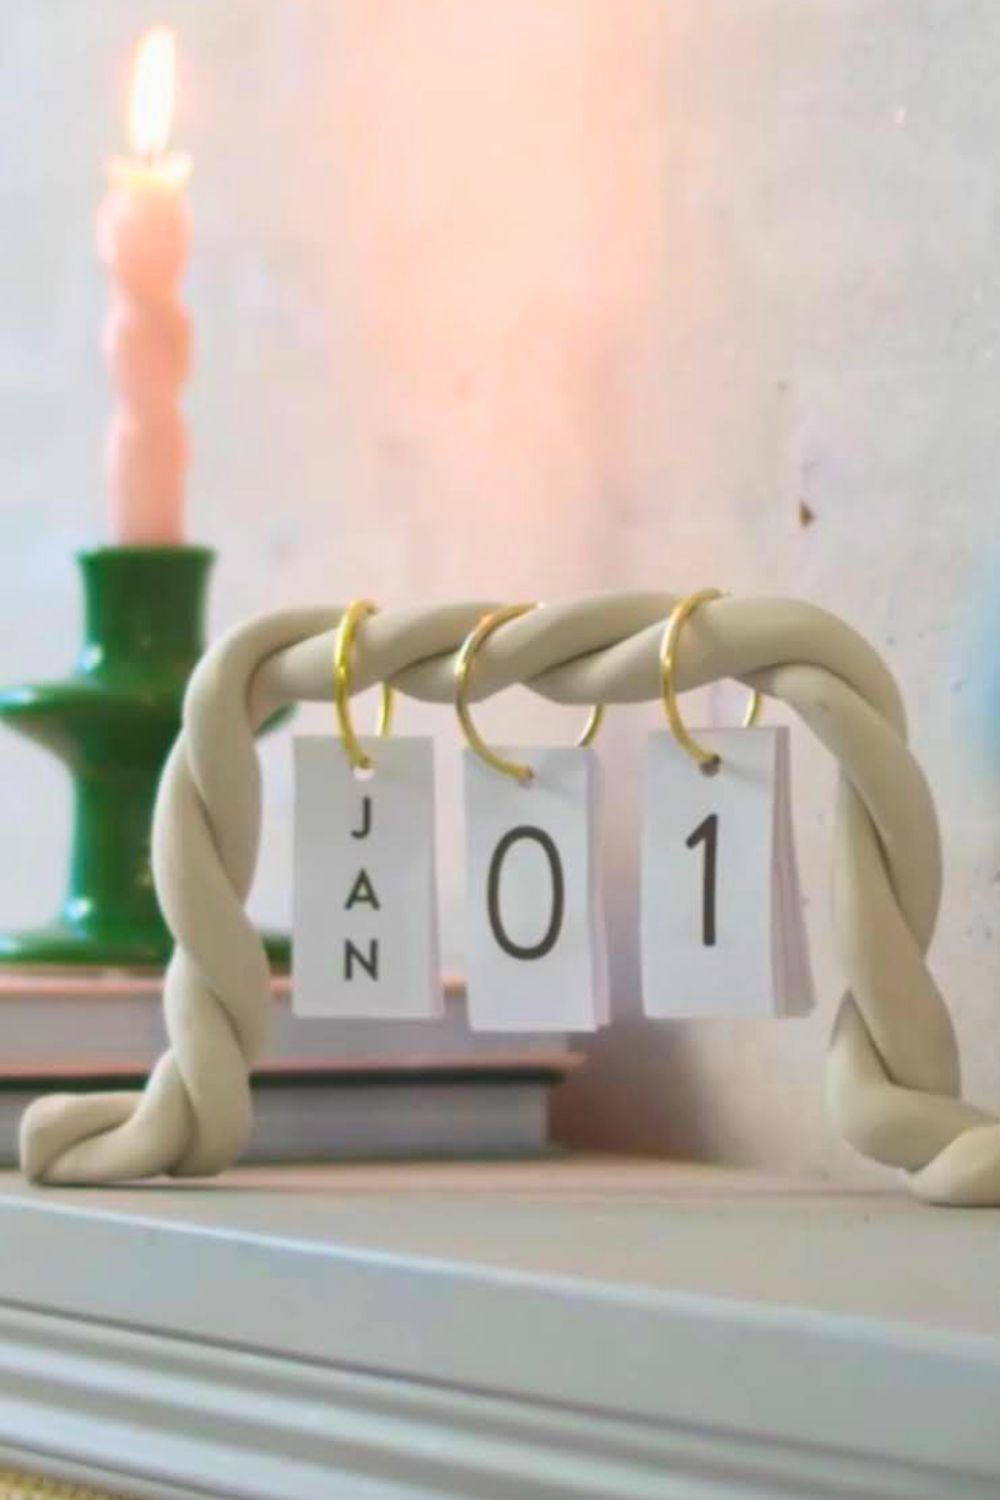
Scandinavian Perpetual calendar
This version uses simple white or neutral colors with crisp black numbers for a clean, modern look.
Twist two pieces of clay to form a long braid. Let it dry on a box to give it a U shape. Then hang Numbers and Month with a gold metal ring for a chic touch.
It pairs beautifully with Scandinavian-inspired decor and works especially well on uncluttered desks or shelves.
For the smoothest finish, DAS clay is a great choice, and acrylic paint keeps the numbers bold and easy to read.
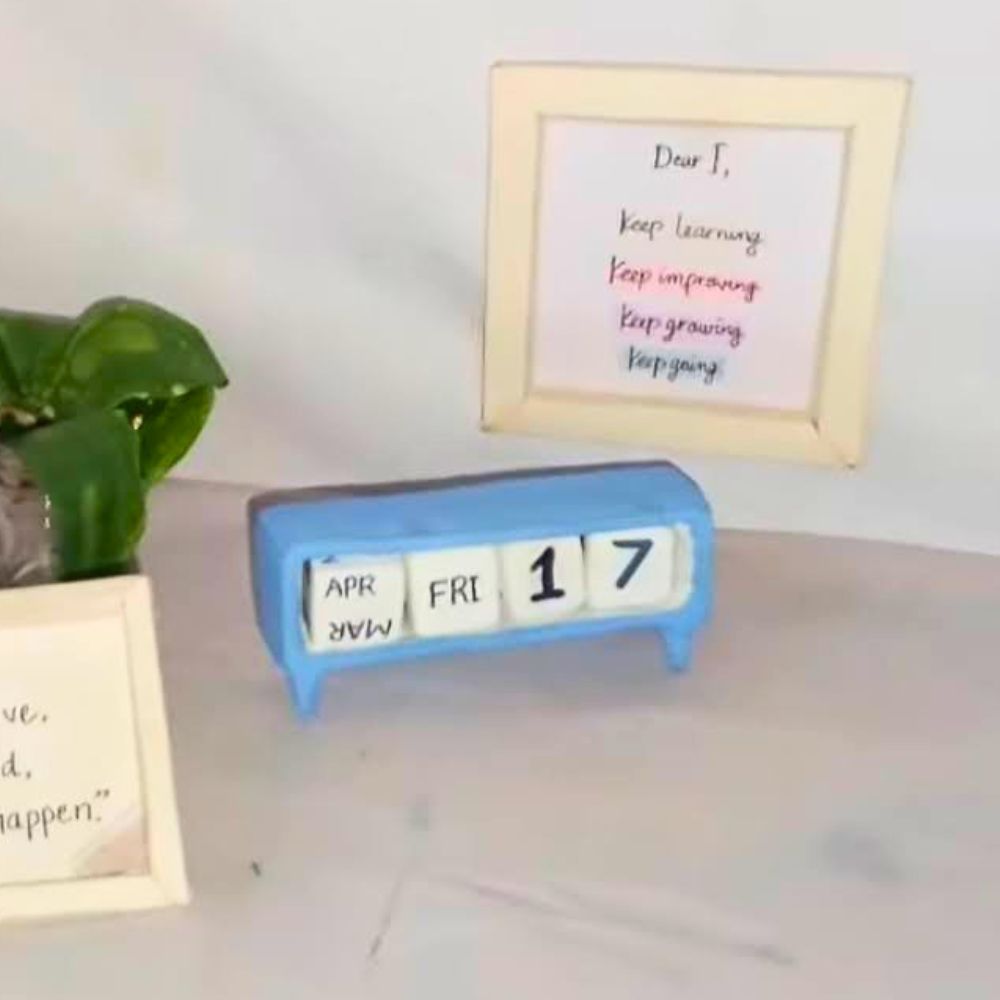
#2 Easy Perpetual Clay Calendar
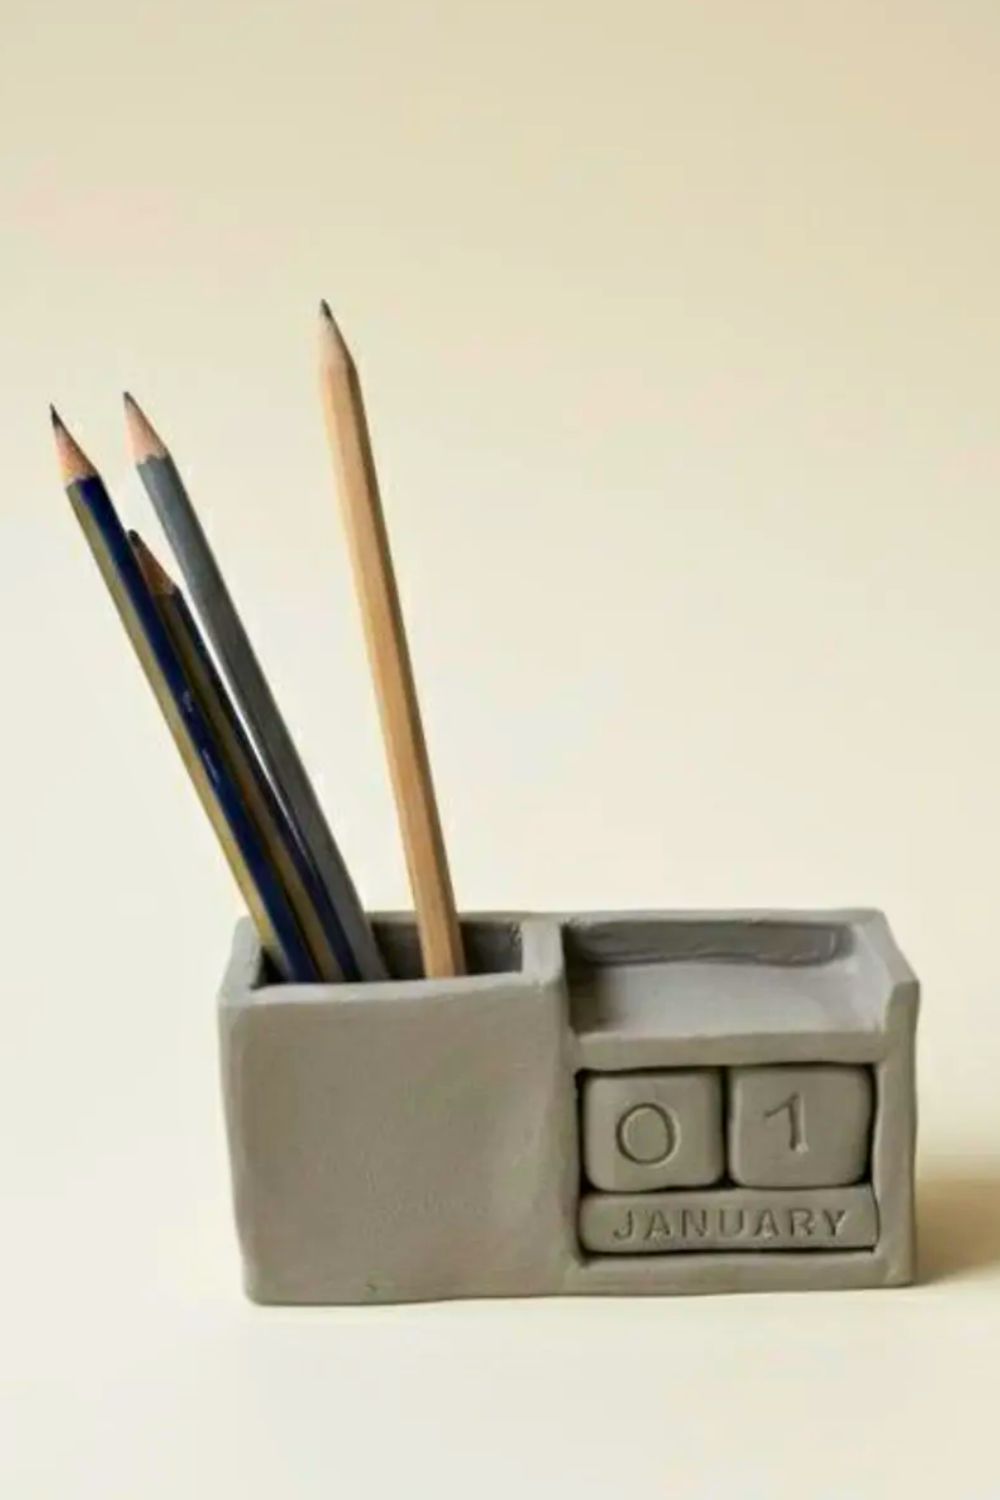
#3 Clay Cube Calendar and Desk organizer
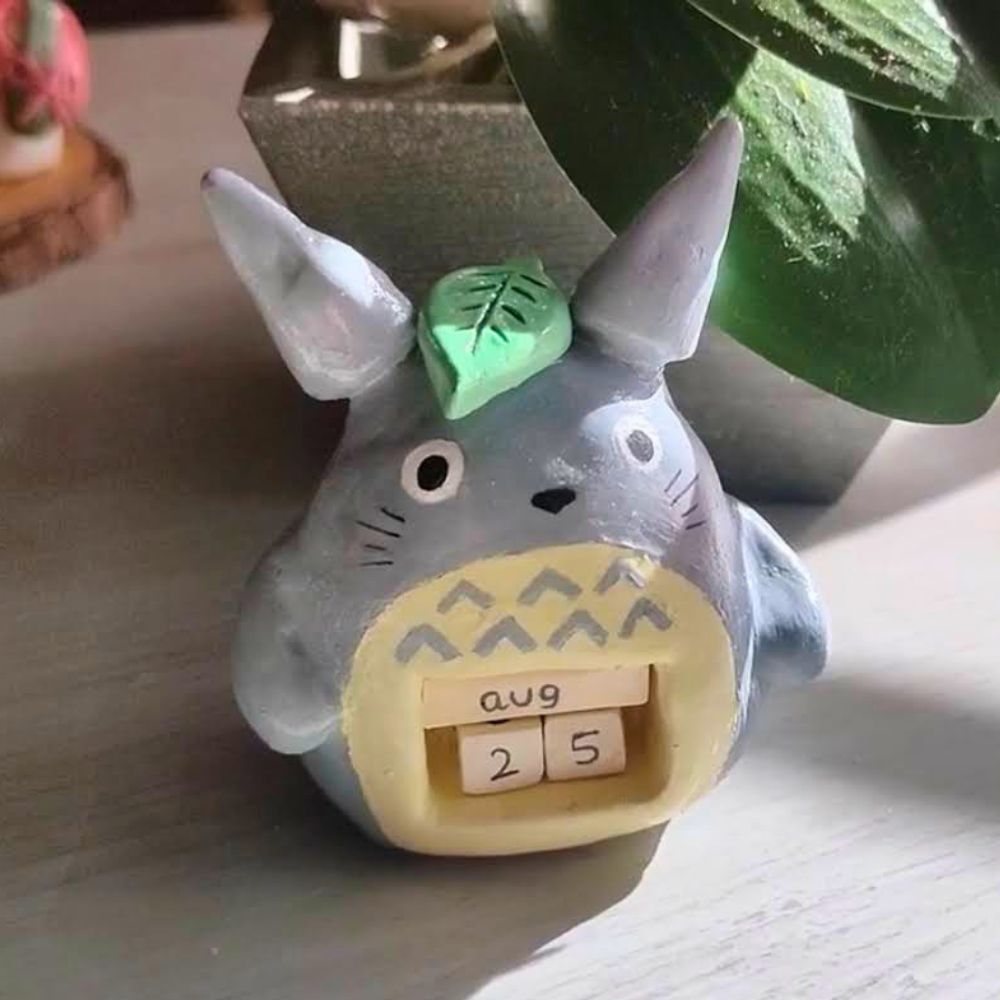
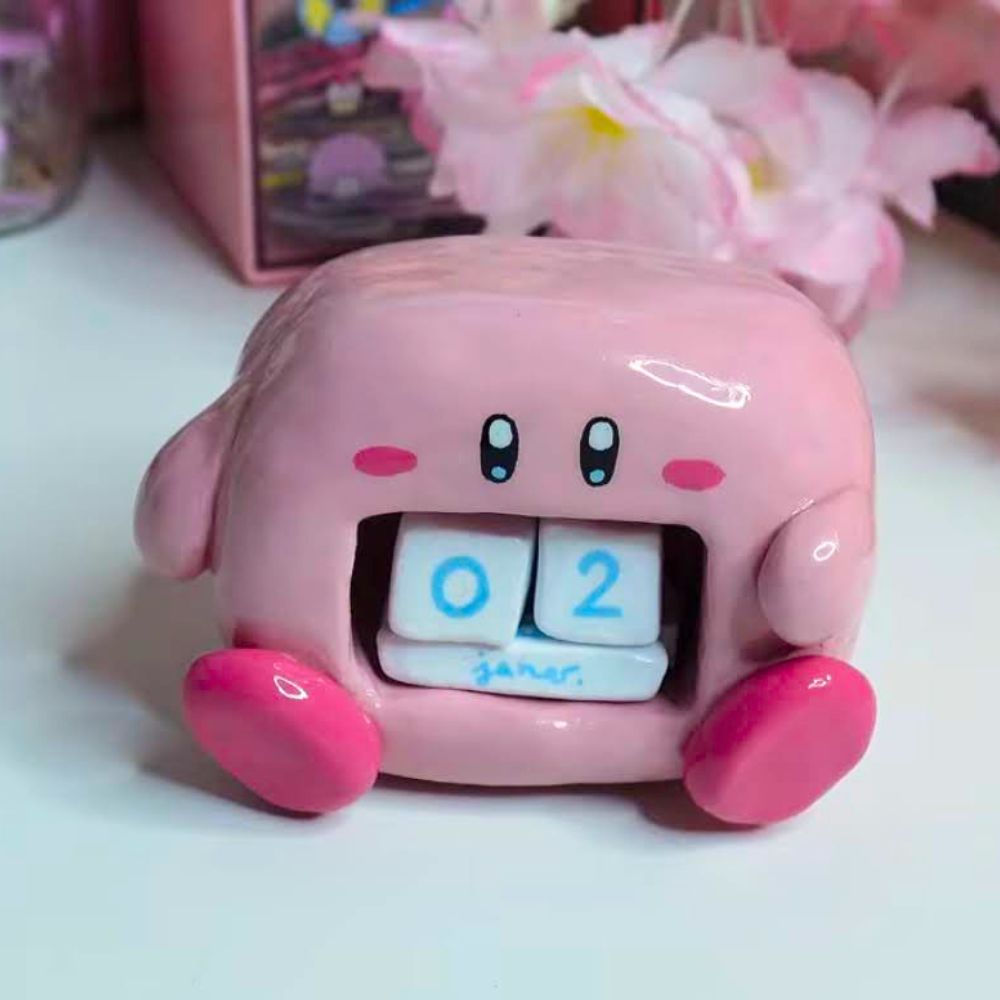
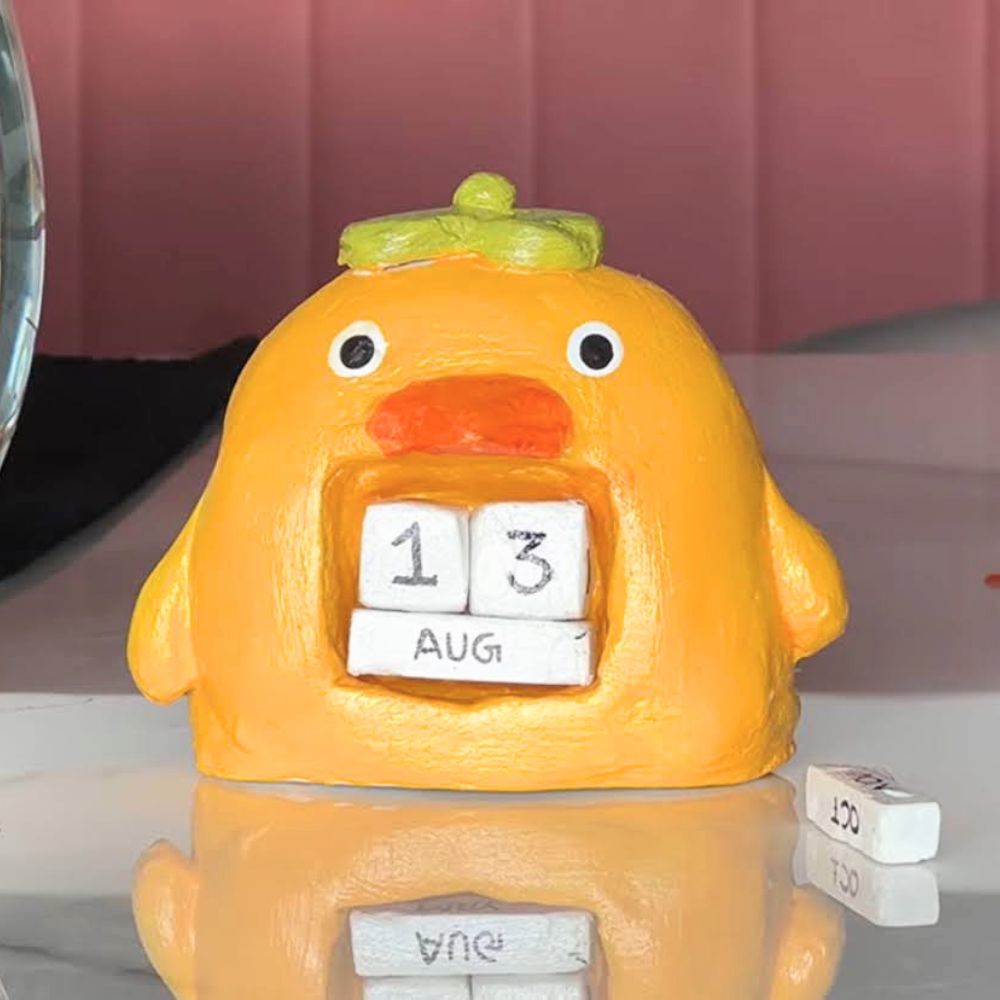
Kawaii Character Calendar
Create adorable calendar blocks inspired by beloved characters like Totoro, Kirby, or Kiiroitori. Shape the clay into character forms: round and puffy for Kirby, egg-shaped for Totoro, or chick-shaped for Kiiroitori.
Carve the center of the figure to display the numbers.
Paint in signature colors like soft gray and white for Totoro with his iconic belly pattern, bubble-gum pink for Kirby with rosy cheeks and simple dot eyes, or sunny yellow for Kiiroitori with orange beak details.
Use fine detail brushes for facial features and sweet expressions. This playful design brings instant joy to desks and makes a perfect gift for anime and character fans.
Seal with gloss varnish for a polished, toy-like finish.
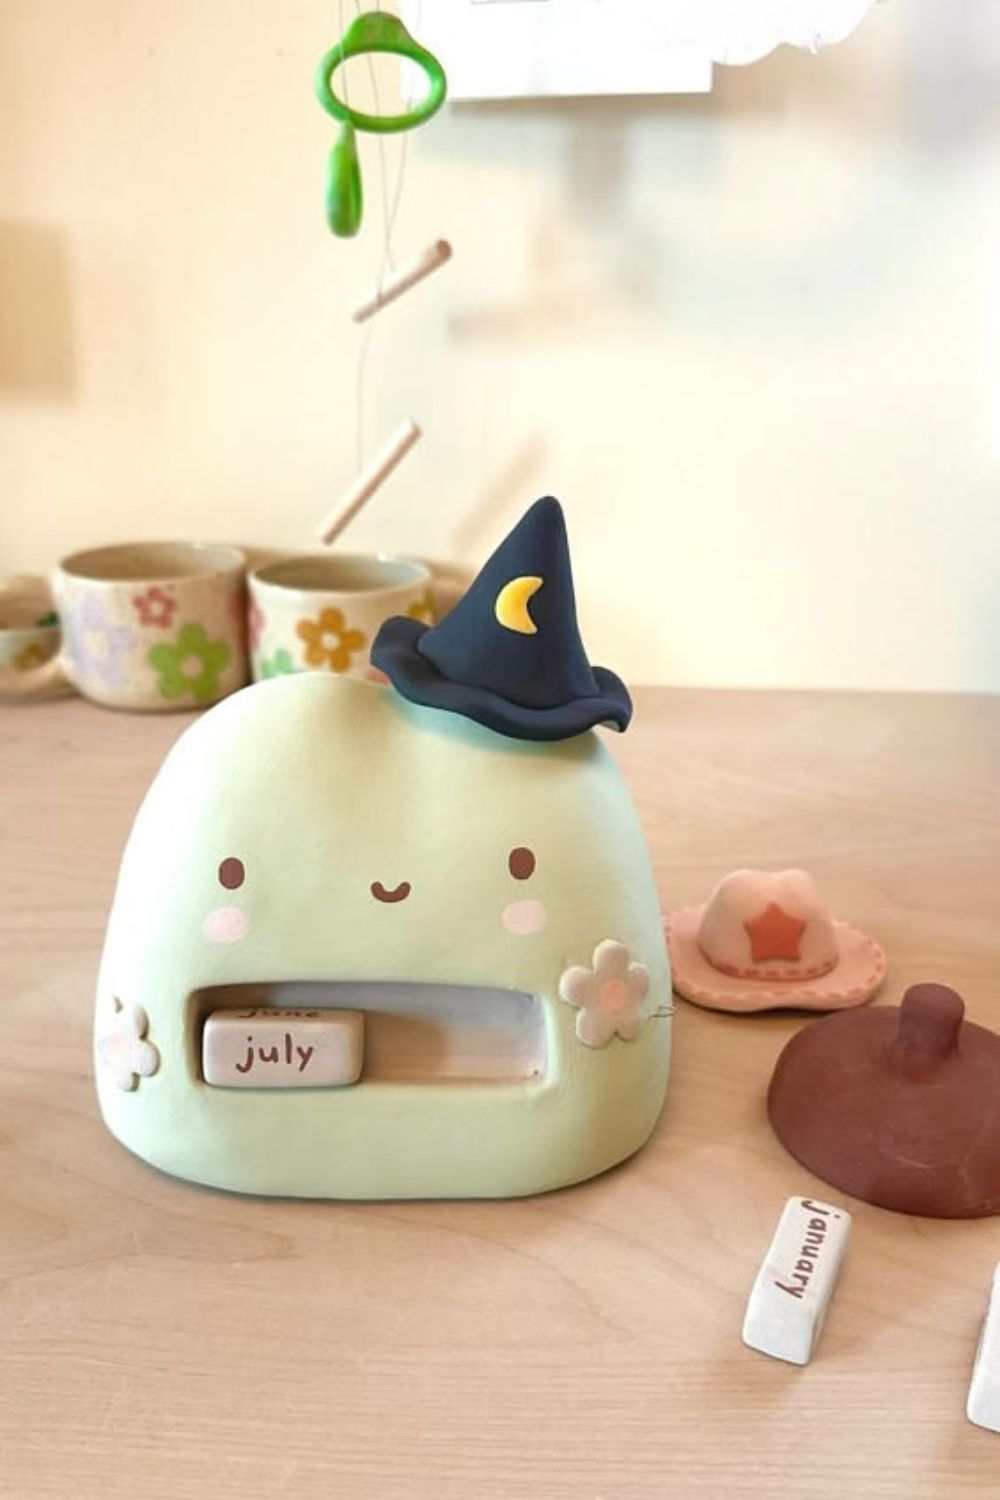
#7 DIY Clay Calendar with cute Hat
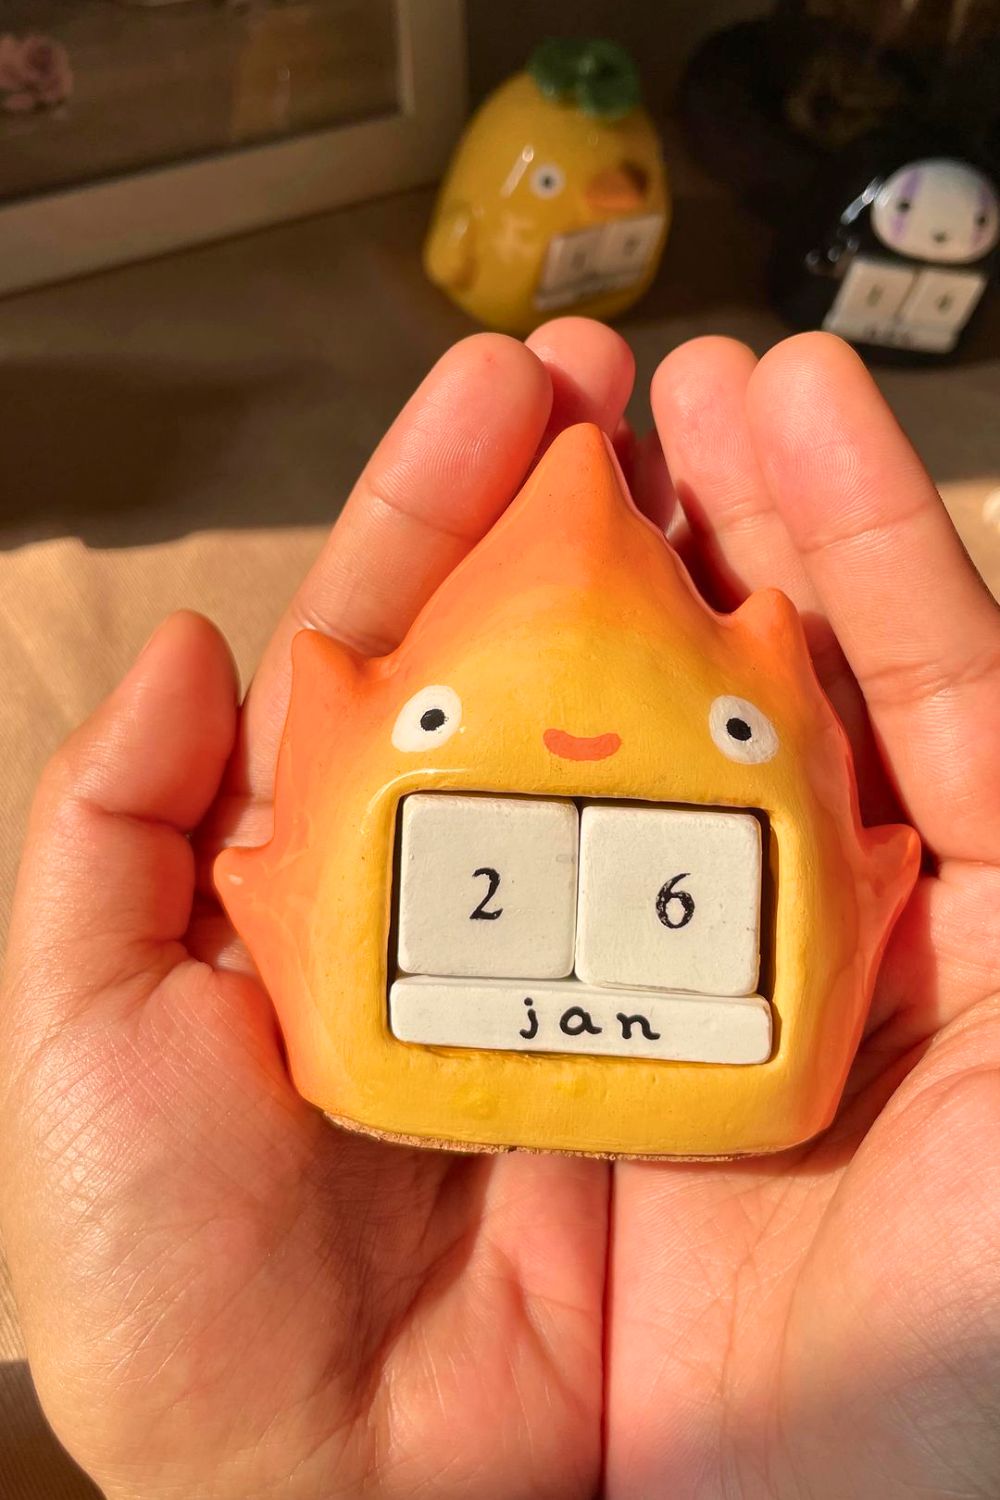
#8 Calcifer Perpetual Calendar
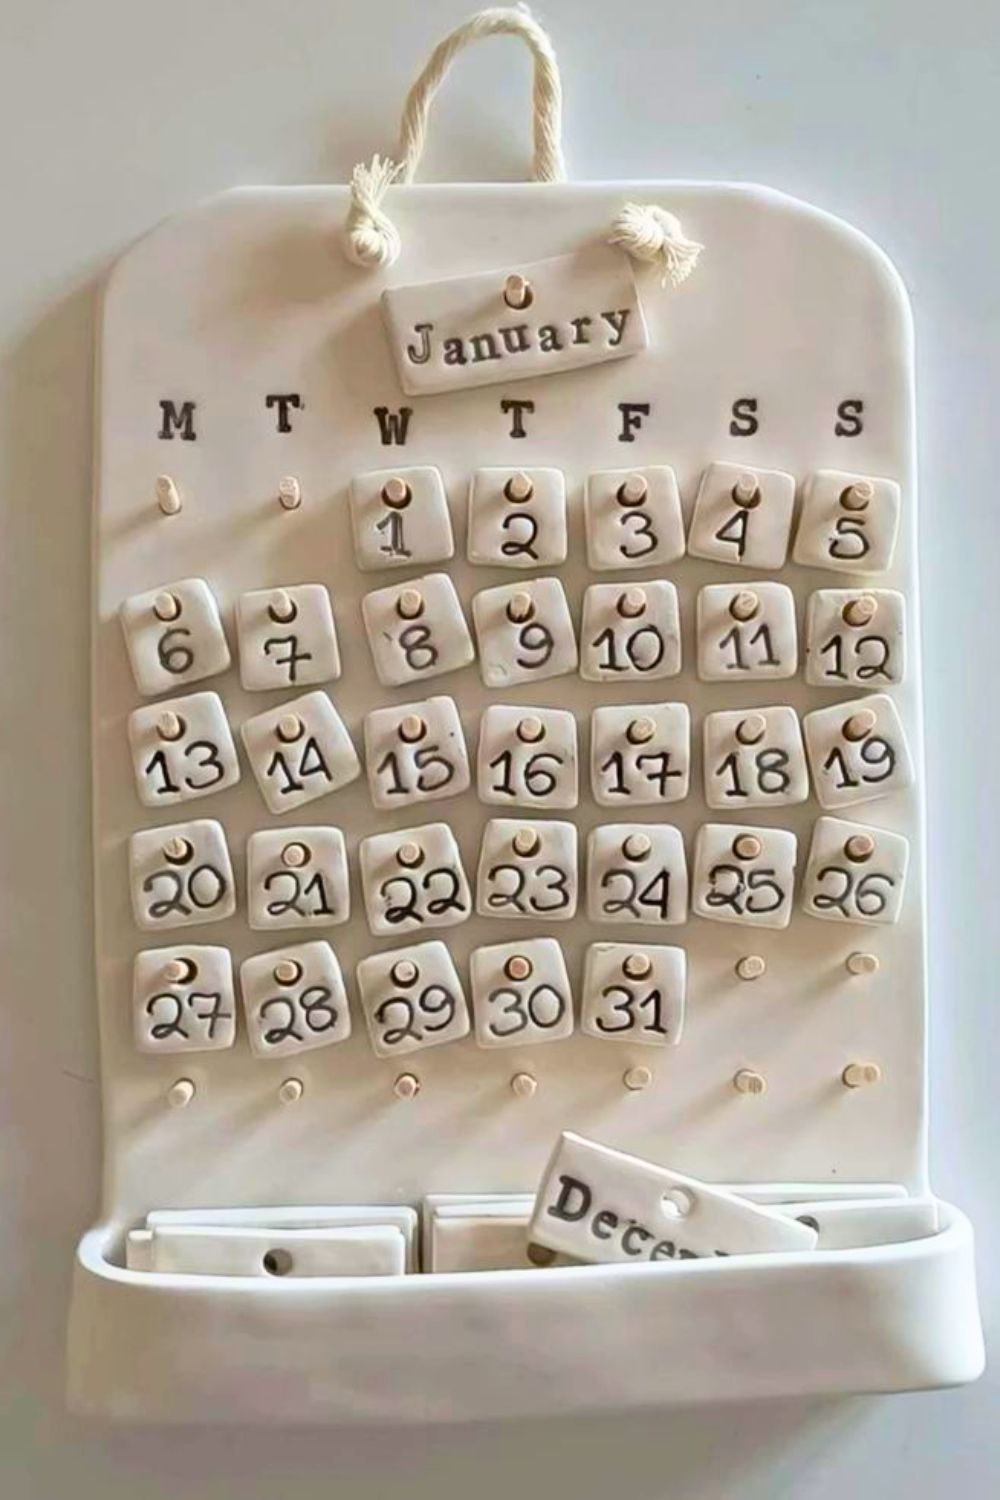
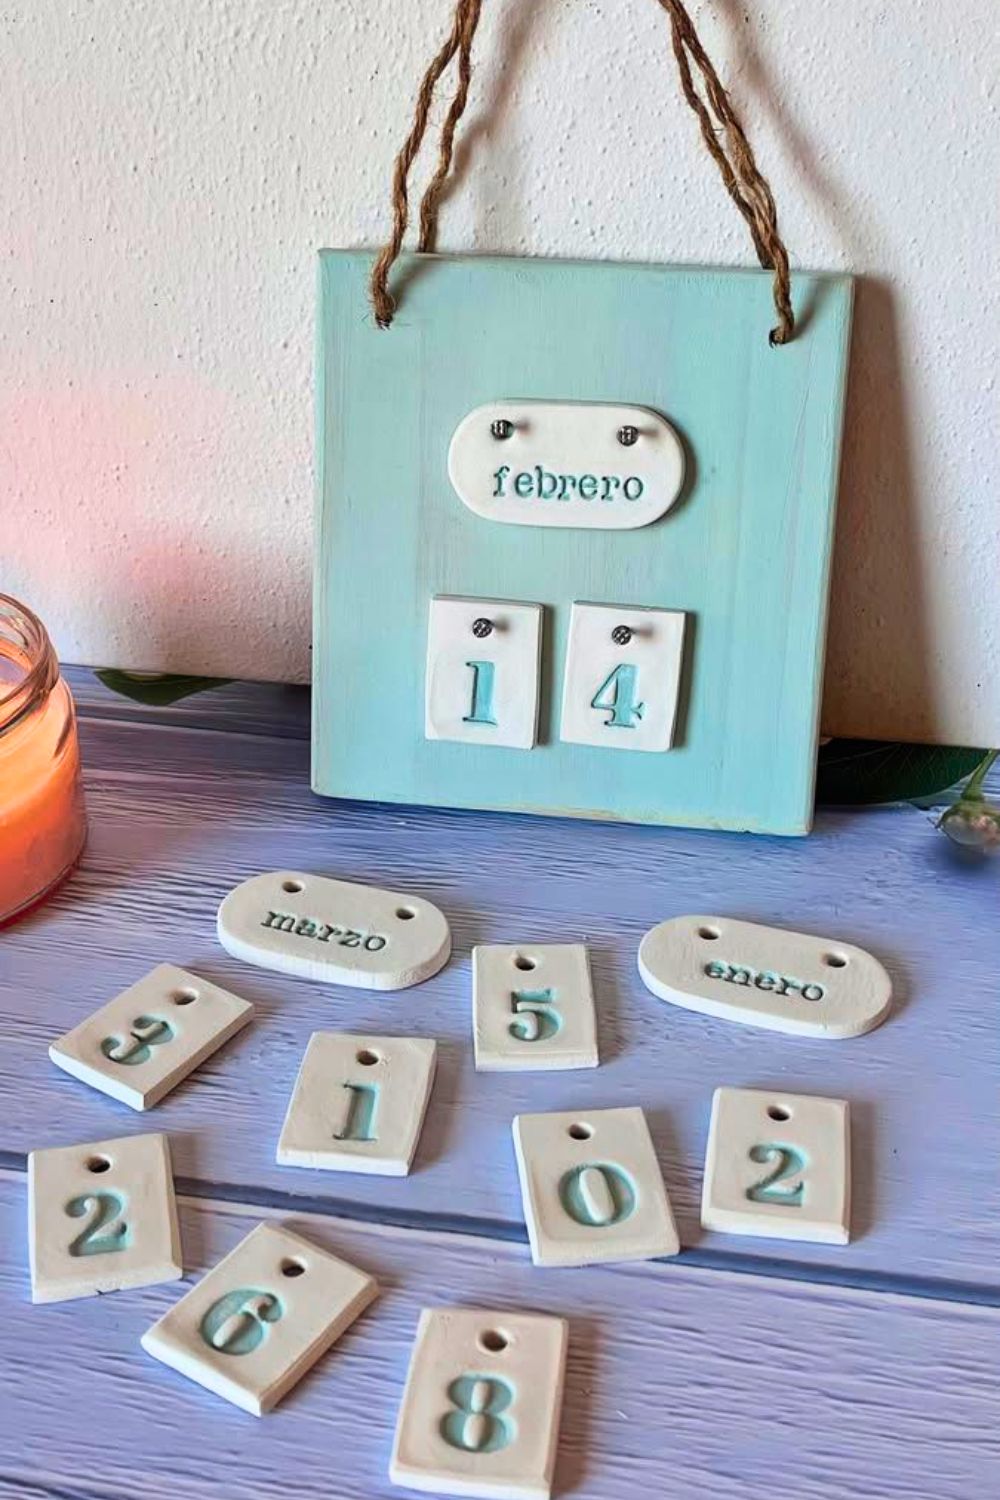
Monthly Perpetual Calendar with Clay
Take your perpetual calendar to the next level by creating a complete monthly system with interchangeable pieces.
Make numbered clay tiles from 0-9 (or 1-31 individual dates), month labels for all 12 months, and optional day-of-week labels.
Use small wooden pegs or dowels inserted into the calendar base so you can hang the numbers. Create a clay tray at the bottom to hold everything organized when not in use.
Paint each element cohesively or color-code the month by season.
This modular design lets you update the full date daily and keeps all pieces neatly stored. It’s perfect for desks, entryways, or as a thoughtful handmade gift that stays useful year-round.
#9 How to make a Clay monthy Calendar
#10 How to make a Perpetual Clay Calendar
Colored Clay Calendar
Create a simple shaped perpetual calendar, decorated with bright colors.
Have fun creating patterns in bright and contrasting colors for extra dimension and charm.
This style feels modern, playful, and easy to customize for different seasons or color themes.
It is a fun choice for kids’ rooms, craft rooms, or any space that could use a cheerful accent.
Tip: stamp while the clay is still soft for the clearest and deepest impression.
#11 Colorfull Clay Calendar idea
Rainbow Perpetual Calendar
Paint each face of the blocks in different rainbow colors, or blend each block from light to dark for a soft ombre effect.
Using white or black numbers helps the design stay readable while still feeling bright and joyful.
This is a lively, colorful option that brings energy to home offices, studios, or creative workspaces.
Acrylic paint works best for vibrant coverage, and a gloss varnish gives the finished pieces extra shine.
#12 DIY Perpetual Clay Calendar
Cute animals shaped Clay Calendar
Shape your calendar blocks into adorable animals like cats, dogs, bears, bunnies, or pandas for a playful twist on the traditional cube design.
Form the clay into rounded animal bodies with simple features like ears, tails, and paws. Keep the shapes chunky and stable so they can stand upright without tipping. Carve the centerof the animal, so the number blocks can fit it.
Paint each animal in natural colors or go whimsical with pastels, brights, or even rainbow patterns. Use fine detail brushes to add sweet facial expressions with dot eyes, tiny noses, and gentle smiles.
Seal with gloss varnish to give the animals a polished finish that enhances their charm. Display on your desk and enjoy!
Watch the tutorial: How to make Animal shaped Clay Calendars
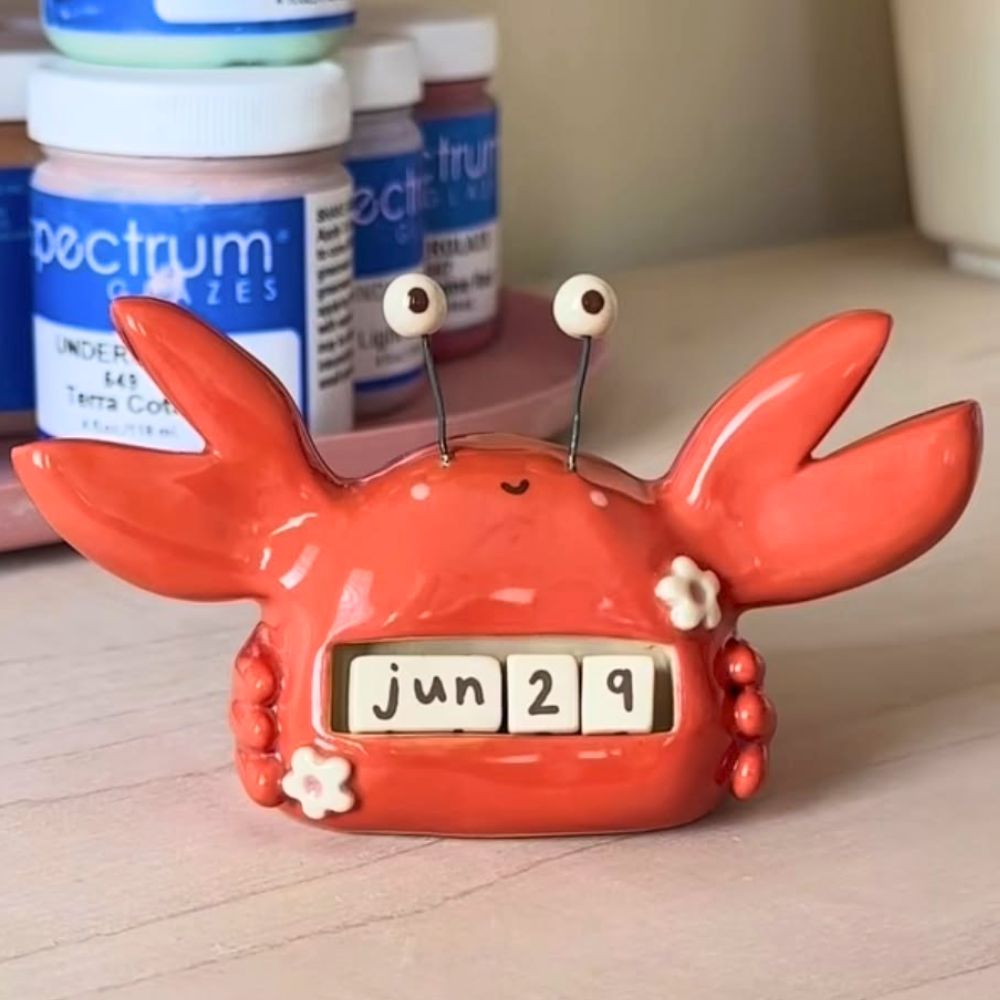
#13 Crab Clay Calendar
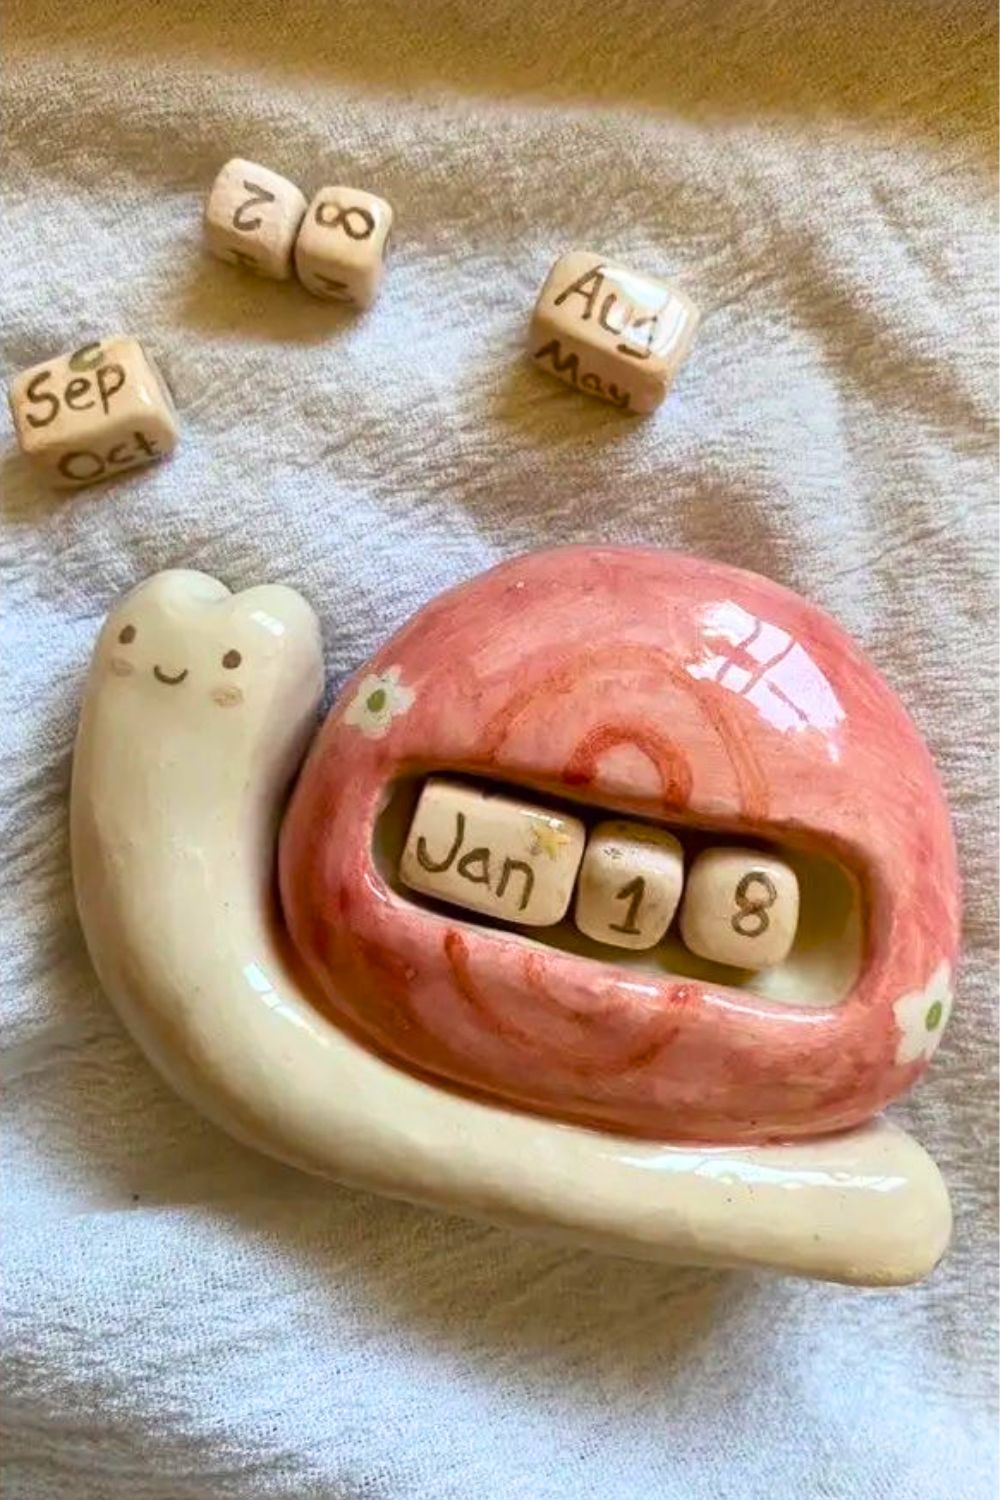
#14 Snail Clay Calendar
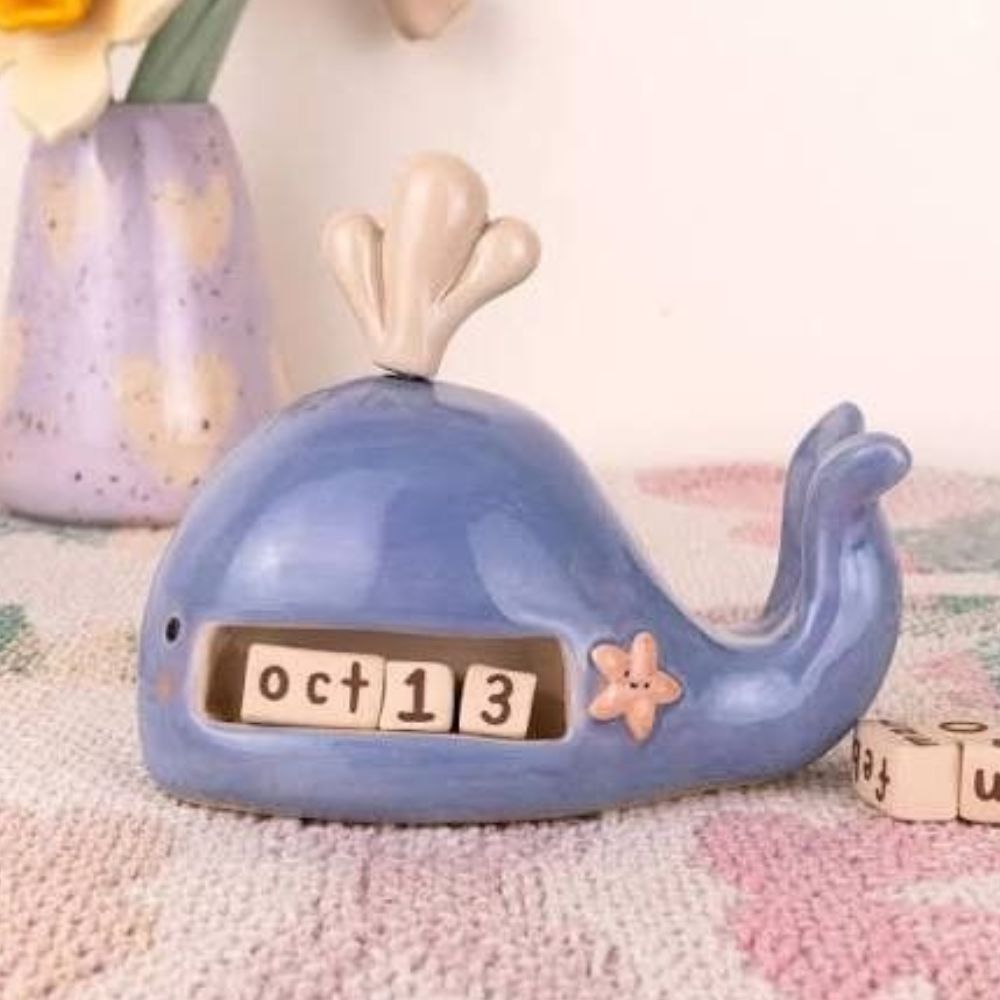
#15 Whale Clay Calendar

#16 Cat Clay Calendar
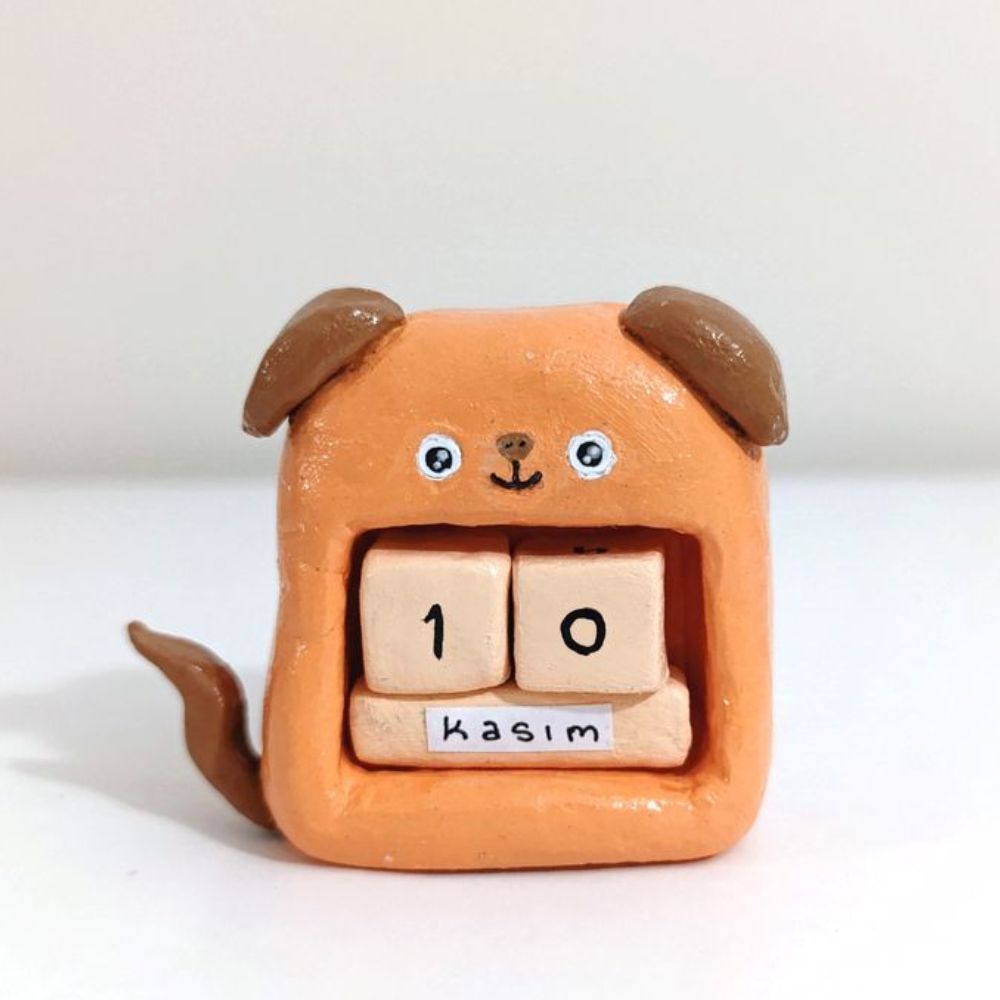
#17 Dog Clay Calendar
#18 Bear Clay Calendar
#19 Turtle Clay Calendar
Floral Calendar
Create small clay flowers or leaves to decorate your calendar and create a romantic botanical texture.
Soft pastels or a natural clay color both work well, depending on whether you want a delicate painted finish or an earthy organic look.
Seal the finished pieces with multiple coats of varnish to help preserve it over time.
Add golden hooks to hang the numbers to keep the design light and elegant.
This idea has a charming cottage-core feel that is especially lovely for bedrooms, vanities, or gift giving.
Seasonal Theme Calendar
Create small clay decorations like pumpkins, snowflakes, flowers, or suns to display on the calendar frame throughout the year.
Keep the date blocks neutral or use seasonal colors so the decorations can take center stage.
This makes the calendar feel fresh and interactive, since you can update the look as the seasons change.
It is a great project for kids because the decorative pieces can be made in simple shapes and swapped easily.
Make multiple seasonal sets so you always have a fun option ready for each time of year.
#21 Seasonal DIY Clay Calendar
Pro Tips for Perfect DIY Clay Calendars
- Work on parchment paper or a silicone mat to prevent sticking.
- Keep clay covered with a damp cloth when you are not actively working with it.
- Use wooden sticks as rolling guides for even thickness.
- Flip pieces every 6-8 hours while drying to help prevent warping.
- Do not rush the drying process because fully dried clay is much stronger.
- Sand before appling paint coats for an ultra-smooth professional finish.
- Test paint and varnish on a clay scrap first to check compatibility.
- Apply varnish in thin coats to avoid drips and cloudiness.
- Use painter’s tape for crisp lines and geometric designs.
- Store the finished calendar away from direct sunlight to help prevent fading.
- Make extra blocks as backups in case of breakage.
- Consider making a matching pen holder or desk organizer with leftover clay.
- Use a lazy susan while painting for easier rotation and access.
Troubleshooting Common Issues
| Problem | Cause | Solution |
| Cracking during drying | Clay dried too fast or unevenly | Dry slowly in a cool area, flip pieces regularly, and cover loosely with plastic to slow moisture loss. |
| Warping or bending | Uneven thickness or drying | Roll clay to a consistent thickness, rotate pieces during drying, and keep them flat on a level surface. |
| Paint not adhering | Clay surface too smooth or dusty | Sand lightly, wipe with a damp cloth, and use primer or gesso before painting. |
| Numbers smudging | Paint not fully dry or poor sealer | Wait 24 hours between painting and varnishing, then use a quality sealer for better protection. |
| Varnish cloudy or sticky | Applied too thick or humid conditions | Apply thin coats, work in low humidity, and allow full cure time between layers. |
| Blocks too fragile | Clay not fully dry or low-quality clay | Dry for a full 48-72 hours, use quality clay, and apply multiple varnish coats for strength. |
Caring for Your DIY Clay Calendar
Dust the calendar gently with a soft cloth to keep the surface clean.
Avoid water exposure even if the piece is sealed, since excess moisture can still cause damage over time.
Keep it away from heat sources and direct sunlight to help preserve the finish and color.
Handle it gently, as air dry clay can chip if dropped or knocked against hard surfaces.
With proper care, a well-sealed calendar can last for years and remain a treasured handmade piece.
RELATED: 75 Easy Pot Painting Ideas That Will Transform Your Home Decor
RELATED: Use air clay to recycle a plastic container into a cute planter
Pin These DIY Clay Calendar Projects!
DIY clay calendar projects are such a rewarding way to combine creativity and functionality in one handmade piece.
Pick the version that fits your space, skill level, and style, then make it your own.
And remember that handmade charm often comes from the little imperfections that give your piece character.
Save this article for later so you can come back when you’re ready to start crafting.