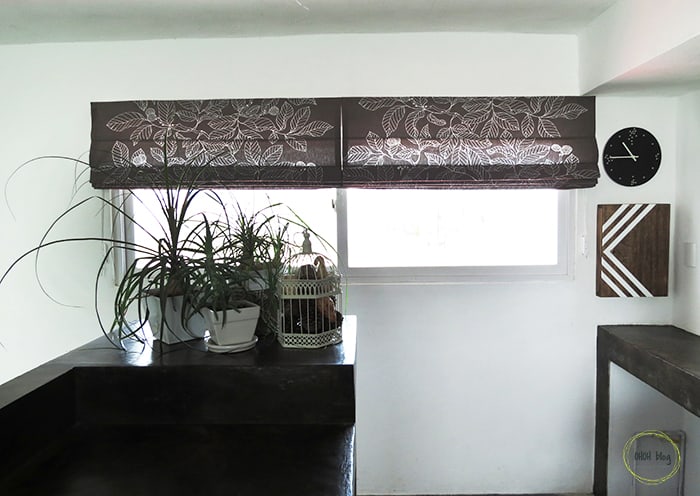
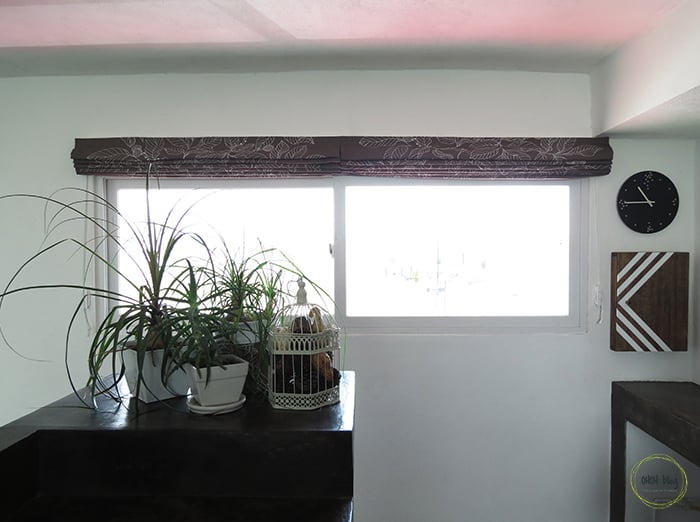
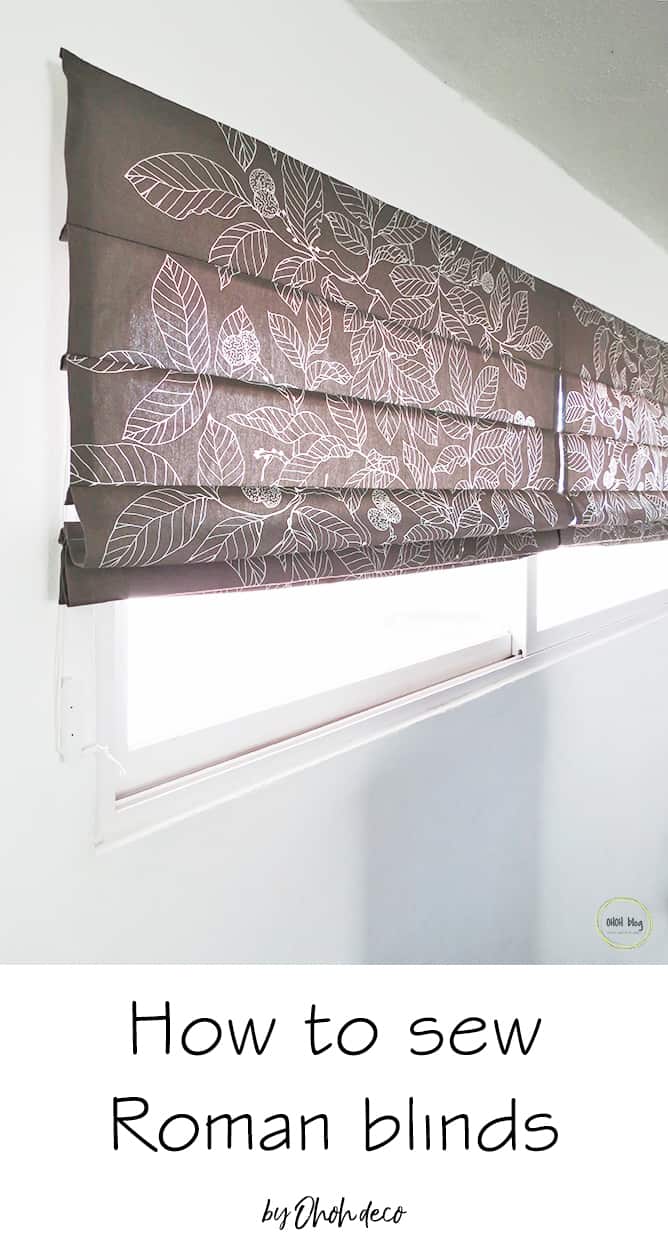
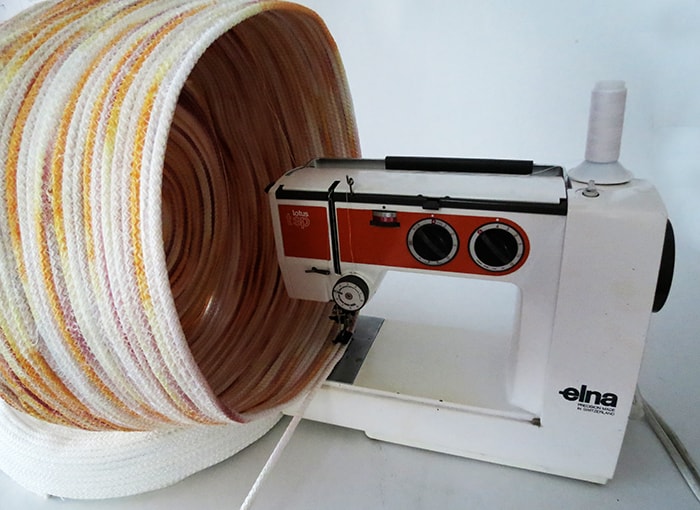
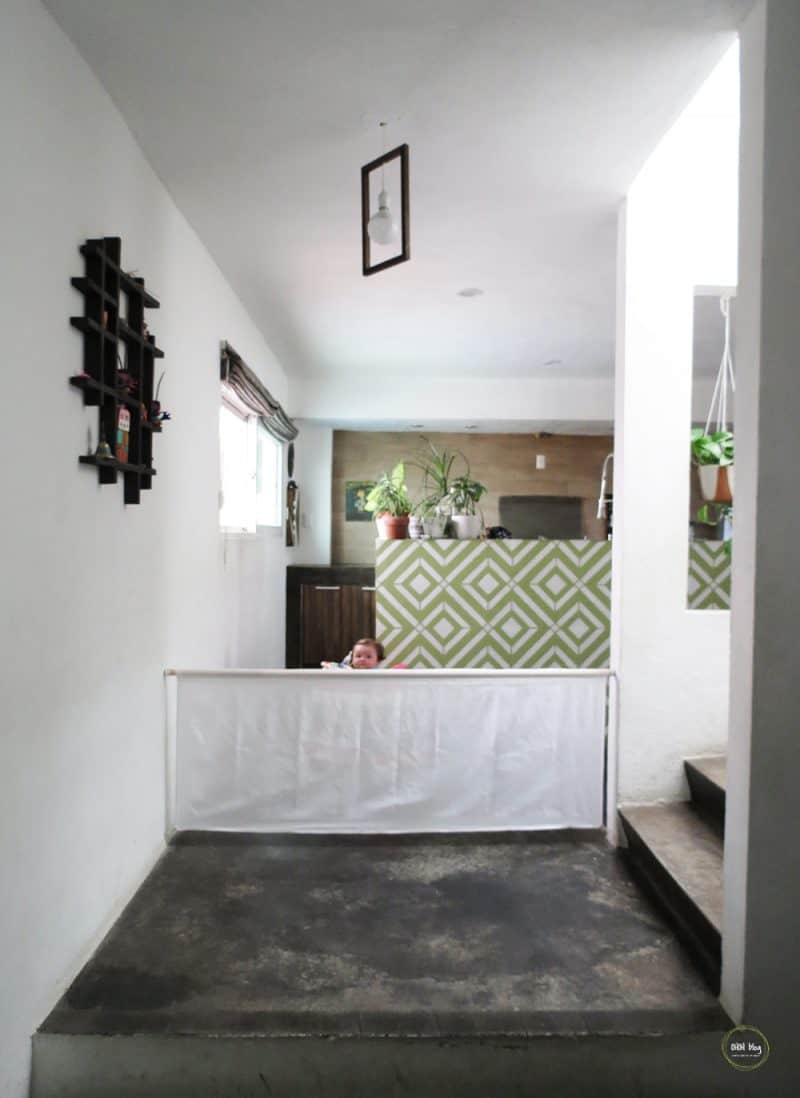
Times ago, I sew roman blinds for the kid’s bedroom, and now I just hanged the kitchen ones. I like roman shades, they look modern and add a nice finished touch to any room.
Sewing your own blinds is much easier than you may think. The two main reasons why I like to sew my curtains is that it’s definitely the best way to save money and still have a custom design by choosing the fabric and adding some funny details, for example in my son bedroom I glued some little car buttons on the edge of the blind. I found a great useful guide you can read before starting sewing curtains.
For a cost-friendly project, you can also make your own curtain rods, see some inspiration in my DIY curtain rods post.
[ THIS POST PROBABLY CONTAINS AFFILIATES LINKS, OUR FULL DISCLOSURE POLICY IS REALLY BORING, BUT YOU CAN READ IT HERE ]
Today I will explain how you can sew your roman blinds. I make them removable, which means you can easily take them off to wash them. I will suggest you wash the fabric before starting cutting and sewing, so your blinds won’t shrink when you wash them. It a quite long tutorial, I hope to provide clear explanations. Don’t hesitate to leave a comment if you have any doubt.
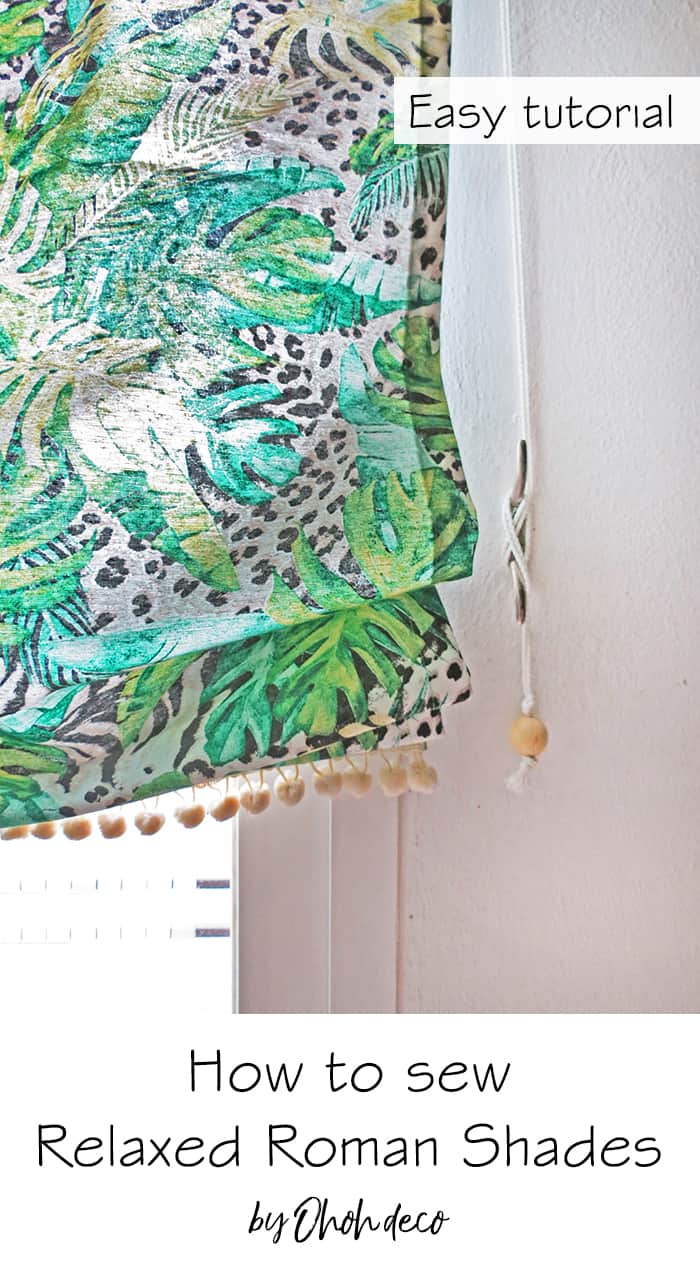
RELATED: How to make relaxed roman shades
RELATED: DIY curtain rods
How to make roman blinds
Materials you will need:
- Nice fabric
- Matching thread
- Plastic rings (or brass rings)
- 1/2 in. wooden dowels
- 1 x 2 wood plank
- velcro
- blind cord
- Rope cleats
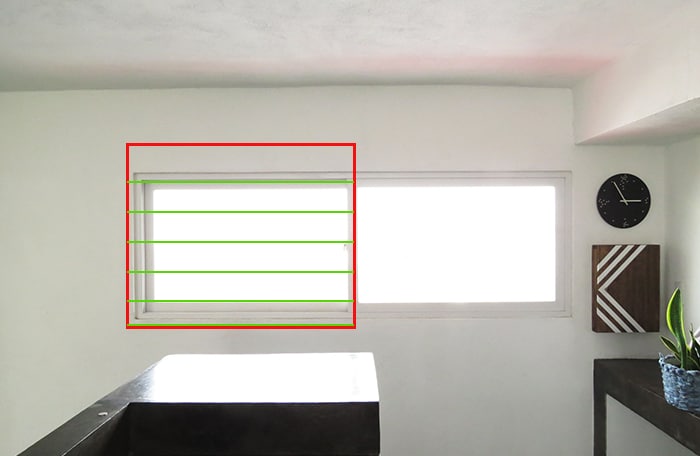
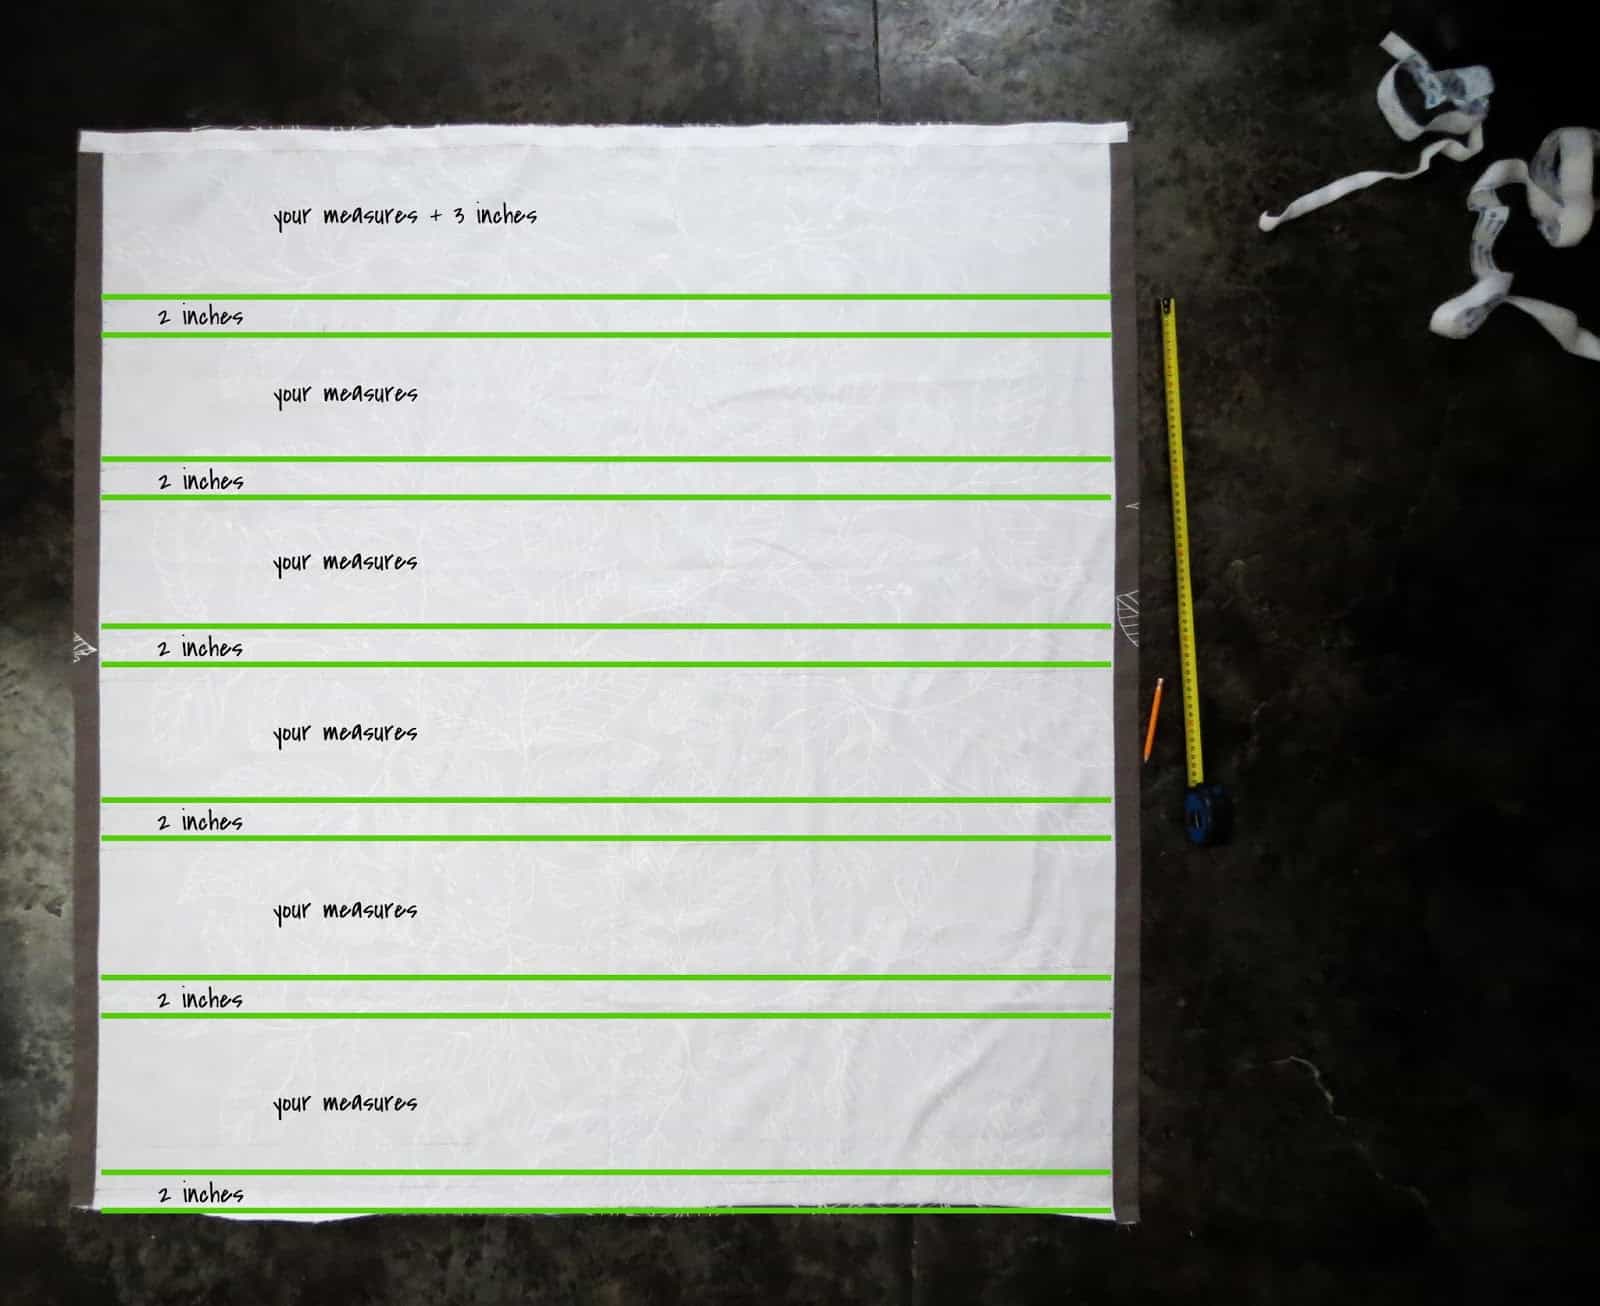
The first step, take the measurements. Definite the finish roman blind dimension (red square), think to leave more fabric on the top part, you need some space to fold the blind above the window. You need to add 1 inch on each side for the seams, and you need to add extra high for each dowel you will use in your blind (green lines).
Example: the finished blind need to be 50 inches wide x 40 inches high. Adding the seams, the fabric dimensions must be 52 inches x 42 inches. You need to add 2 inches for each dowel, in this case, 6 dowels: 2 inches x 6 = 12 inches to add on the height. So the fabric piece to cut is 52 inches x 54 inches.
The number of dowels you will need will depend on the window dimension. I suggest placing one every 6-10 inches. Calculate to place them in a uniform manner along the entire height.
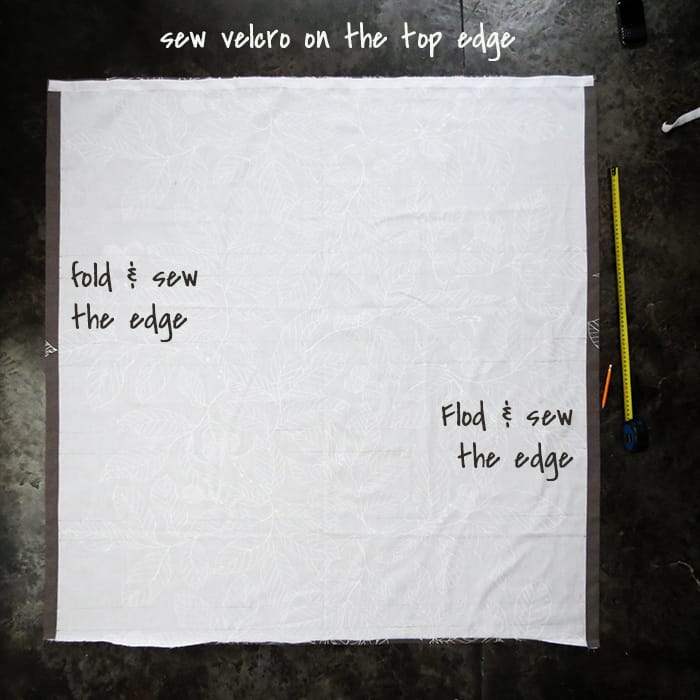
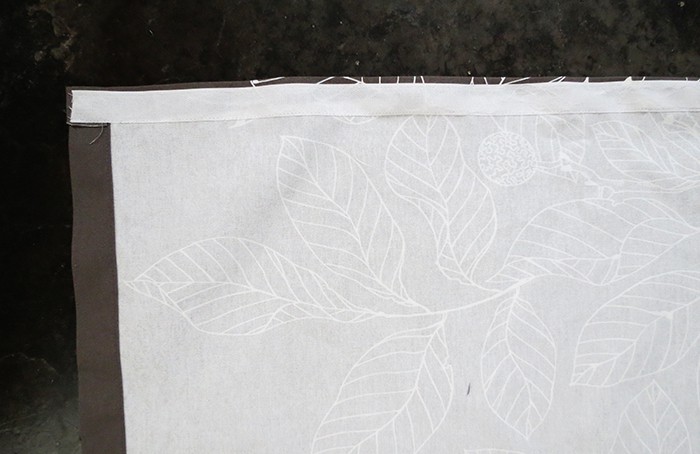
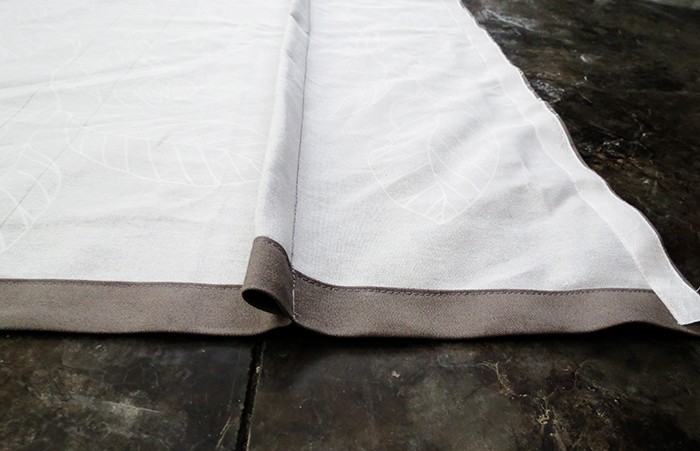
Take the fabric, fold the vertical edges and sew them.
Fold the top edge and sew a piece of velcro all along. This will allow you to take off the blind if you want to wash it.
Take a ruler and trace the lines to make the fold where the dowels are gonna be slide in.
For this blind, we place a dowel every 6 inches ( = your measure on the pic). Starting from the top (just under the velcro), take the measure + 3 inches. It this case 6 in. + 3in.= 9 inches. Trace a line at 9 inches, and a second one, parallel, at 2 inches distance.
Leave 6 in. (= your measure) and trace a line, and the second one at 2 in. And so on until the bottom edge.
The measures must fall just on the edge, if it is not, start again by modifying the distance between each dowel fold (= your measure)
Fold the blind through the inside following the lines, both lines must be on top of each other. Pin and sew on the line.
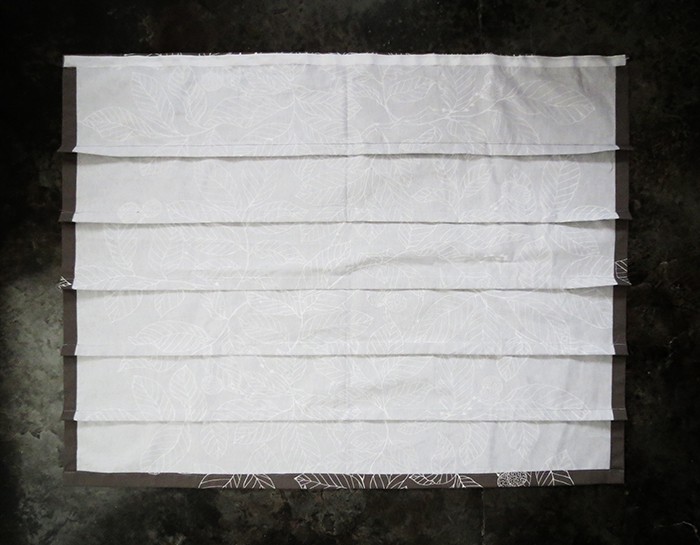
Repeat to make all the folds. To make the bottom fold, where you will slide the last dowel, you just need to fold the edge. When all the folds are made, iron your blind.
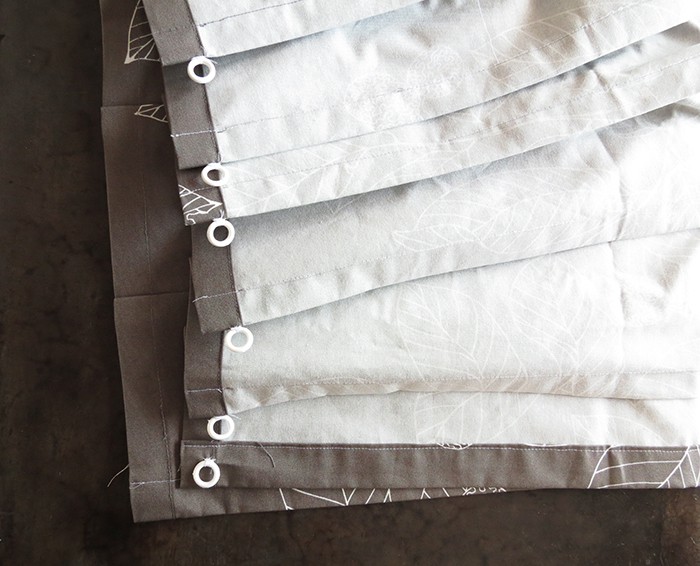
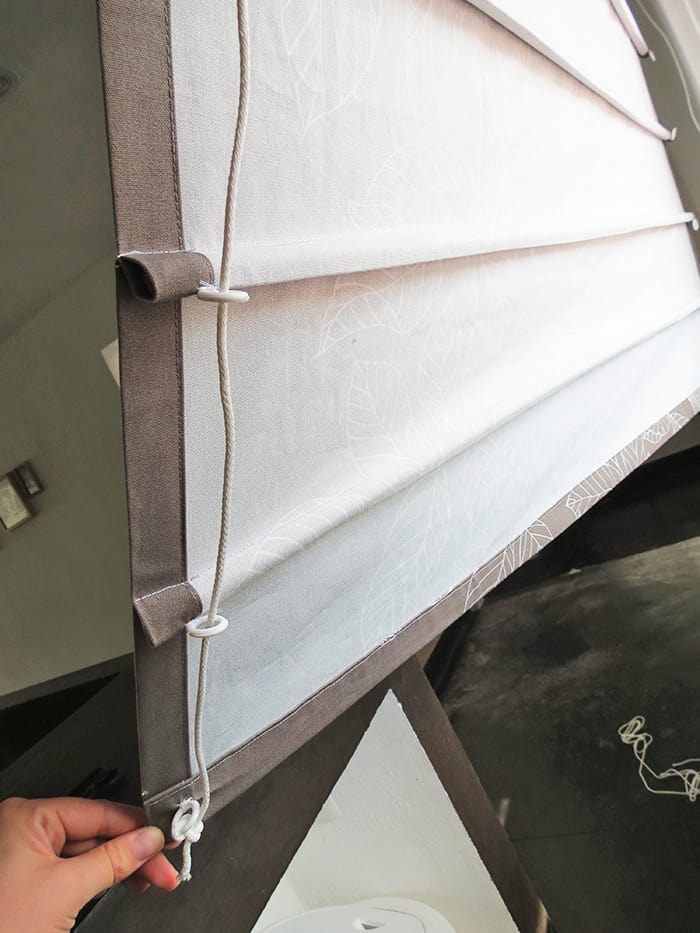
Hand stitches rings on each fold, at more or less 1 inch from the edge. Do it on both sides.
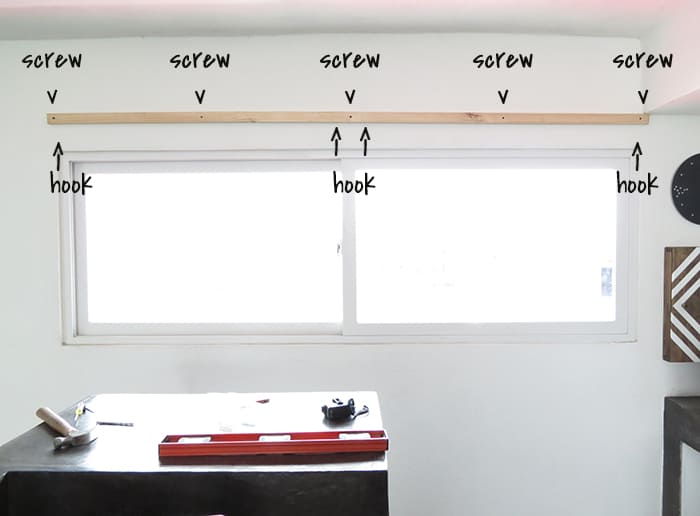
Now that you finished to sew your roman blinds, it’s time to hang them on the wall.
Screw the 1×2 wood trim on top of the window. I place it at 7 inches above the window, but it will depend on your folds dimensions.
Screw 2 eye screw (hook) on the lower part of the wooden trim. I make 2 blinds, so in this case, I will need 4 eye screws (2 for each blind).
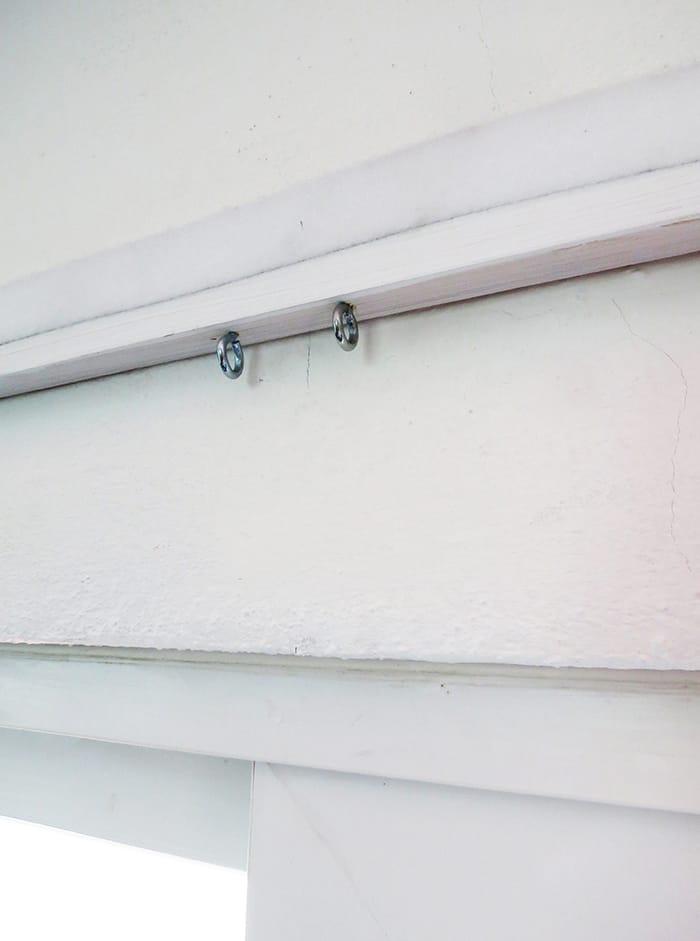
If you like too, you can paint the wood to match your wall color. Glue velcro on the upper part of the plank. You can use adhesive velcro, or a glue gun to fix it.
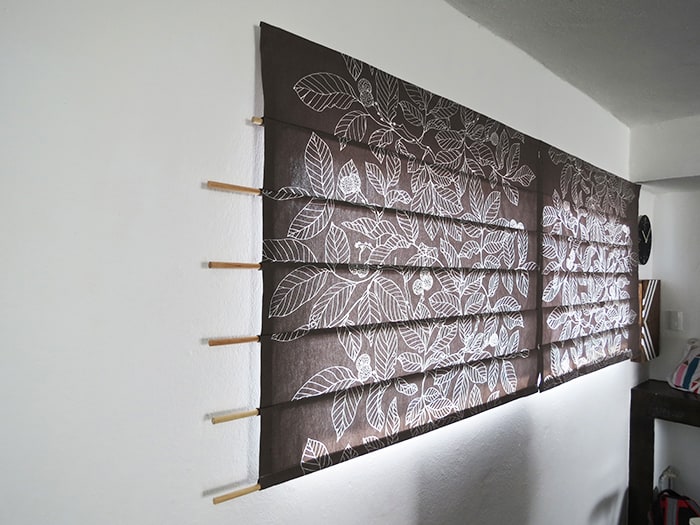
Attach you blinds on the plank, just put both velcro sides ( the blind one and the plank one) on top of each other and press.
Ensures that the shades are straight, the good thing is you can easily remove them if needed. Cut the 1/2 wooden dowels, 1 inch smaller than the blind width, sand the edges and slide them into each fold.
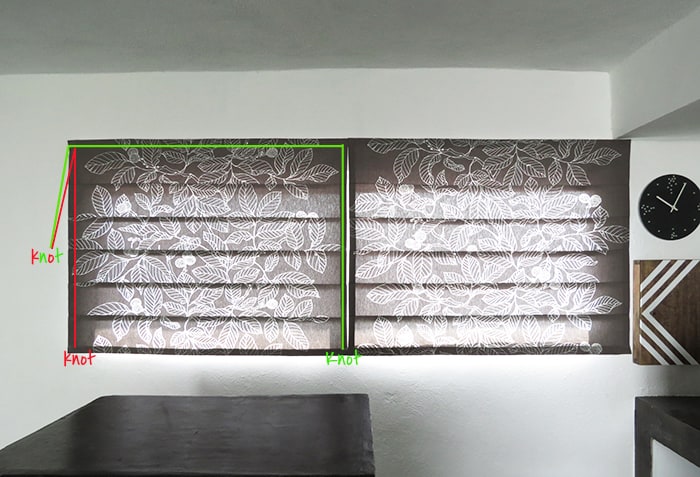
Almost done, to open and close the blinds, you have to pass 2 pieces of rope into the rings and eye screws.
First rope (green line on the pic): start with a knot, pass the rope into each ring, and both eye screws (green line on the pic).
Second rope (red line): make a knot with the lower ring, pass into each ring, and one eye screw. Pass the rope into the second eye screw and joint both rope pieces, adjust the length.
Both ropes should be slightly tense so that the blind opens and closes right, finish with a knot.
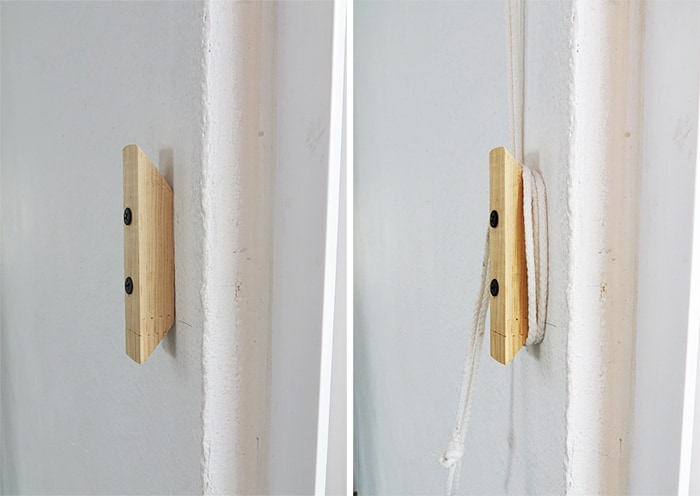
To attach the rope, and leave the blind open, fix a rope cleat on the window side. For some reason, I couldn’t find them at my hardware store, so I made one in wood and paint it white.

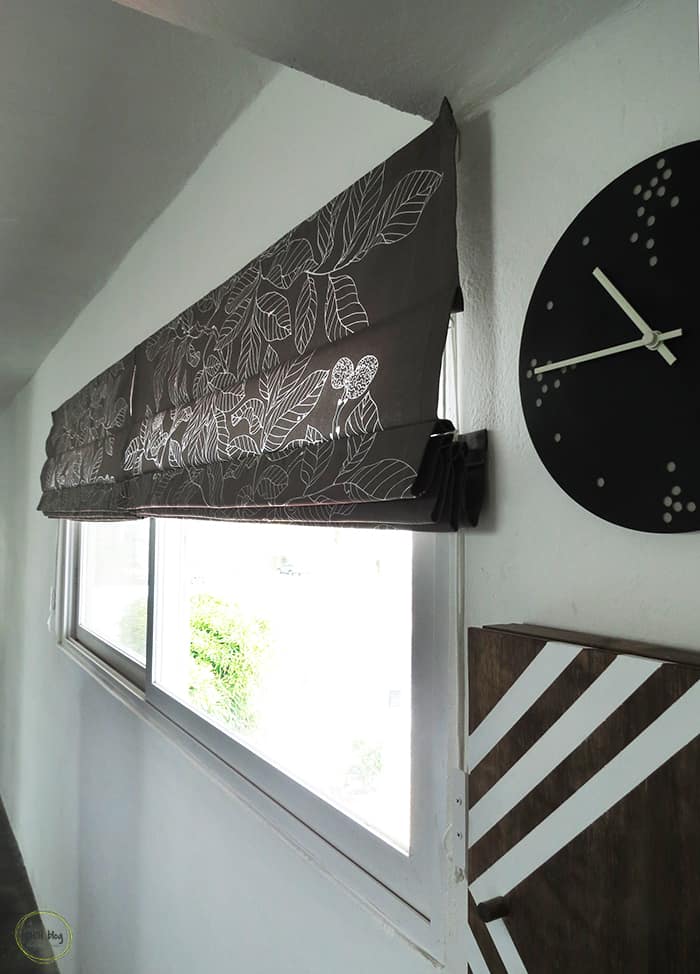
And done! I hope it will help you to sew your own blind. For my kid’s bedroom, I made blinds lined with blackout fabric.
You can see some pics of the blinds in my son’s bedroom in the post talking about How to build a headboard with a few planks. If you look closely you will see the little car buttons (because he likes cars and not trees).
In conclusion, learning how to sew roman blinds may seem daunting at first, but with a few simple steps and some helpful tips, you can create beautiful and functional window treatments for your home.
From choosing the right fabric to mastering the techniques of measuring, cutting, and stitching, we have covered all the key elements to make this project a success.
As the saying goes, “Your home should tell the story of who you are, and be a collection of what you love.” So go ahead and add your personal touch to your windows with these DIY roman blinds.
Now, it’s time to put your skills to the test and get started on your own creative journey. Happy sewing!
RELATED: How to make relaxed roman shades
RELATED: DIY curtain rods

Looking for more sewing ideas?
You will find all the tutorials featured in this video on my Best off-page.
Want to remember it? Save this Roman Blinds Sewing Tutorial in your favorite Pinterest board.
You may also like these projects:
Amaryllis
Jolis, les stores ! N'oublies pas de laisser une petite "craille" pour voir ce qui se passe dans la rue 😉
Bizz
Merci! Dis tout de suite que je suis la concierge de service 😉
DIY Blindhook? You are all kinds of Genius! I couldn't find any and gave up after I made my rolled blinds. And they are difficult to wash too, next time I'll make them with Velcro for sure.
Hi Dalia, I'm glad the DIY blind hook will be useful! It was the same for me. I couldn't find anything to attach the blinds…Finally this simple piece of wood was the solution! Easy and cheap to make, plus you can paint it the same color as your wall.
I love the out come of the blinds, Great Job.. Wow amazing…
Thanks Adelaide!
I love this. I have one room that needs blinds and will be doing this.
Great! If you want to share, I will love to see your finished blinds!
I have been looking for this type of shade for many years. I am sure I will be making these in the very near future. Thank you for letting us see and learn how to make these.
Hello Judy, I'm glad it helps. Let me know how how your shades turns!
I’m wanting to attach a backing that is the same fabric and color as the front will be. Would I sew the rod pockets onto the right side of the fabric and then sew the two pieces of fabric together wrong sides so that the rod pockets will be on the back and then the right sides of the fabric will beshowing on both sides. This will be a first for me and I’m sewing for a friend so don’t want to mess it up. Thank you for your help. o
Hello Joanne, I made the same kind of blinds using blackout backing for my kids bedrooms. I first made a blind, following this tutorial, with the blackout fabric. This mean that the folds and the dowels are into the blackout. Then I cut a rectangle in the fabric I wanted to use in the front, I folded the edges to have a nice finish and sew it on top of the “blackout blind”. Obviously you have to sew it on the flat front side, and you have to stop the seam for every rod pocket, so they stay open and you can slide the dowels inside. I hope this will help you!
Ok great, thank you. Wish me luck!
@Joanne Dozier, I made a lined set for my living room and sewed them like a pillow case then stitched the horizontal slots for the dowels. I like how it reinforced it for the dowels and I feel like it creases nicer when I draw them up. I did also use light fusible interfacing because my fabric is fairly sheer and it wanted it to diffuse the light but not be too transparent if that makes sense. If you have a heavier fabric, I agree with her process for adding the front piece just over the top with edges folded and finished. Because mine was a light cotton blend, I was able to just stitch both.
Fantastic tutorial. This has to be the best I have seen so far. Thank you very much.
I want to make a couple of roman-type shades, but I don't have mini blinds to upcycle as some tutorials require. Your method is great and will look nicer from the outside view as well. Thanks so much for your well-thought-out method and excellent directions.
Hello Dinah, thanks for your nice comment! You are right, it does look clean from the outside when the blinds are closed, which is also important to me. I will have to take a pic and share it!! Have fun sewing and let me know who your blinds turns out!
I made Roman shades using mini blinds a few years ago. They need to be redone because the cheap blinds broke.
These shades are much more long lasting as they are made with wood dowels! Let me know how they turns out!
When you open the blinds do your folds ever go inward? I made a Roman shade for my kitchen from a different tutorial and it looks nice but when I open it I have to pull the folds to the front (I hope that makes sense). I wasn't too make some for my boys' room but they'll need blackout so my 4 year old doesn't complain so much about it still being light outside.
The folds goes to the front, but some times I have to arrange them to have them flat. I made the same kind of blinds with blackout for my kid's bedroom. It works great, even if sometime the fabric crumples a little.
This is great! I made some by adapting old roller blinds. Two things I learned: 1. Never get the adhesive velcro, it isn't strong enough, get the sew on one. And you can get little metal washers for the back instead of plastic, they don't get brittle in the sun and break like plastic.
I would had prefer metallic rings, but they only have plastic ones at the store. I did use washer in a previous blind, but they are to sharp. It chafe the rope and after a time it breaks it.
Oi, Amarillys! Quero te dizer que, de todos os sites em que procurei o tutorial da cortina romana, o teu é o mais completo! Não leio/escrevo em inglês e entendi completamente! Obrigada! Beijo, Camélia Paiva.
When adding a blackout backing is necessary, how would you go about doing this?
Hello Megan, I made the same kind of blinds using blackout for my kids bedrooms. I first made a blind, following this tutorial, with the blackout fabric. This mean that the folds and the dowels are into the blackout. Then I cut a rectangle in the regular fabric, I folded the edges to have a nice finish and sew it on top of the "blackout blind". Obviously you have to sew it on the flat front side. I hope this will help you!
It's a nice information about roller blinds Oldham.Nice blog ….we will wait for your upcoming post.
Nice tutorial! Thank you for using fabric that shows up clearly. When using a blackout lining as someone else asked, how does the lining fold with the backing as you pull open the shade? It sounds as if you stitched the front fabric to the lining after all the folds for the dowels were made so that the front fabric is only attached around the edges. How does that work for the folds?
If you want to make a blind lining with blackout fabric, you first make the blind using the lining fabric (following this tutorial). Then you apply the nice fabric on the front (the flat side) of the lining blind. You sew the edges together AND you make a seam above each fold of the lining blind. Try to make the seam as close as possible of the seam you made to create the fold in the lining. That way both fabrics are stitch together and the nice fabric will open and close perfectly with the lining. I hope my explanations help you!
Thanks great trutorial , you can use little round rings that are use for lady’s bras straps . it’s a little smaller but work very good, you can get it from craft shops or shops that sold material and sewing stuff
Hi Santie, I never thought of using bras rings but it’s a clever idea! Thanks for sharing the tip.
Can you talk about washing the shades?
You have to remove the rope and you just pull the shade to take it off, it’s easy with the velco. Take the dowels off and then you can cold wash and iron the fabric. You hang back the fabric by fixing the velcro together again. Pass the dowels back into the folds. The last thing you need to do is passing the rope back into each ring and make the knots. I avoid the dryer, I’m to scary they will shrink.
oh, wow, i love those floral window coverings. I have similar ones in purple color. It gaves such a good shade. Mine is from decoshaker from where are those blinds in pictures? I’m thinking to change blinds in bedroom and I’m looking for some ideas. Anyway, really great interior, simple and cozy. Good luck and keep going
hello Monic, The fabric comes from Ikea, I bought it a few years ago so I’m not sure they still sell it!
It’s great ideas. It very helpful as well. Thank you for sharing.
I am using a lightweight cotton fabric. Would it work if I line the fabric with a lightweight cotton? Thank you for the tutorial.
Hello Carol,
Yes it will work. You can hang your fabric in front of the window to see how it will look before starting making the blind. And if you need blinds to keep the room darker you can line them with cotton or blackout lining (it’s what I used in my kids bedroom and it works great).
These were the clearest, easiest directions I have ever seen for this type blind. Why would anyone make those other kinds out of old mini-blinds is beyond me. Beautiful job. I hope to make these soon for a kitchen window.
Thanks for your sweet comment Patricia!
Just wondering if you could put the main fabric and lining fabric wrong sides together and treat it as one piece of fabric before continuing to sew side seams and folds that will hold the dowel rods. Have you tried this before?
Hello Kathie, I never try that before. I guess it can work if both fabric are not too thick. I think if the folds are too thick the blind won’t open and close nicely! I used blackout lining fabric to make the blinds in my kids bedrooms, I first made and sew the folds on the blackout lining and then sew the fabric (flat) on top. Let me know how it works if you decide to give a try!
If I understand you correctly, you only added the 2 inches for each dowel to the blackout fabric and not the front fabric?
Hello Geri, exactly. The folds are in the blackout fabric and the front fabric is flat.
By far, the best tutorial I’ve seen. Do you have any recommendations on how I can make some for my bay windows? They would have to fit inside the window frame.
Thanks Zulin. I guess you have to be very precise with the measurements to be sure the blinds fit in the window frame…maybe they have to be a little smaller than the windows so you would be able to close and open them easily.
You are amazing…well explained this DIY…thank u so much for sharing this…
love poornima
You are welcome, thanks for your nice comment Poornima <3
Great tutorial, thank you for putting this together.
I just had one question, in the initial fabric measuring, you need to add and extra 2inches x number of dowels fabric length to accommodate each dowel. But in your example you have added that to both the length and the width. Is that a mistake? I can’t tell where the width you need extra for seam allowances other than the edges.
Thank you!
Hello Danielle, I checked the tutorial again and the measures I give are correct. I needed a finished blind of 50in. width x 40 in.high. So the fabric I cut was 52 in. (50in. + 2in. for the seams) and the high is 54 in. (40in.+ 2in. for the seams + 12in. for the dowels folds). Let me know if you have any doubt 😉
Hello, what do you do 3 isches supplementary at the front of your blind?
(i’m french excuse me for my bad english)
Hello, i don’ undersand you add 3 inches for the top of your blind but you didn’t add this when you cut your tissue? If i follow your instruction you need 55 in. (40in.+ 2in. for the seams + 12in. for the dowels folds+ 3in. for the top)
Sorry, i’m french and i have a bad english level. 🙂 Thank you for your answer
Je viens de voir que vous etes belge !
Bonjour Marine, Les mesures pour couper le tissu sont celle mentionnées dans la première partie du tutoriel. La raison pour laquelle il faut ajouter 3 in. dans la partie supérieure est parce qu’il faut prendre en compte l’épaisseur de la latte en bois et du velcro. Si on travaille avec la même distance que pour le reste du store, le premier plis sera plus petit que les autres. Ceci dit le store fonctionnera parfaitement mais le plis du haut sera plus court. Voila, j’espère que j’ai répondu a ta question. Bonne couture, et n’hésite pas si tu as besoin d’autres indications.
Thank you for posting these instructions. I am going to do this in our camper. I am not a fan of the fabric-y accordion blinds with the old fashioned valances. These will be a perfect, more modern replacement. Now I will see how well I follow instructions!
Sounds like a fun project! I would love to see your camper blinds, you can tag #ohohdeco if you share your sewing!
Any idea what the cost was involved in making for one window?
The cost mostly depend of the fabric you will choose. The Ikea fabric I used was 5$/yard, so the cost for one blind, which also include dowels, rings and string, was more or less 15 US$
I made these blinds. I absolutely love them. Im on a serious budget and waited for JoAnns to have a big coupon and made them out of burlap, and now I’m going to make them with painters tarp. Thank you so much for this pattern. It’s the most simple to follow one I cam across. I so appreciate people who post things like this for us simpletons. I will continue to use it throughout my home. What an excellent way to ‘upgrade’ the look in the house for half the cost. Bravo!
Thanks Kila! I like your idea of using burlap to make blind…It’s something I would love to try in the future.
Thanks for one of the best tutorials I have seen
I have made roman blinds before ( 14 years ago) and used Velcro on the shade as well as on the window fame. I like the peice of wood idea you used as that will recess the shade into the frame instead of on top of the frame
I had ordered firm plastic dowels from a mail order company and followed directions from a book but lost the directions and sources.
What you have shown is so wonderful. I will be making them for my sons home in
the near future Thank you. Noorjehan
You are welcome Noorjehan! And thanks for your nice comment! Let me know how the blinds for your son turns out 😉
Hi, I can’t see when comments were made or when this was published so hopefully you’re still answering questions haha. What kind of pull rope did you use?
I’ve looked at nylon and polyester braided rope but everything I find is either much thinner or much thicker and looks way to slippery. Anyway, I made these and the instructions were fantastic and they were very quick to make! Thank you!!
Hello Kelsey, I used synthetic rope (not sure if it’s polyester) I made several knots and add a little glue (silicone) to hold the knot together because you are right, it’s a little slippery. With the use, I found out that synthetic rope hold more time than natural fiber (cotton).
Your roman blind looks great ,your directions are straight forward, just what I need, and I get to recycle my old blinds ,
Thank you !
Thanks Wendy!
Luv ur work keep i coming!!!
My shade is 70 inches wide. I am thinking I would need to add at least one or more rows of rings and screw eyes at the top of the board – what are your thoughts?
Like it. And I have just the place for a set. 🙂
I have been wanting to do this for ages, wonderful clear steps, thank you so much
This is awesome. I think I’ll try making them for my bedroom window. Thank you for the easy to follow tutorial. Very detailed and very well done.
Thank you for this tutorial! I needed something to cover the window in my metal basement door. This worked great! I used sticky Velcro to attach the Roman blind to the door and then used two pulls, one on each side, with a command hook that I could attach the pulls to when it’s open. That helped me not have to put holes in my metal door. So thank you!
Hello Cari, Thanks for your message. I’m glad my tutorial helps you sew a blind that works for your door.
Hi ! In the beginning of your post you included a link for a DIY Roman Shade hardware set. Have you ever installed pulleys with the rope to help guide the shade when opening and closing? I wonder if it would make for a smoother opening and closing of the curtain? I ask because I plan to make for my daughter’s room and anticipate opening/ closing the blinds multiple times a day ,so I’d like the system to be durable… any thoughts? Thanks!
Hi Caroline, I never installed the pulleys set but I think it’s worth it if you plan to open and close the blinds often. I made all the blinds for my kid’s bedrooms and I had to change the rope because it was worn (I had to change it after 3 or 4 years of use…I can’t remember exactly). Let me know your thought if you decide to give a try with the pulleys.
I made them!!! 🤗🤗🤗 just finished them. Now next step is to install them. They are very easy to make.
And the explanation of the measures was the best, and also easy!!!
Thankx a lot for all the training.
I’m so glad my easy tutorial helps you to sew your blinds. Enjoy!
I can’t nail anything to the wall so I want to put them on a curtain rod. It says these have a rod pocket, so I’m confused about how they install.