
I wanted to make a barbie house for a long time. I remember having a good time as a kid playing and decorating my dollhouse. I don’t like the barbie house you can find in stores: too pink, too plastic and too expensive. I choose to make a very simple one. First, because it was the easiest to build, but also because it’s the most versatile.
[ This post probably contains affiliate links, our full disclosure policy is really boring, but you can read it HERE ]
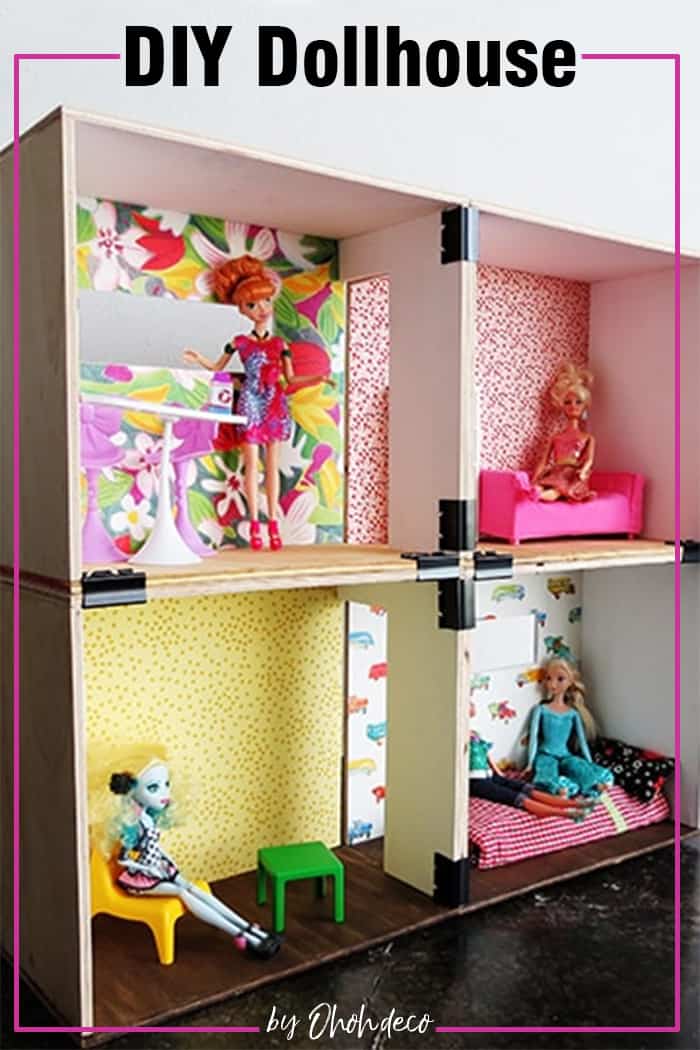
Basically, it’s just a few wooden boxes you can assemble the way you want. You can attach them together with big paper clips. My kids love to play with, they make a tower, a four-bedroom villa, or a condo…I may add some more boxes in the future.
It’s made out of plywood but you will only require a few tools. Remember that you can ask your hardware store to make the cut for you.
How to build a DIY dollhouse
Materials you will need:
- 9mm plywood
- 1 inch nails
- wooden glue
- Saw
- Jigsaw
- Hammer
- Drill
- Paint
- Some nice papers
RELATED: How to make a sock doll
RELATED: How to make your own dominoes

I will explain to you how to make one room, then you can repeat the process as many times as you like to build the wood dollhouse the size you want. You first need to cut the five box sides to build the room:
- 2 pieces of 22cm x 40cm to make the floor and the roof (8 2/3 x 15 3/4 in.)
- 2 sidewalls of 34 cm x 21 cm ( 13 1/3 x 8 1/3 in.)
- 1 back wall of 34cm x 40cm (13 1/3 x 15 3/4 in.)

Trim a door in one of the sidewalls, the opening dimensions are 9cm x 29.5cm (3 1/2 x 11 1/2 in). This is optional, but I think it’s fun if dolls can “walk” from one room to another.

In some of the boxes, you can make a window. You will need a drill and a woodworking jigsaw to do so. Draw a rectangle of 22cm x 7cm at 8 cm from the top. Be sure to center it on the wall.
Note that you can make a window the shape and the size you like, a horizontal cut give the dollhouse a modern look.

Drill four holes in each corner, I use a 1/4 drill bit. Once the holes are made you will be able to slip the jigsaw blade in it to cut the rectangle shape.

Sand all the pieces, insist on the edges to have smooth finish surfaces.

Choose the colors of the dollhouse. I stain the floor and paint the sidewalls and the roof white. To add a little fun I apply a colored paper on the back wall. I tried different glue to apply paper on plywood, and the one that works best was my kid’s school glue stick.
Know that you can also order dollhouse wallpaper. There is different color and texture, the best is that the wallpaper is made at a dollhouse scale. You can find tiles, wood flooring, and a lot of other cute decorations you can use to customize your dollhouse.
Once you are done with the wall decoration, you can start assembling the box.

You need to glue and nail all the sides together. Start with the floor and the back wall, put some glue, and nail. After a few fail nailing, I found out that it was much easier to drill a small hole first and then put the nail. Do what works best for you.
UPDATE: I made some more boxes to enlarge the dollhouse and I only used glue and trigger clamps to build the box. The boxes hold perfectly in time, even without the nails.

Then glue and nail the sides, and finish with the roof.

Tadaaaam the first room is done!! Repeat the same process to do more boxes.

For now, we have a four rooms dollhouse. We will think of some extension later.

Kids can play with the boxes on the floor. But you can also put them on top of each other and construct different houses.
The dollhouse is made for barbie doll size, but you can also decide to keep on with more DIY and make your kiddo some cute fabric dolls to play with.
To prevent any accident, like a wooden box falling on a little toe, you can attach the boxes together with 2″ paper fasteners. They are easy to use and to remove when you want to change the box arrangement.
If you have small kids you may want to remove the arms of the clip for more safety. Older kids can have fun playing and moving the boxes by themselves.
RELATED: 15 Cute crafts ideas for kids and teens
RELATED: Kids playroom ideas

And a few more pictures…

I purchased a set of doll furniture at Ikea, but we need to complete the decor. If like me you are thinking about making some, I found this great round-up post with DIY ideas to make barbie furniture.
Don’t hesitate to drop a link in the comment if you have more tips about doll furniture.


It was such a fun project to make. She plays all afternoon with the dollhouse. I already plan some dollhouse improvements, like extra furniture, a swimming pool, and a garden. Finally, I’m maybe the one who enjoys the most the new dollhouse…I promise I will share it with my kids!!
UPDATE: it’s been 3 years since I made the dollhouse. As I said I made some extra boxes. My oldest girl, who is nine, still plays with it and hacked the decoration a little (understand sharpie drawing). She has to share the barbie house with her 2-year-old sister, which often ends with an argument.
I tell you this to tell you that this homemade dollhouse holds very good and I’m so glad I took the time to make a wooden house instead of buying a plastic one. Let me know if you decide to make one, I would love to see your houses and your kids playing with it!
If you like to see my kid’s playroom and have a look at the DIY makeover I made in the room. You will found some great and cheap decor ideas you can apply to your home.


Want to remember it? Save this DIY dollhouse on your favorite Pinterest board
You will find all the tutorials featured in the video on my “Best DIY” page.
Amaryllis


Awesome ?
Thank you!
amazing!
Thanks Anna!