
Today is the day I can finally share the playroom makeover with you! If you remember I published some sneak pics of the rainbow wall on my Instagram…that was mid-January, so 5 months after the room is officially finished!!! It was work and doubts and some failures too, but I completed my kid’s room redo and just for that I’m quite proud of myself. I hope you will like it as much as I do.
If you want to organize and decorate a playroom, I’m glad to share what I learn to organize toys, use effective storage and create a pretty decor. I hope it will help you to set up a nice room for your kids. It’s much easier than you think, keep reading and tell me what are your plans for your playroom.
* * *
¡Hoy es el día en que finalmente puedo compartir la renovación de la sala de juegos contigo! Si recuerdas, publiqué algunas fotos del arco iris en mi Instagram … eso fue a mediados de enero, ¡¡Así que 5 meses después la sala esta oficialmente terminada !! Fue mucho trabajo y dudas y cometí algunos errores también, pero completé la remodelación de la habitación y solo por eso estoy muy orgullosa. Espero que les guste tanto como a mí.
Si quieres organizar y decorar una sala de juegos,te comparto lo que aprendí para organizar juguetes, usar almacenamiento efectivo y crear una decoración bonita. Espero que te ayude a crear una bonita habitación para tus hijos. Es más fácil de lo que piensa, siga leyendo y dígame cuáles son tus planes para una sala de juegos.

Kids playroom ideas
First, take a moment to think about the playroom decor you want to create:
- You can create a decor around a theme: like a personage (superhero, princess…) or a place (jungle, farm, space…) or a movie. You can use posters, pictures or some accessories your kids already have to create the decor around them.
- If you want something a little more neutral you can choose to work with a pallet color you like. I find it quite hard to create a color palette that works, so I give you my trick: choose a piece of fabric you like and want to use in the room (curtain, cushion…) select a few of the colors that come on the fabric and use them to paint the room and some accessories. Try to balance light and dark shade harmoniously.
How to organize the toys?
Before starting any decorating, you must sort the toys (my personal nightmare). Identify what your kids like to play with the most, organize them by category (dolls, matchbox cars, legos, stuffed animals, dinosaurs, books…) and get rid of the broken and unused toys.
Now that you have the toys you want to keep you can evaluate how much storage you need. This will help you to decide if what you have work of if you need to find more storage options. When choosing the storage, keep in mind that it’s easier to organize the toys by categories. I find that drawers, boxes, and baskets are the most practical options. If the drawers are too big, you can use open boxes or plastic containers to compartmentalize them.
If kids of different ages will use the playroom try to have different storage high. Put the baby and toddler toys in the lower drawers or in basket stored on the floor. Place the toys for growing up kids (lego, board games, books…) on shelving or on top of the furniture. This will prevent eventual accidents of a baby chewing small pieces and it will help to keep the room more organized, as a toddler won’t reach the growing up toys like board games and legos, and spill all the boxes on the floor.
What to use on the floor?
Kids sit and play on the floor most of the time, so it’s important to think about the floor covering when redecorating your playroom. The first option you may think about is a rug. It’s comfortable and warm and the kids will surely like it. It may not be the best option, as in my opinion, I find a rug hard to clean. Who wants to scrub dry Playdoh, clean stain of paint or remove Crayola crumbs out of a nice rug?
The second option, and maybe the most popular, are the foam mats. They are comfortable and easy to clean, but in general not very nice looking. If you already own some, you can paint them. I did it in my kid’s playroom and I’m very happy with the results, even if it was a lot of coat of paint. If someone knows about good looking foam mate, please let me know in the comment!
The third and last option is to use an outdoor rug. You can find a very nice rug pattern, they are long lasting and easy to clean, maybe not as comfy as foam mate or regular indoor rug trough.
I hope these few tips will help you to decorate and organize a nice playroom for your kids. You can keep reading if you want to see what I did in my kids room.
* * *
Ideas para una sala de juegos
Primero, tómate un momento para pensar en la decoración de la sala de juegos que deseas crear:
- Puedes crear una decoración alrededor de un tema: como un personaje (superhéroe, princesa …) o un lugar (selva, granja, espacio …) o una película. Puede usar carteles, fotos o algun accesorio que tu niño o niña ya tienen para crear la decoración.
- Si deseas algo un poco más neutral, puede elegir trabajar con una paleta colores que te gustan. En lo personal me resulta bastante difícil crear una paleta de colores que funcione, así que te doy mi truco: eliges una tela que te guste y que quieres usar en la habitación (cortina, cojín …) selecciona algunos de los colores que vienen sobre la tela y úsalos para pintar la habitación y algunos accesorios. Trate de equilibrar los colores claros y oscuros armoniosamente.
¿Cómo organizar los juguetes?
Antes de comenzar a decorar, debes ordenar los juguetes (mi pesadilla). Identifiquas con cuales juegan tus hijos, organícelos por categoría (muñecas, carritos, legos, peluches, dinosaurios, libros …) y dezaste de los juguetes rotos y que no utilizan.
Ahora que tienes los juguetes que deseas conservar, puedes evaluar la cantidad de almacenamiento que necesitaras. Eso te ayudará a decidir si puedes ocupar lo que tiene o si necesita encontrar más opciones de almacenamiento. Al elegir el almacenamiento, tengas en cuenta que es más fácil organizar los juguetes por categorías. Para mi los cajones, cajas y cestas son las opciones más prácticas. Si los cajones son demasiado grandes, puedes usar cajas abiertas o recipientes de plástico que colocas adentro para compartimentarlos.
Si niños de diferentes edades van a usar la sala de juegos, tratas de tener diferentes alturas de almacenamiento. Coloquas los juguetes para bebés y niños pequeños en los cajones inferiores o en unas canastas almacenada en el piso. Pones los juguetes para los niños mas grandes (legos, juegos de mesa, libros …) en repisas o encima de los muebles. Esto evitará un eventual accidente de un bebé masticando trozos pequeños de juguetes y tambien te ayudará a mantener la habitación más organizada, ya que un niño pequeño no llegará a los juegos de los grandes, como juegoas de mesa o legos, ni derramará todas las cajas en el piso.
¿Qué usar en el suelo?
Los niños se sientan y juegan en el piso la mayor parte del tiempo, por lo que es importante pensar en el revestimiento del piso al redecorar tu sala de juegos. La primera opción en la que puedes pensar es en una alfombra. Es cómodo y cálido y a los niños seguramente les gustará. Puede que no sea la mejor opción, ya que en mi opinión, una alfombra es difícil de limpiar. ¿Quién quiere rasgar plastilina, limpiar una mancha de pintura o levantar migas de crayola de una bonita alfombra?
La segunda opción, y quizás la más popular, son los tapetes de foami. Son cómodos y fáciles de limpiar, pero en general no son muy bonitos. Si ya tienes algunos, puedes pintarlos. Lo hice en la sala de juegos de mis niños y estoy muy contenta con los resultados, aunque se tiene que aplicar muchas capas de pintura. Si alguien sabe acerca de unos bonitos tapetes de foami, comparten en los comentarios.
La tercera y última opción es usar una alfombra para terraza. Puedes encontrar muchos diseños diferentes, son duraderas y fáciles de limpiar, aunque no son tan cómodas como los tapetes de foami o una alfombra de interior.
Espero que estos consejos te ayuden a decorar y organizar una sala de juegos agradable para tus hijos. Puedes seguir leyendo si quieres ver lo que hice en la habitación de mis niños.
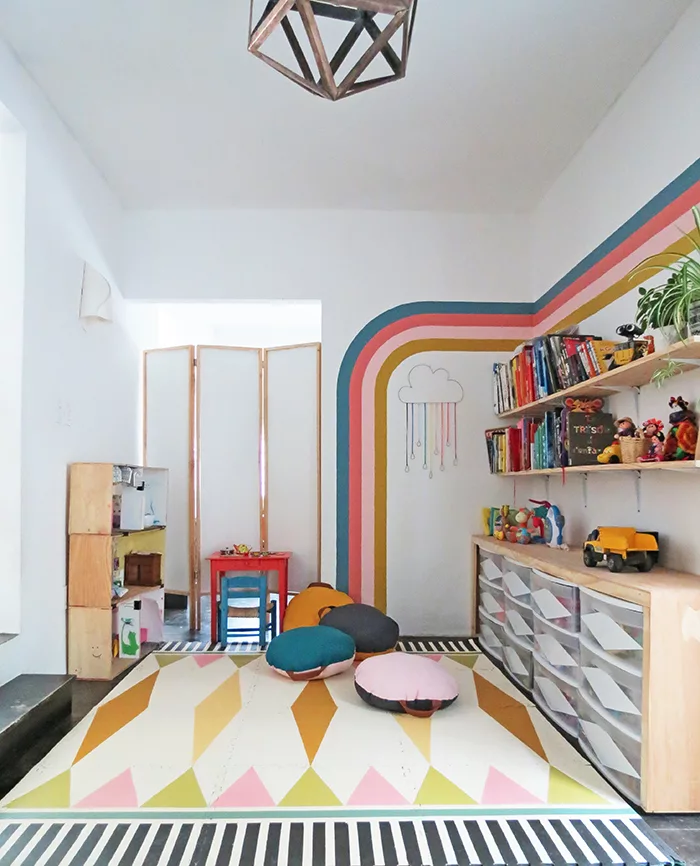
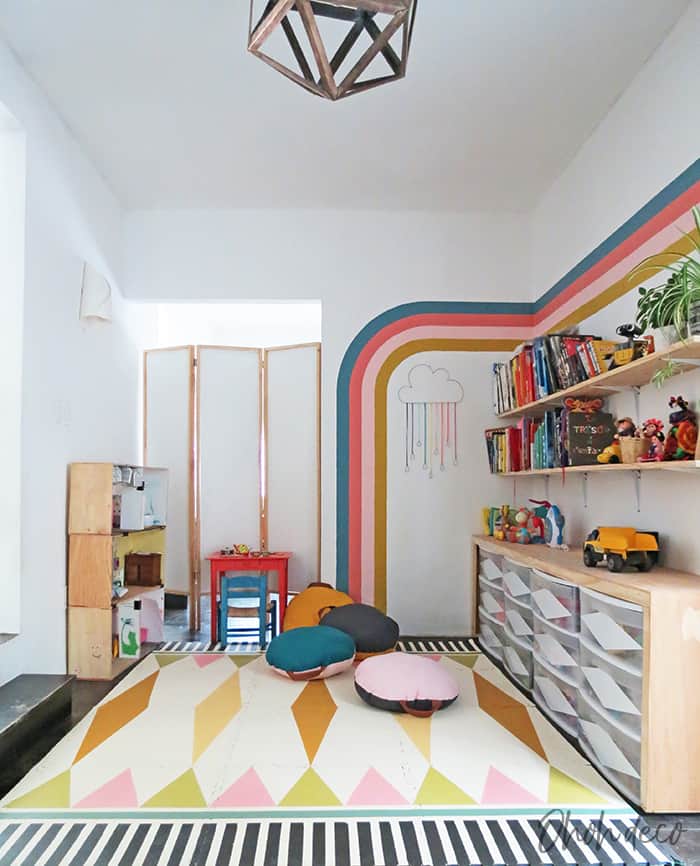
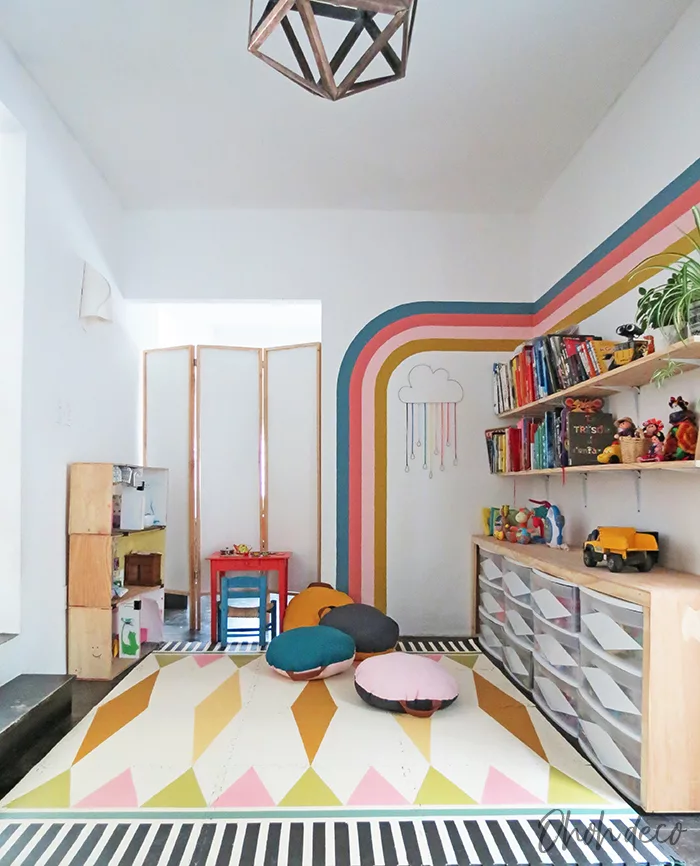
My playroom makeover
As you know me, there were a lot of DIY involved. I like simple and cost effective renovation, so I made a lot of things myself. If you wonder about the budget, I spend a total of 250 US$ for this room makeover. You will find all the details about each project here.
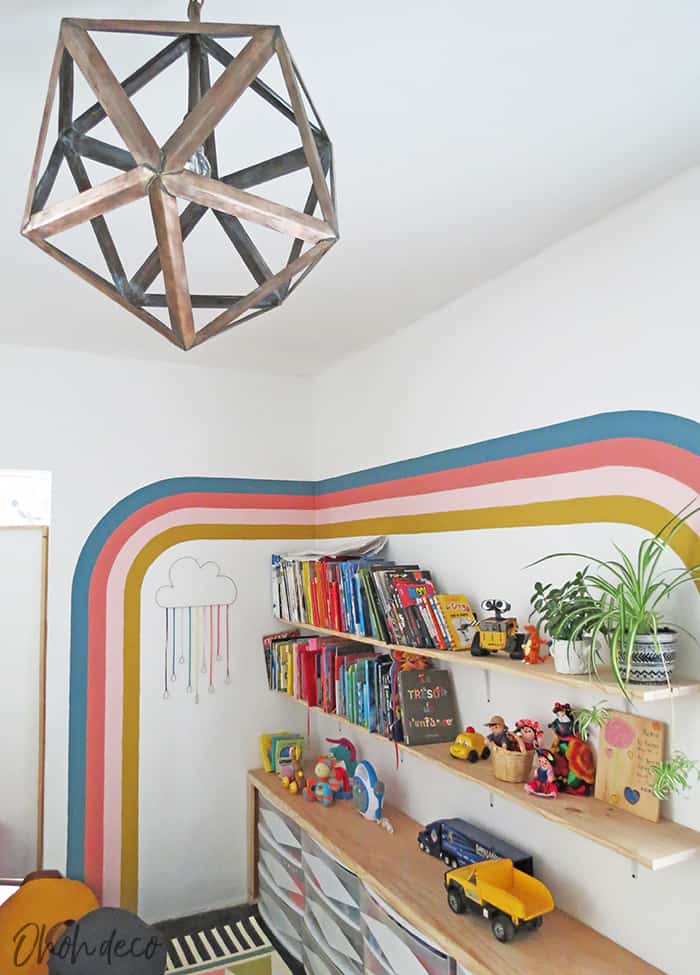
Let’s start with the before. Our playroom is a weird space because there are doors (or openings) on each wall. The room connects with the office, the living room, the entrance, and the backyard. Kids love that a lot because they are always in contact with family life (and they can spread them toys easily across the house), but all these doors limit the layout possibilities. As I already tried different ways to organize the space in the past, I had stuck with the one that works best: a storage unit with drawers and shelves along the wall and a table for drawing in the opposite corner.
* * *
Como me conoces, hubo un montón de bricolaje involucrados. Me gusta una renovación simple y poca costosa, así que hice muchas cosas por mí misma. Si te preguntas sobre el presupuesto, invierti un total de US $ 250 para esta remodelacion. Encontrarás todos los detalles sobre cada proyecto aquí debajo.
Vamos a empezar con el antes. Nuestra sala de juegos es un espacio extraño porque hay puertas (o aberturas) en cada pared. La sala se conecta con la oficina, la sala de estar, la entrada y el patio lateral. Les gusta a mis niños porque siempre están en contacto con la vida familiar, pero todas estas puertas limitan las posibilidades de diseño. Como ya he probado diferentes maneras de organizar el espacio en el pasado, me quedé con la distribucion que mejor funciona: una unidad de almacenamiento con cajones y estantes a lo largo de la pared y una mesa para dibujar en la esquina opuesta.
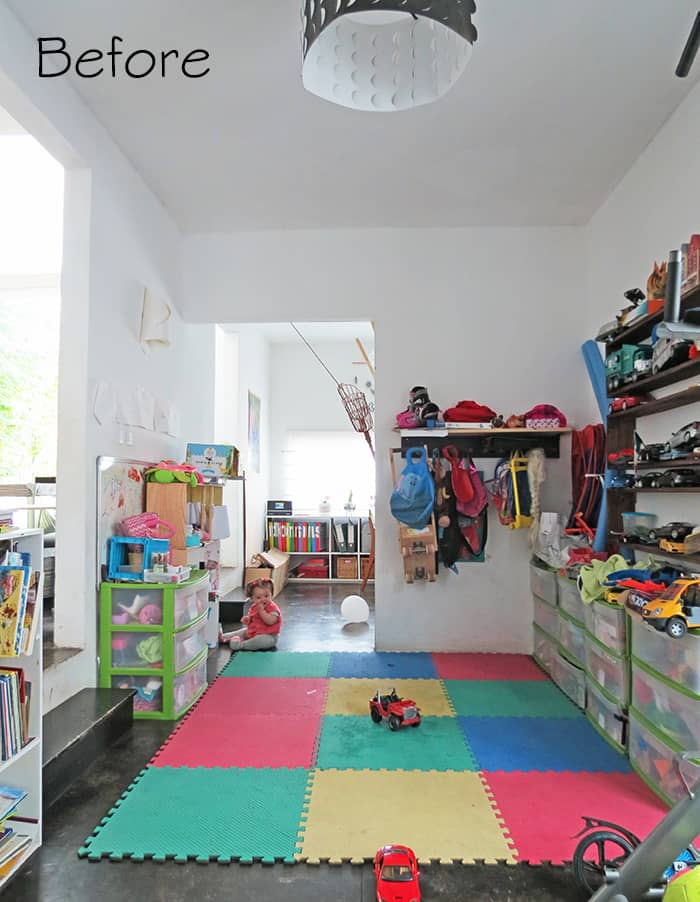

Here is the before playroom. In front, you can see the opening how gives access to the office and on the left the door to the living room. You will find below all the changes and DIY I made to improve the space. As I said I didn’t modify the layout because of all the 4 doors we have in this room, therefore there aren’t many options.
* * *
Aquí está la sala de juegos antes. En frente puedes ver la abertura que da acceso a la oficina y, a la izquierda, la puerta de la sala de estar. Encontrarás aquí debajo todos los cambios y DIY que hice para mejorar el espacio. Como dije, no modifiqué el diseño debido a las 4 puertas que tenemos en esta sala.
- I removed the shelving that were previous DIY projects but didn’t fit well for toys storage.
- I sorted and organized the toys, which allow me to reduce the plastic drawers unit to 4 (instead of 5)
* * *
- Quité las repisas que eran DIY anteriores, pero no me funcionaban bien para guardar los juguetes.
- Clasifiqué y organicé los juguetes, lo que me permitió reducir los cajones de plástico a 4 (en lugar de 5)
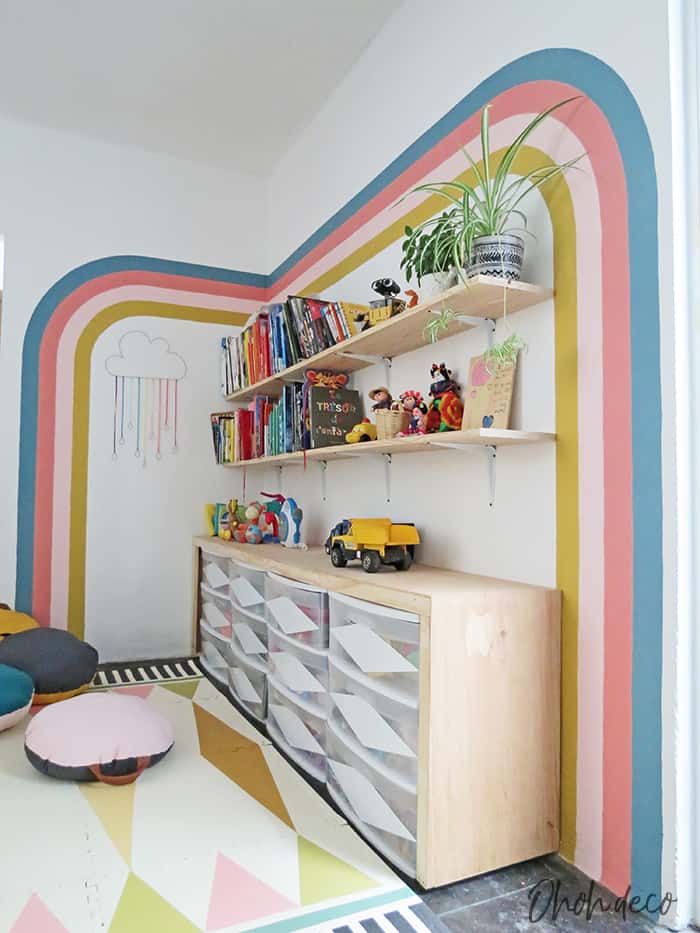
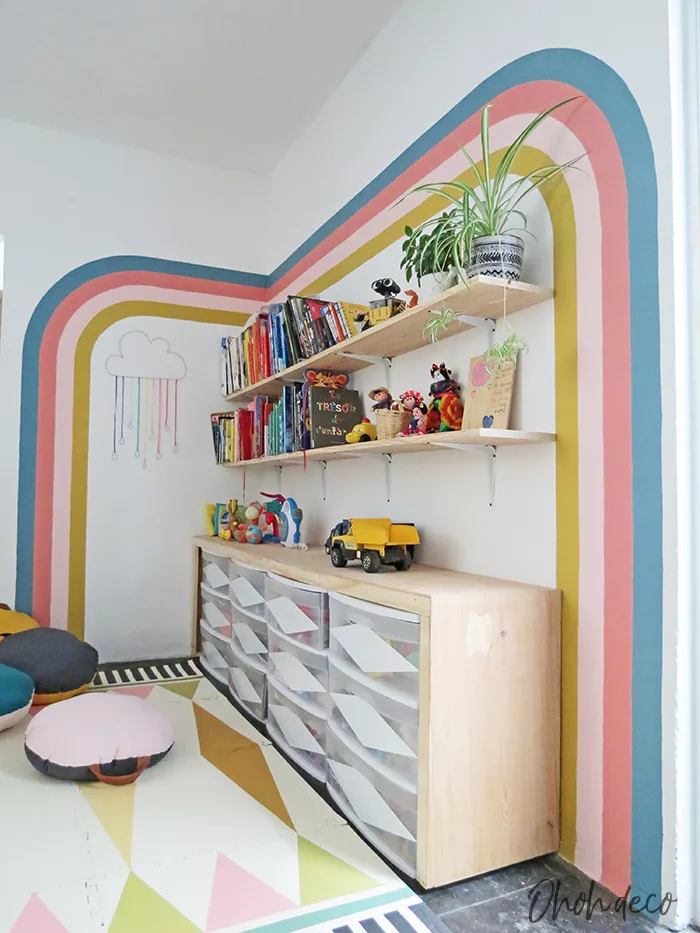
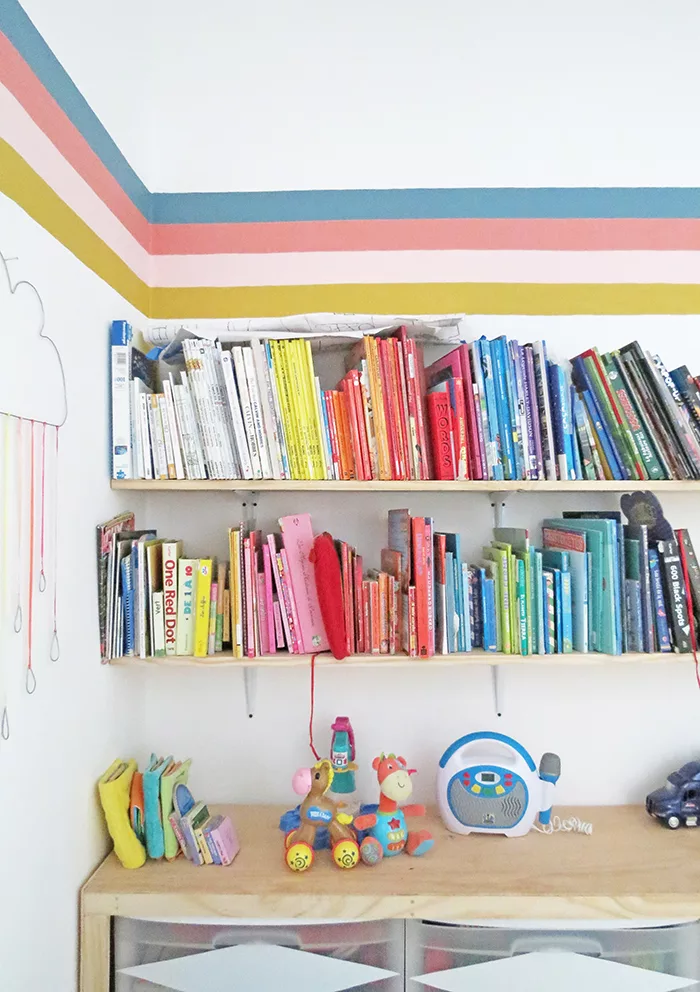
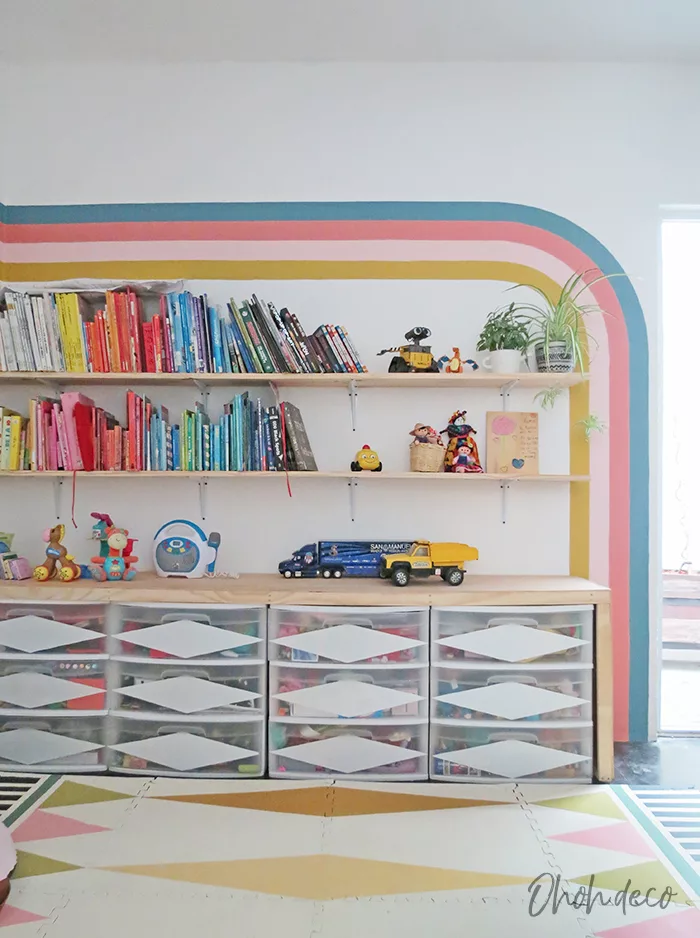
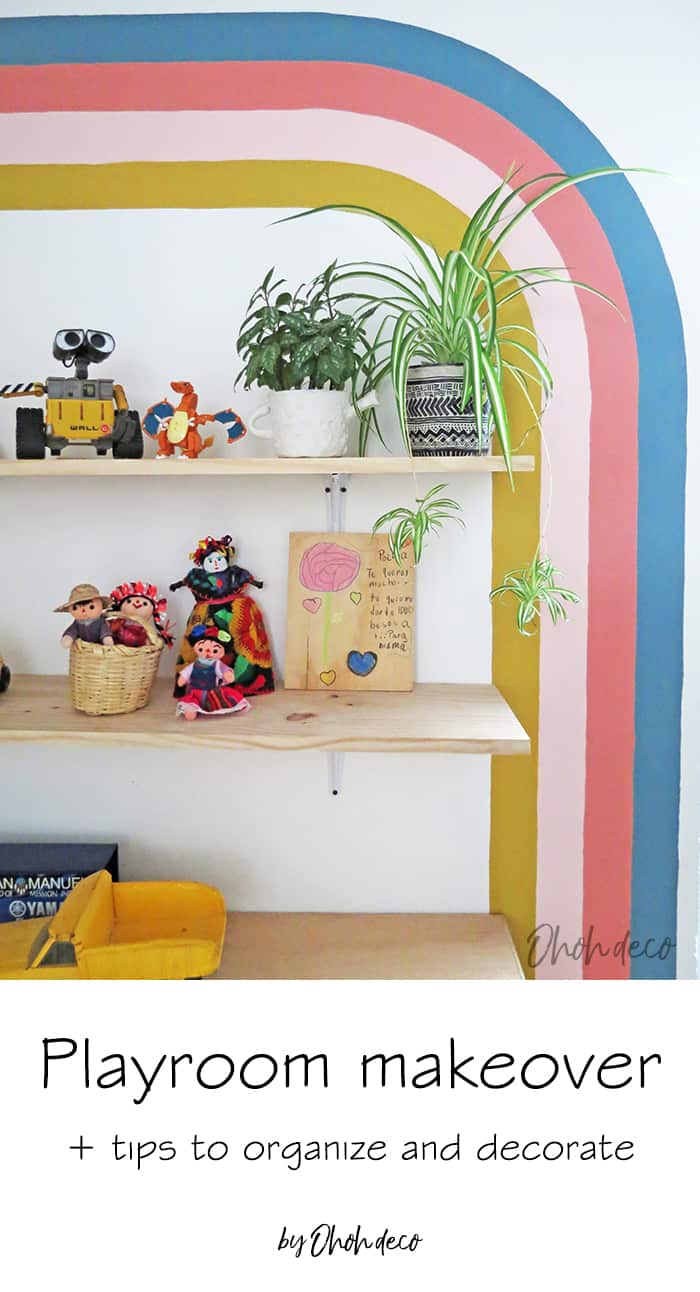
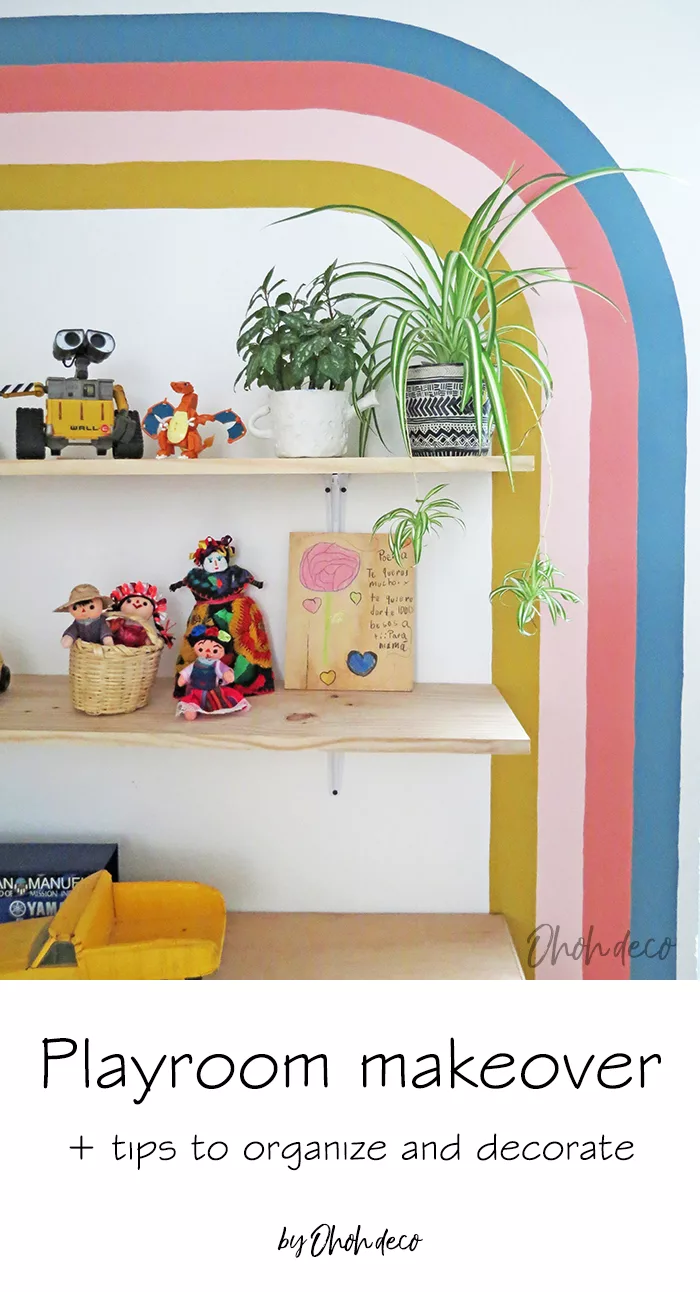
- I painted the walls with a fresh coat of white paint and added a rainbow for a pop of color. I purchase a gallon of white paint and use 4 color sample to paint the rainbow. All the paints I used for this project are from Behr. The rainbow colors are Oarsman blue, Indian sunset, Cupcake pink, and Sweet mustard.
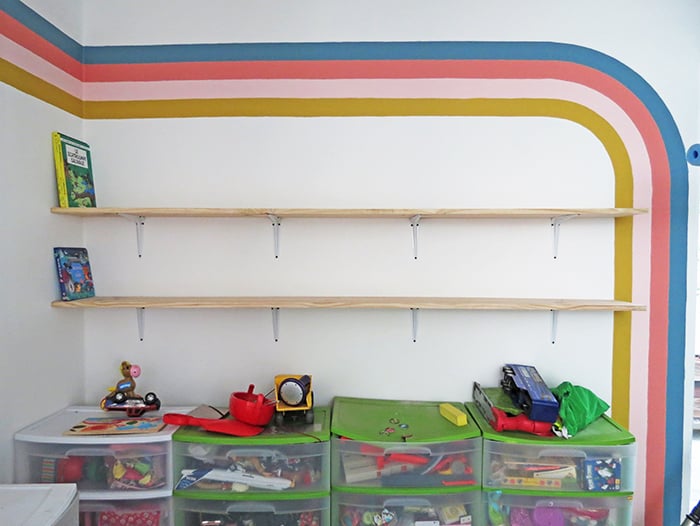
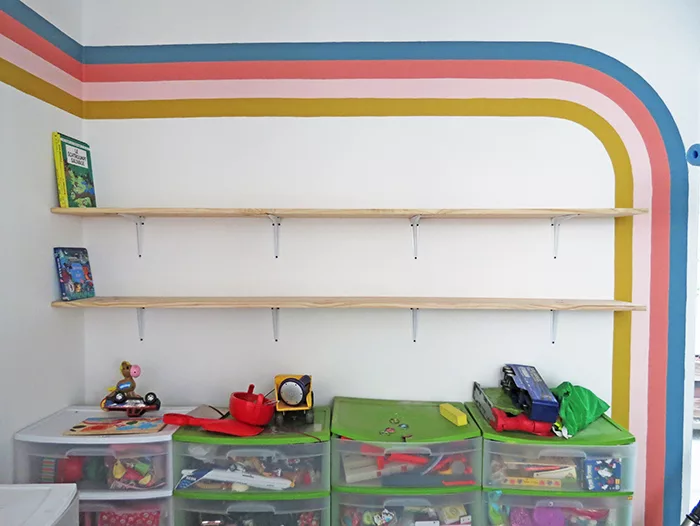
- I placed two planks on the wall to create shelving for book storage and toys, mainly the ones I don’t want my toddler to reach.
* * *
- Pinté las paredes con una nueva capa de pintura blanca y agregué un arco iris para dar un toque de color. Compre un galón de pintura blanca y use muestras de 4 colores para pintar el arco iris. Todas las pinturas que utilicé para este proyecto son de Behr. Los colores del arco iris son Oarsman blue, Indian Sunset, Cupcake Pink y Sweet mostaza.
- Coloqué dos tablones en la pared para crear estanterías para guardar libros y juguetes, principalmente los que no quiero que mi niña pequeña alcance.


- I build a wooden frame around the plastic drawers to have a strong countertop so the kids can use it to play or put some toys. It also makes the plastic drawers look a little nicer and keeps them together. I switched the green drawers for white ones I already had around the house. To hide a little the mess inside the drawers I cut diamond shapes in white adhesive and stick one on each drawer front.
* * *
- Construi un marco de madera alrededor de los cajones de plástico para tener una encimera mas solida que los niños puedan usar para jugar o guardar algunos juguetes. También ayuda a que los cajones de plástico se vean un poco más bonitos y se mantengan juntos. Cambié los cajones verdes por los blancos que ya tenía en la casa. Para ocultar un poco el desorden dentro de los cajones, corte formas de diamante cun un adhesivo blanco y los pege en cada frente de cajón.
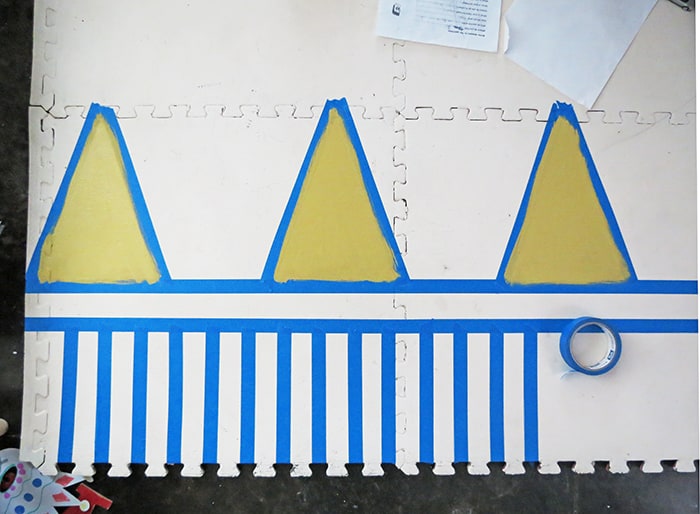
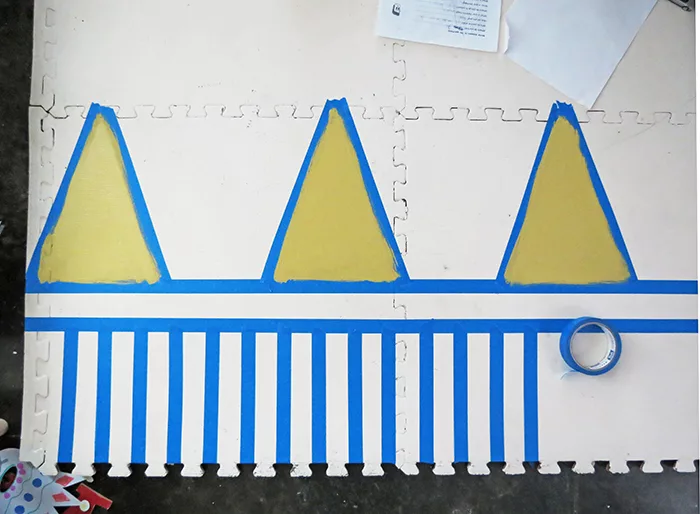
- I painted the old floor mats with two coats of primer, two of color, a lot of masking tape and some paint leftover. I give you all the details in this post (coming soon)
* * *
- Pinté los viejos tapetes de foami con dos capas de primer, dos de color, mucha cinta adhesiva y algunos colores que me sobraban. Te doy todos los detalles en este post (próximamente)
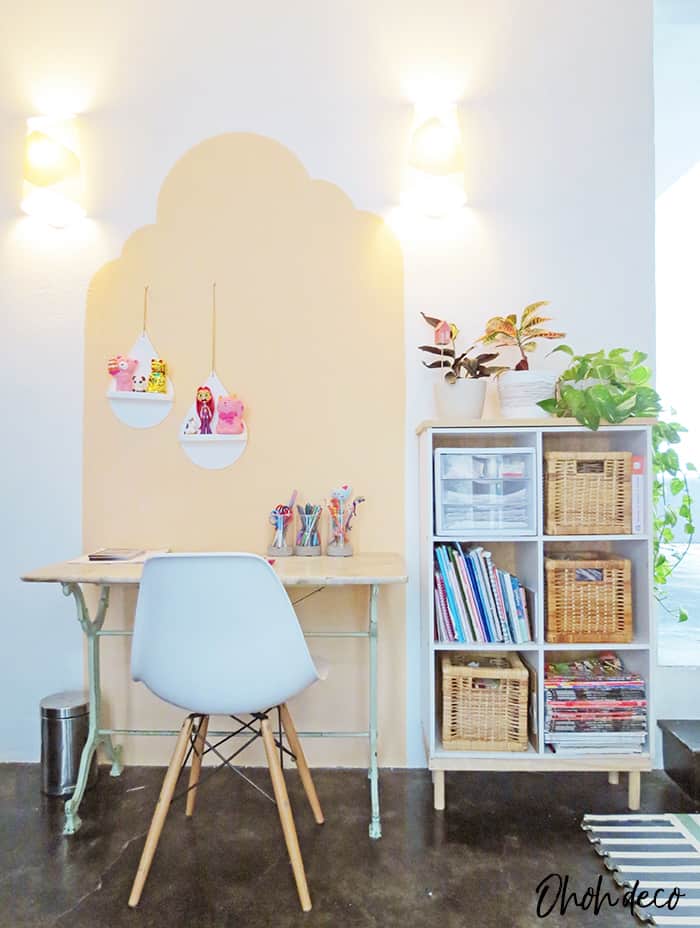
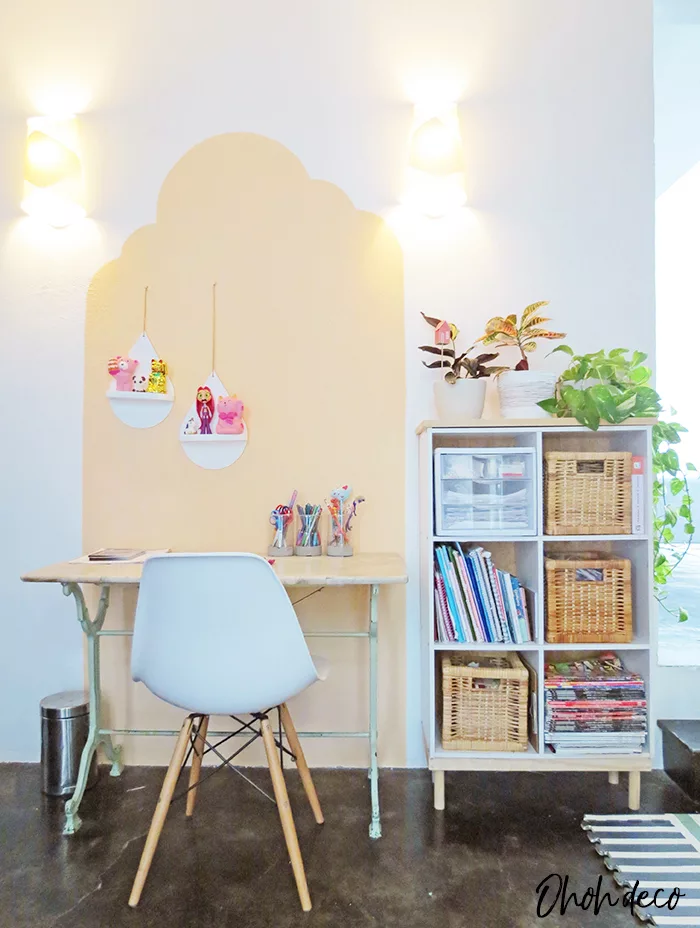
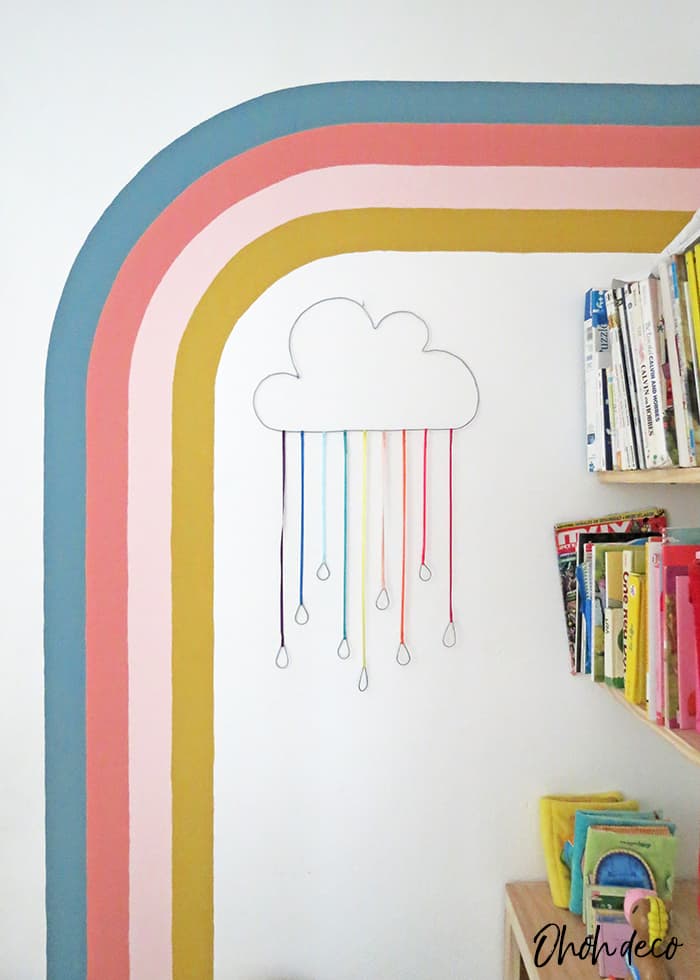
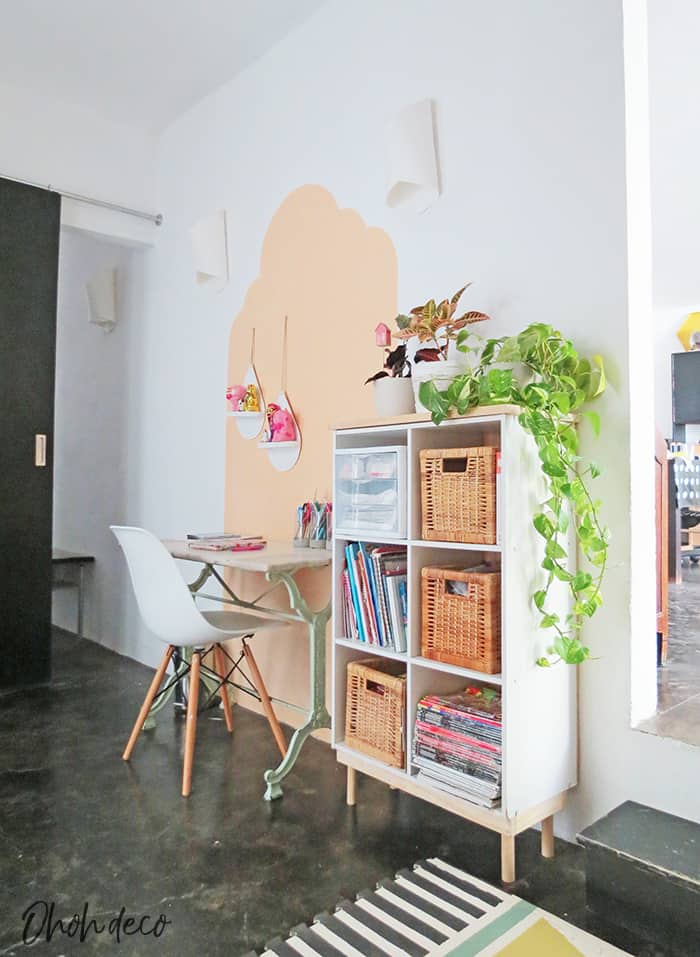
- I refreshed the drawing and craft corner of the playroom with this DIY easy shelf unit makeover and painting a cloud shape on the wall behind the desk. I first painted a cloud the same blue as the rainbow but it was too dark for the room, so I finally switched for Behr shade Tropical fruit. On the wall, I added a cute little DIY drop shaped shelf to display my daughter’s figures collection.
* * *
- Actualicé el rincón para dibujar y hace manualidades con un cubo de repisas y pinté una nube en la pared detrás del escritorio. Primero pinté una nube del mismo azul que el arco iris, pero estaba demasiado oscuro para la habitación, así que finalmente cambié para el tono tropical fruit de Behr. En la pared, agregué unos lindos estante con forma de gotas para mostrar la colección de figuras de mi hija.

- I changed the DIY paper lampshade for a metallic geometric lamp. I tough it would look better in an other color. So I painted it in mustard yellow…totally hated it and spend a all morning scraping the paint to found back the original material!
* * *
- Cambié la pantalla de papel por una lámpara geométrica metálica. Pense que se vería mejor en otro color. Así que lo pinté en amarillo mostaza … ¡No me gusto para nada y me pasé toda una mañana raspando la pintura para recuperar el material original!
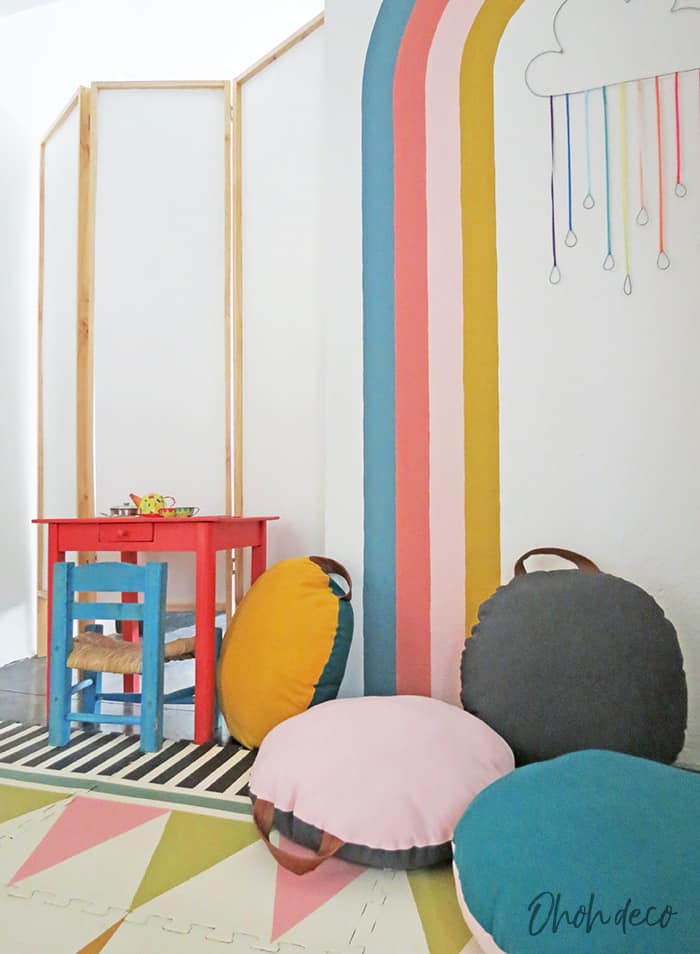

- I have sewn some floor cushions with a handle, so the kids can carry them around, to make a cozy reading corner. You can have a look at my article How to sew a round pillow if you want to make some.
- The little rainbow cloud on the wall is a DIY I made times ago for Dream a little bigger. I finally found the perfect spot to hang it.
* * *
- Cosí unos cojines de piso con un asa, asi los niños los puedan llevar, para hacer un rincón de lectura acogedor. Puedes echar un vistazo a mi artículo Cómo coser una almohada redonda si quieres hacerla.
- La pequeña nube de arco iris en la pared es un DIY que hice hace un tiempo. Finalmente encontré el lugar perfecto para colgarlo.
Now that I made the list of what I did it was quite a big job. If you wonder I did everything myself, from woodwork to painting, mostly during nap time…which explains why the process was quite slow. Maybe I can train my kids to help me with my next makeover? I would love to hear what you think about the room! Don’t hesitate to ask if you have any questions or if I forgot to mention something!
* * *
Ahora que tengo la lista de lo que hiceme doy cuanta que si fue trabajo. Si te pregunta, yo mismo hice todo, desde la madera hasta la pintura, principalmente durante las siestas de la beba … lo que explica por qué el proceso fue bastante lento. ¿Tal vez puedo entrenar a mis hijos mayores para que me ayuden en mi próxima remodelacion? ¡Me encantaría escuchar lo que piensas de la sala de juego! ¡No dudes en preguntar si tiene alguna duda o si olvidé mencionar algo!


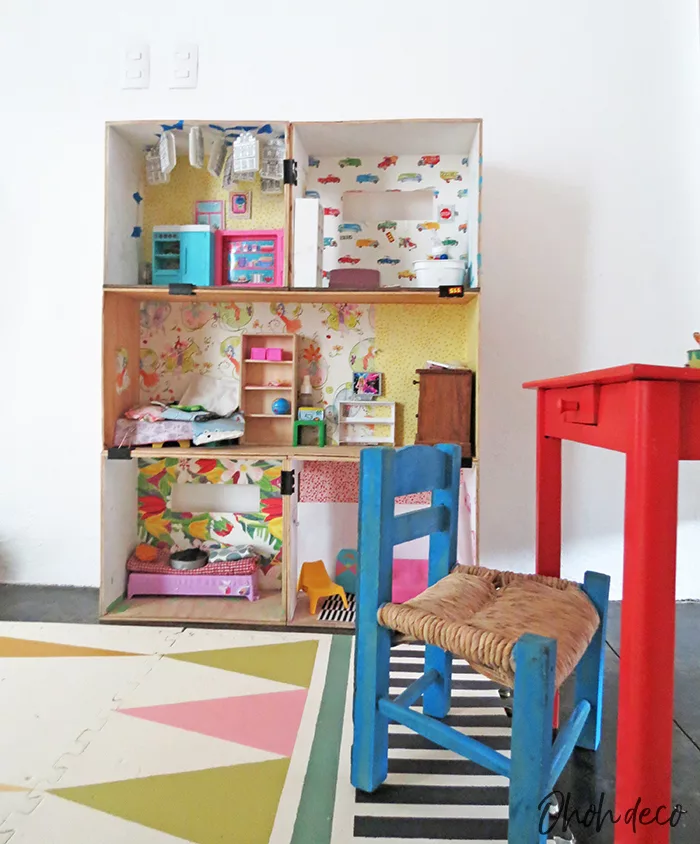
This is the barbie dollhouse I made for my daughter a few years ago. As you can see she customized it a little. You can read the tutorial and find out how to build a homemade dollhouse HERE.
Want to remember this? Save the DIY Playroom Makeover in your favorite Pinterest board.
Amaryllis
Ayla
Thursday 20th of June 2019
Wowwww, realmente ha valido la pena el trabajo, el cambio es espectacular y ahora se ve todo mas ordenado y bonito. La alfombra de foamy pintada no parece la misma. Y ese tablero que reune a todos los cajones de plástico como si fuera un mueblecito con sus cajones es una gran idea. Me encanta todo el conjunto y los colores que has puesto. Besote!!!!
Diana
Sunday 16th of June 2019
Quedo hermoso 😍. Como siempre tienes ideas originales y prácticas. Saludos 🌺
amaryllis
Sunday 16th of June 2019
Muchas Gracias Diana! Intento hacer lo mejor con un presupuesto mínimo! Me alegra que te guste! Saludos
Dinah
Sunday 9th of June 2019
Oh, also, “toddler” stopped me short —-your BABY IS A TODDLER! Ugh. Where does the time go?
amaryllis
Tuesday 11th of June 2019
Yes she is almost two. You can see her as a baby in the before picture...that's the time it takes me to think about the decoration, start doing it and finally finishing the playroom! 😂😂😂
Dinah
Sunday 9th of June 2019
Amaryllis! This is sooo great. Functional for your kiddos and so pretty! People think we decorate (only) for ourselves, but I know as a 60+ year old retired designer, kids pick up and embrace the environment in which they are nurtured. My adult sons had an appreciation for design and architecture from pre-teen on. I don’t take all the credit but I did intentionally inform and encourage it early. The floor mats! I’ll be curious how the paint holds up. What type of paint did you use? I love every idea. Well done, my friend!
amaryllis
Tuesday 11th of June 2019
Thank you so much. I'm planning to write a all post about the floor mats. I painted the primer and the background color 2 months ago and they hold pretty good so far.
patti
Friday 7th of June 2019
this looks wonderful! I love how you re-purposed the giant floor puzzle and painted it. great idea! everything looks so neat and clean. hope it's easy for THE KIDS to pick up and get it back in shape.
amaryllis
Tuesday 11th of June 2019
Thanks Patti! That would be fantastic is they pic up them toys by themselves...even if I'm pretty sure it won't happen! 😀