It’s been 5 years since we move from Belgium to Mexico, and there are still unopened boxes! I have to admit that was easier when we change home two years ago, but it’s time to deal with this problem! I like to take time to find the right place for every item, so it’s kind of a long process. Obviously the perfect solution would be an all-inclusive interior design service, like Boss Design Center McLean VA. We have only a few furniture. So we have to buy or build exactly what we need, which is good as we avoid being cluttered with objects that don’t work in our house. For now, we are moving at our own pace, one small project at a time.
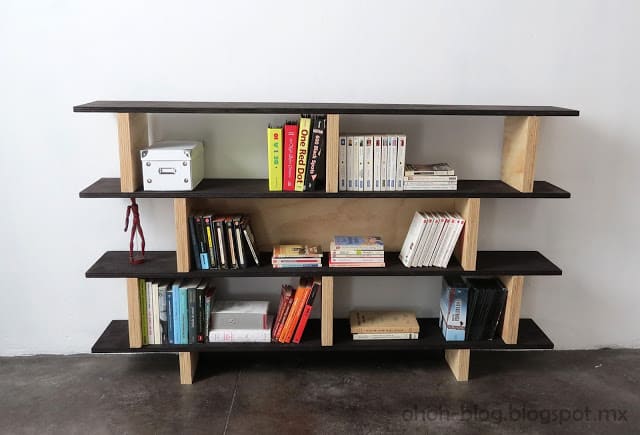
Getting back to our unopened moving boxes, most of them contain books and comics, so a bookshelf was needed! I’ve always loved this Bookcase created by Charlotte Perriand, so I took some inspiration for it. The original is better, but it doesn’t fit in my budget!
Hace 5 años que nos mudamos desde Bélgica hasta México, y aún hay cajas sin abrir! Bueno fue mas fácil cuando nos cambiamos de casa hace dos años, pero ha llegado el momento de resolver el problema!
La mayoría de las cajas contienen libros y cómics, por lo que se necesitaba una biblioteca ! Siempre me ha gustado esta biblioteca creada por Charlotte Perriand, entonces la tomé como inspiration. El original es mejor, pero no cabe dentro de mi presupuesto!
How to build a bookcase
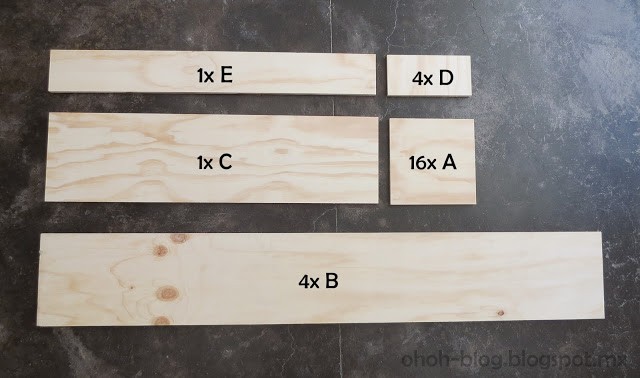
I did cut the plywood boards with a carpenter, at the following dimensions:
Shelves:
A/ 16 pieces of 10″ x 10″
B/ 4 pieces of 10″ x 63″
Back:
C/ 1 piece of 10″ x 36.5″
Base:
D/ 4 pieces of 5 “x 10″
E/ 1 piece of 5″ x 36.5”
Mande a cortar los paneles de triplay con un carpintero, con las siguientes dimensiones:
Repisas:
A/ 16 piezas de 25 cm x 25 cm
B/ 4 piezas de 25 cm x 160 cm
Fondo:
C/ 1 pieza de 25 cm x 93 cm
Base:
D/ 4 piezas de 12 cm x 25 cm
E/ 1 pieza de 12cm x 93 cm
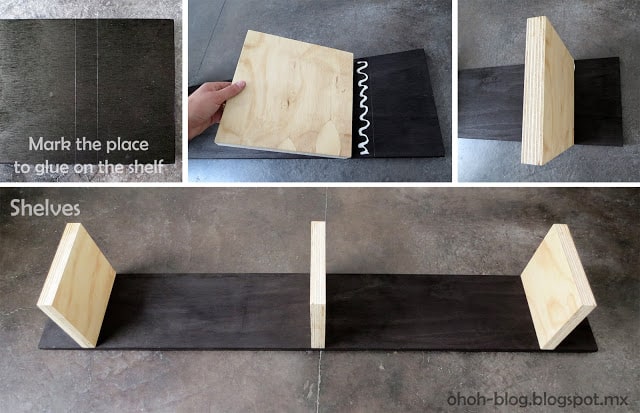
A small sketch to make it clear:

The first step was to glue two by two the “A” pieces, to make the vertical parts. I used wood glue and clamps to hold them together until it was well stuck.
I did the same with the D pieces to make the base.
I sanded all the pieces, flat and edges (booooring part). I stained shelves in chocolate color and applied transparent varnish on the other pieces. I like the contrast between the two colors, this can work with any other colors combinations, give it a try.
El primer paso consistió en pegar de dos en dos las piezas “A”, para hacer las partes verticales.
He utilizado pegamento para madera y abrazaderas para sujetar las juntas el tiempo que se seque el pegamento.
Hice lo mismo con las piezas D para hace la base.
Lijé todas las piezas, bordes y planos (aburriiiiiiiiido). He teñido los estantes color chocolate y apliqué un barniz transparente sobre las otras piezas.
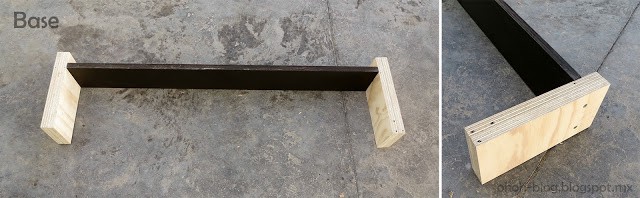
I assembled the D and E pieces to make the base of the bookcase. You have to put the D pieces perpendicular to the E piece, put some glue between the pieces and then fasten with two screws on each side.
Armé las partes D y E para hacer la base de la biblioteca. Tiene que poner las piezas D perpendicular a la pieza E, poner un poco de pegamento entre las piezas y luego fijar con dos tornillos en cada lado.
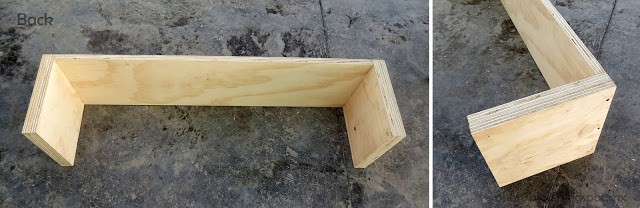
Then I did the same with the C piece and two A pieces (after gluing them 2 by 2) to make the back of the bookcase.
Luego hice lo mismo con la pieza C y de dos piezas A (después de pegarlas 2 por 2) para hacer la parte de atrás del librero.
After, I assemble three A pieces with a B shelve. I put glue on the shelf and lay the A above, be sure they are verticals. I did it twice.
Después, ensamblé tres piezas A con un estante B. Puse pegamento en el estante y coloque la pieza A encima, fijense que sean verticales. Lo hice dos veces.
Almost done, we can start to assemble the shelves, put the base on the floor ad some glue and put a shelve on top. Use clamps or weights (books or toolbox) to have good adherence. Then add glue and put the other part on top, and so on….until the last shelf!
Ya casi terminamos, podemos empezar a armar la partes, colocar la base en el piso, poner un poco de pegamento y poner un estante en la parte superior. Utilice abrazaderas o pesos (libros o caja de heramientas) para presionar y tener una buena adherencia. A continuación, agregue pegamento y colocar la otra repisa en la parte superior, y así sucesivamente …. Hasta el último estante!
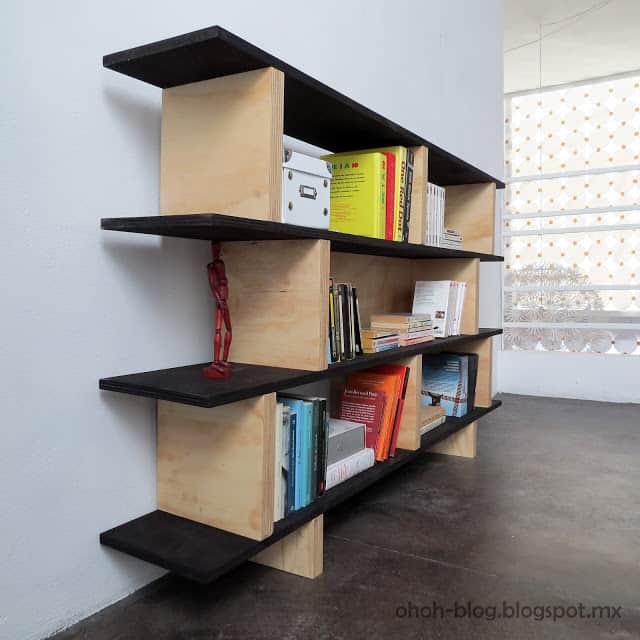
I hope you like it, and that the explanations will allow you to build your own one! Don’t hesitate to leave a comment if you have any questions or doubts!
Espero que les gusta, y que las explicaciones las ayudaran a realisar uno! Preguntan me si les queda duda!
what thickness of plywood did you use?
Hi, I used 16 mm thick plywood.
and you made the A & D double right, to be bold
Right, A & D are double!
You are awesome! Thanks for sharing this wonderful DIY bookcase
Thanks for sharing. I really love this bookshelf.
superbe!
Hi There.
Thanks for this tutorial, my friend and I made this bookcase.
We used 18mm ply as 16 wasn't available in SA and I made the longest part shorter (120cm instead or 160cm)
This was to fit in the space available but it was still too wide for the space so he put it sideways and it looks good!
Making it 120cm made it so it fit onto one sheet of plywood (only cost R450 or $42).
Below is the link to my write up with photos. https://www.facebook.com/woodanddesignsa
https://www.facebook.com/photo.php?fbid=907651452582101&set=pcb.907652622581984&type=1&theater
So nice! Thanks to let me know, you make my day!
I just made this! I used dowels along with glue for extra strength but it worked out perfectly, thanks so much for such a clear walkthrough
You are welcome! I would love to see your bookcase! You can leave a link in the comments if you want to!
I absolutely LOVE, LOVE, LOVE this bookshelf! Thank you so much for sharing and for giving such great instructions and photos! This is definitely going to be my next weekend project…in fact, I am going to make 2 of these…one for each of my son's rooms! I am hoping these will inspire them to keep stuff off the floor! Thank you again…this is absolutely beautiful! And, BTW, I love your stick art wall-hanging that starts as a hexagon but looks like a cube…might have to make that one too!! 😀
Thanks Erin! Have fun making the bookshelf! My kids have a spot in the bookcase to store them books…but they seem to think that's much more practical to spread them on the floor. Let me know how it works with your boys!
This is absolutely fabulous! 🙂
Thank you for sharing! Merci, gracias!
Greetings from Helsinki
Hi Aikku, I'm glad you like it! Thanks for your comment! A bientot, Saludos.
Hi! I'd like to know how much did you spend approximately. I know it's been a long time but I'm on a budget so it would help to know that. Congrats on your blog!
Hello, I would say around 80 dollars. You just need plywood, stain, varnish and glue.
wow it's awesome …. 🙂
Doesn't look like my question was posted properly so I'll ask again…
1) is c necessary?
2) how did you make the edges of the ply look nice?
Hello Joe,
Sorry for my late answer. I didn't saw your message.
I wanted to be sure that the shelf was strong enough. Books are quite heavy and I wanted to avoid any risk of bending, it's why I added the C piece. If you plan on using the shelf for displaying lighter items, I think it will work without the C piece. I asked for the plywood cut at my hardware store, and then I sanded every piece. Starting with a 60 grit paper and finishing with a 150 grit for a smooth finish. I hope it will help you to complete your project! Have fun crafting.
What kind of plywood did you use? Right now I'm thinking I will use birch veneer.
Hello Emma, I used 16 mm plywood. You can pick any veneer finish you like, it will look great.
Hi Ama,
What kind of paint and primer did you use? Thanks!
The black ones are plywood 16 mm too?
Just finished this project! Thanks for the idea it looks really good.
I stretched the dimensions around to make it fit my space and made it 52×60, ended up fitting into 2 sheets of plywood. Made the shelves a little taller, cut the supports an inch more than the shelves so it would overhang, and double stacked it.
https://imgur.com/a/ginLuij
Thanks for sending a pic of your bookshelf! I love your tall version!
i love the stuff you build because I’m building one of your projects. the project I’m doing is bookcase
Thanks Justin. I would love to see how your bookcase turns out once you finish it. You can drop me a email, or tag me on IG @ohoh.deco or FB @ohohdeco
Great post! Love the bookcase! Nice craftwork! Check out some of our carpentry work