If you ask me, the best way to organize the house is by using boxes and bins. I have them everywhere to sort items and easily find what I’m looking for. If boxes work great in general, it’s not the option I will recommend for jewelry storage. Even if using small different boxes, the necklaces end up tangled, earrings never stick in pair and it’s hard to find what you are looking for.
I bet, like me, you have little time in the morning to get dressed up and ready to go, so having jewelry organize and be able to pick the one that matches your outfit in a few seconds is helpful.
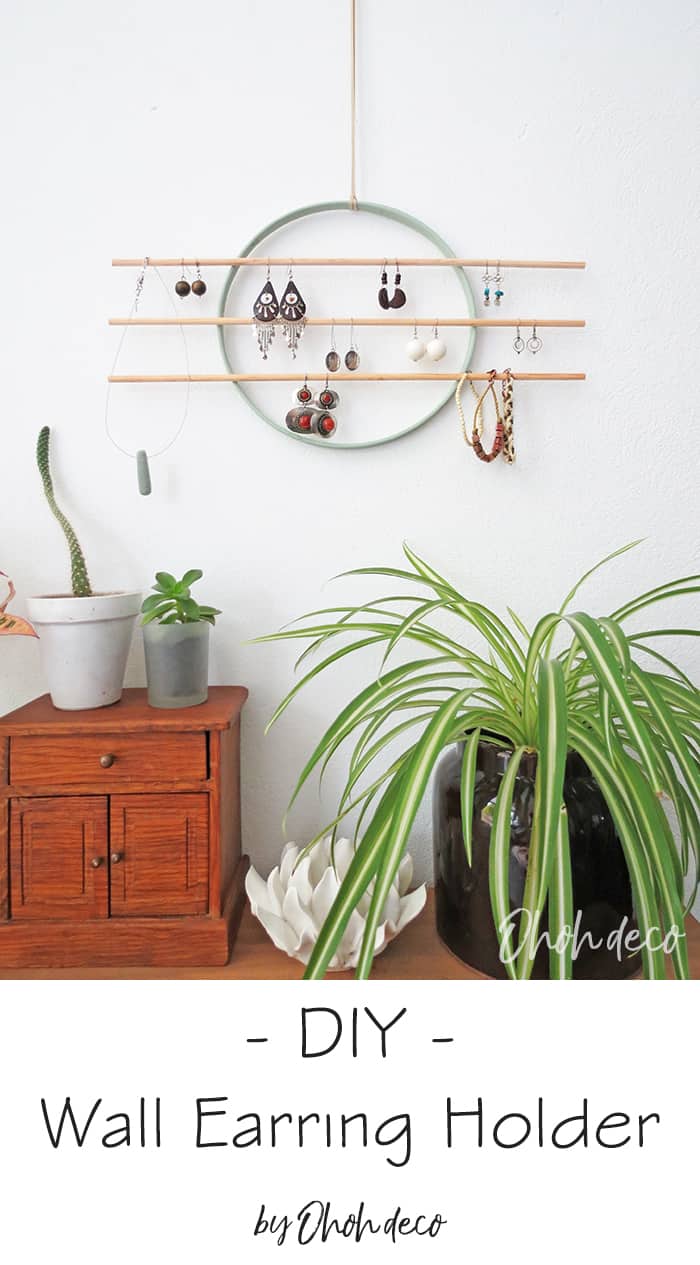
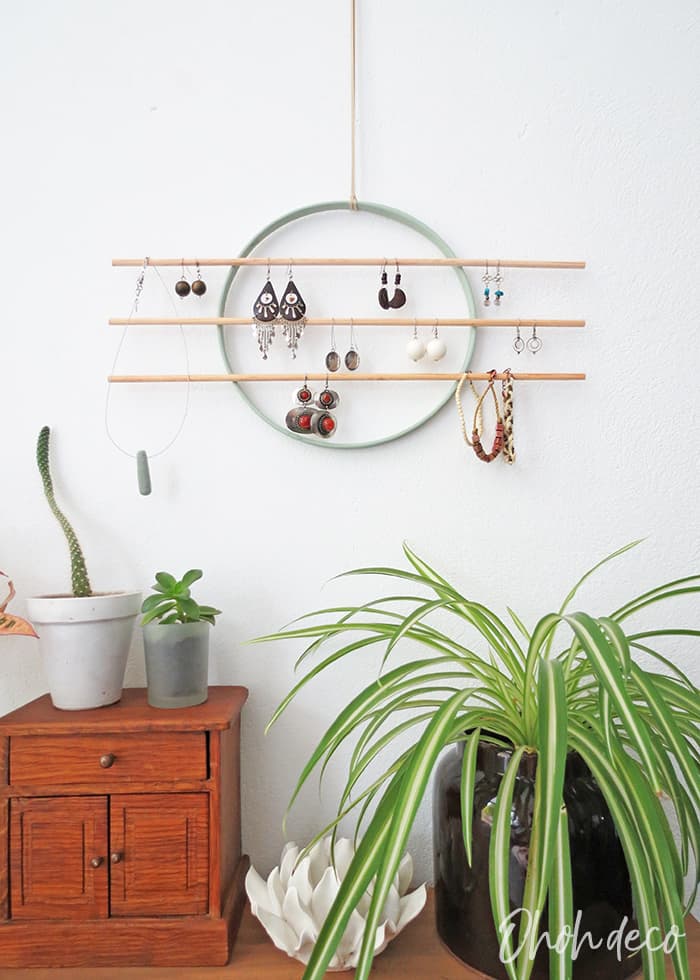
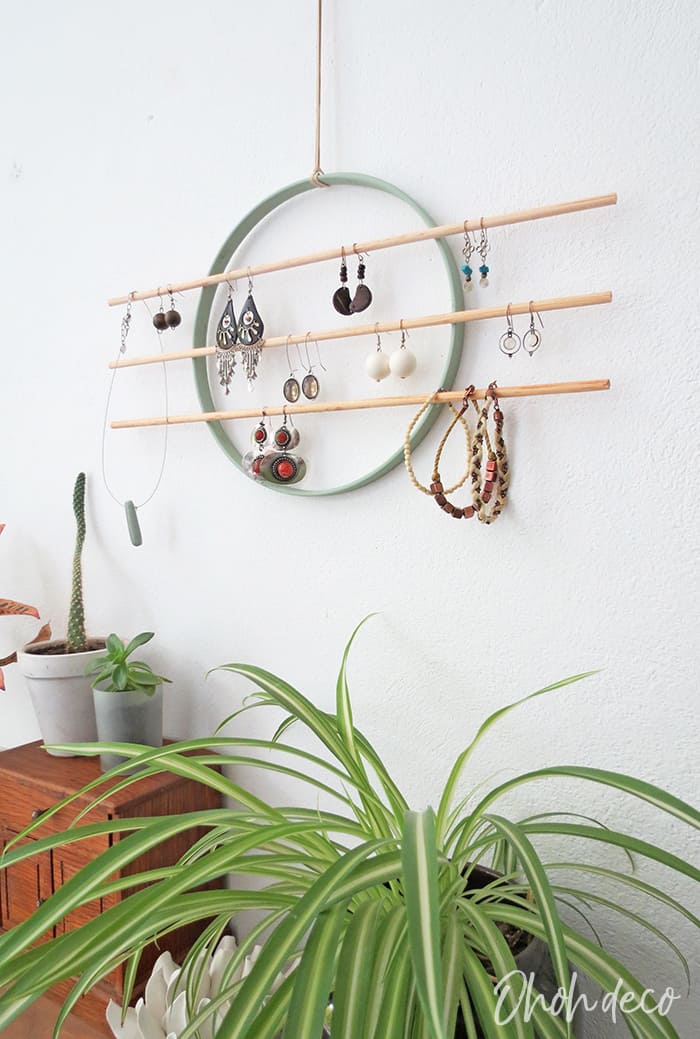
I use a DIY cup stand tree to hang my necklaces but didn’t have practical storage for the earrings. That why I came up with the idea of hanging a few craft sticks on the wall to have earrings on hand and sorted by pair.
This wall organizer is so simple, if you skip the painting, it will only take you 5 minutes to make. It’s pretty and modern so you can easily hang it in your bathroom or bedroom. I’m sure you will enjoy picking your daily earrings in just a second! Let’s make it!
* * *
Si me preguntas, la mejor manera de organizar la casa es usar cajas y contenedores. Los tengo en todas partes para ordenar artículos y encontrar fácilmente lo que estoy buscando. Si las cajas funcionan muy bien en general, no es la opción que recomendaré para guardar joyas. Incluso usando pequeñas cajas diferentes, los collares termina enredados, los aretes nunca se quedan en pares y es difícil encontrar lo que estas buscando.
Apuesto a que, como yo, tienes poco tiempo en la mañana para vestirte y estar lista para salir, por lo que tener tus joyas organizadas y poder elegir las que combinan con tu atuendo en unos segundos es muy útil.
Utilizo un portatasas DIY para colgar mis collares, pero no tenía un almacenamiento práctico para los pendientes. Asi penpeze con la idea de colgar unos palitos en la pared para tener los pendientes a mano y ordenados por pares.
Este organizador de pared es tan simple que, si omite la pintura, solo te tomará 5 minutos hacer lo. Es bonito y moderno, por lo que puedes colgarlo fácilmente en tu baño o dormitorio. ¡Estoy segura de que disfrutarás eligiendo tus pendientes diarios en solo un segundo! ¡Hagámoslo!
DIY wall earring holder
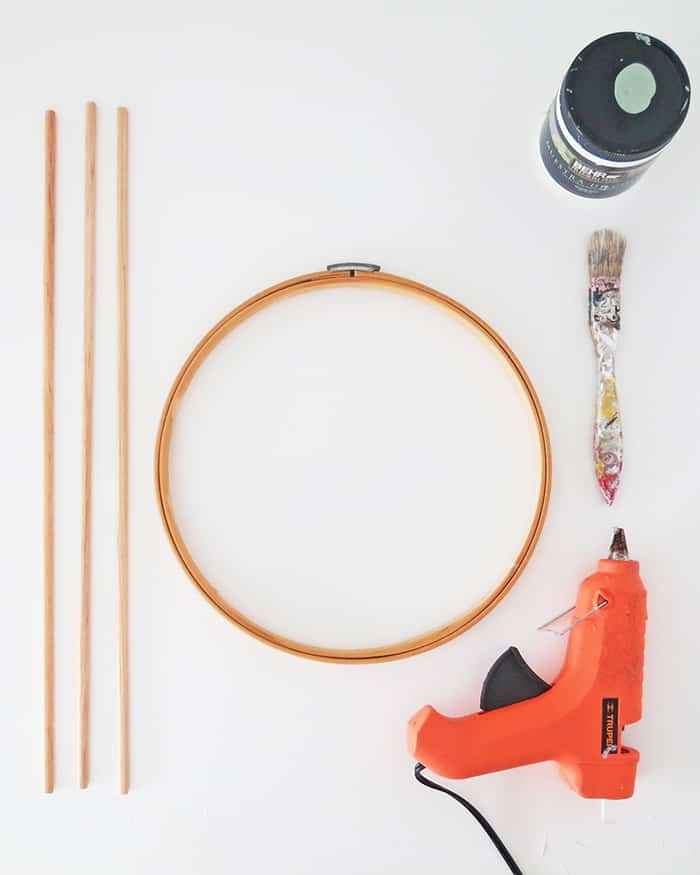
Materials you will need to make your organizer:
- Embroidery loop (10 in.)
- Craft dowels
- glue gun or wood glue
- Paint and brush
- Thin cord or ribbon
* * *
Material que necesitas para hacer tu organizador mural:
- Un bastidor (25 cm)
- Unos palitos para manualidades
- Una pistola de silicon o pegamento para madera
- Pintura y pincel
- Cuerdita o liston
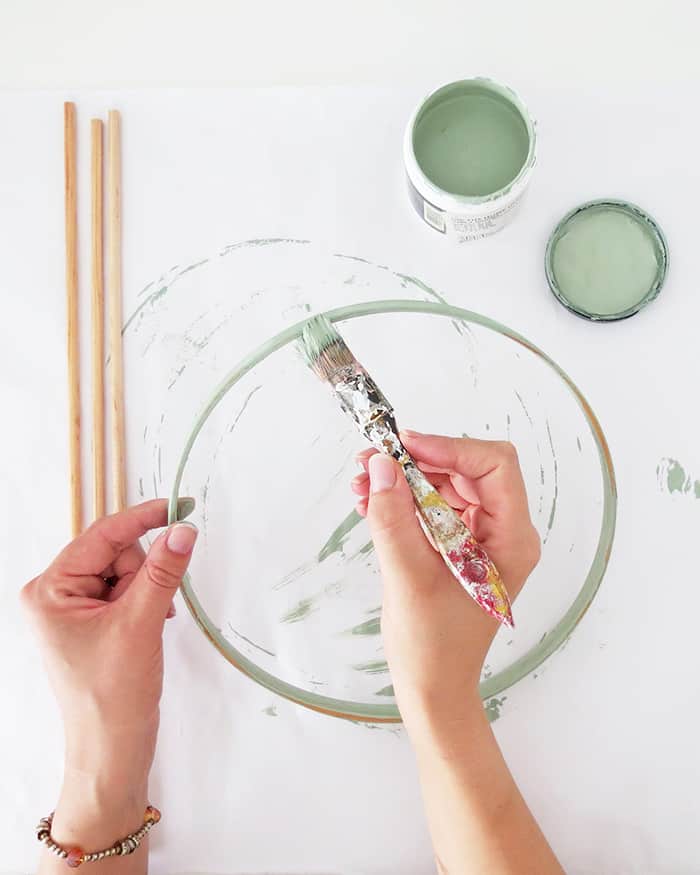
Take the inner part of the embroidery hoop and paint it with acrylic paint, the color you like. I choose mint green. This step is optional and you can leave the hoop as it if you prefer a natural wood finish.
* * *
Tomas la parte interna del bastidor y píntalo con pintura acrílica del color que desee. Eleji un verde menta. Este paso es opcional y puedes dejar el aro tal como está si prefieres un acabado de madera natural.
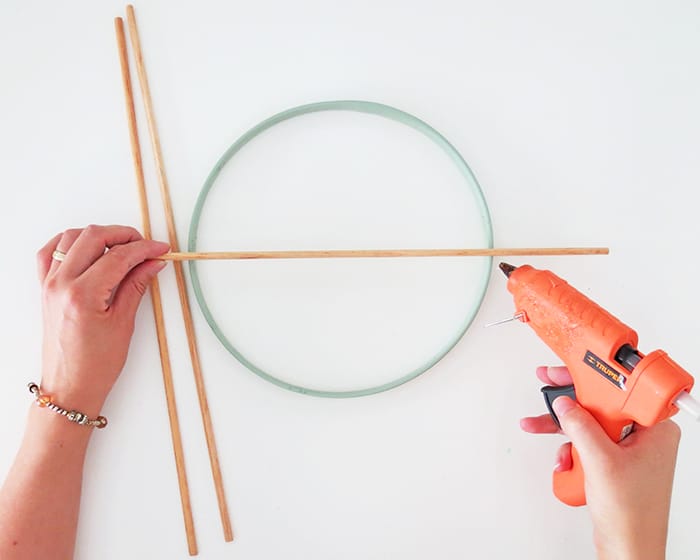
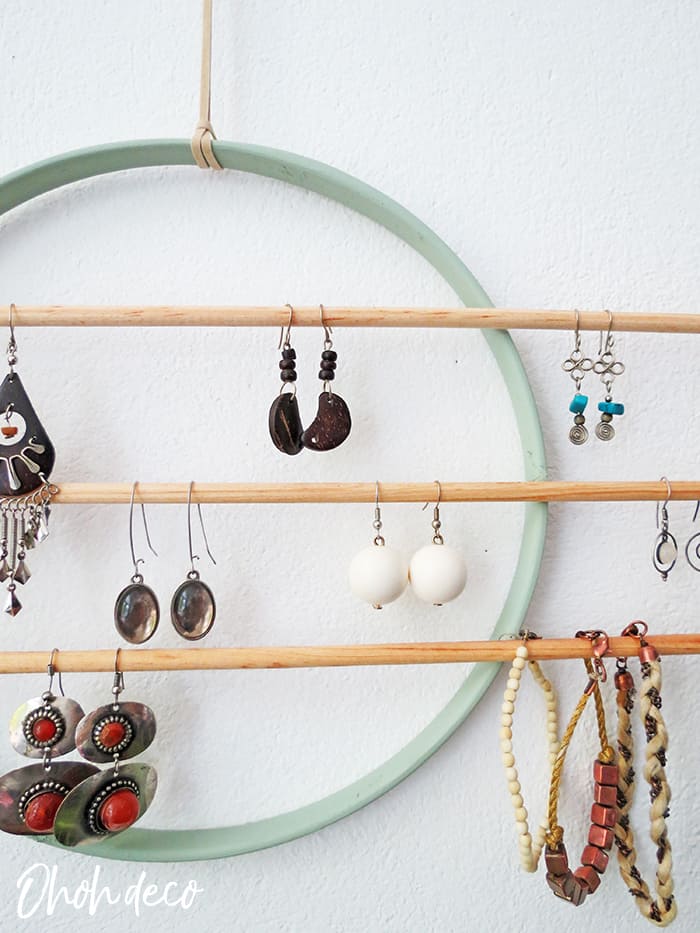
Craft dowels come in different length, I use three dowels of 17 1/2 in. Glue the first one with the embroidery loop, try to place it in the center of the circle. you can measure and make small marks on the hoop side to know where to glue. Press a little the dowel while the glue dry. Once the center dowel is glue place one above and another under, leaving a space of 2 inches between each dowel. The dowels have to be parallel to each other and the ends also have to be aligned between them.
Note that I used a glue gun, but I also gave a try with wood glue and it works perfectly, even if the drying time is a little longer.
* * *
Los palitos para manualidades vienen en diferentes longitudes, yo uso tres de 44 cm. Pegues el primero sobre el aro, intentes colocarlo en el centro del círculo. Puedes tomar medidas y hacer una pequeña marca en sobre el aro para saber dónde pegar. Presiones un poco el palo mientras el pegamento se seca. Una vez que el palito central esté pegado, coloque uno arriba y otro debajo, dejando un espacio de 5 cm entre cada uno. Los palos deben ser paralelos entre sí y los extremos también deben estar alineados entre ellos.
Usé una pistola con silicon, pero también probé con pegamento blanco para madera y funciona perfectamente, solo que el tiempo de secado es un poco más largo.
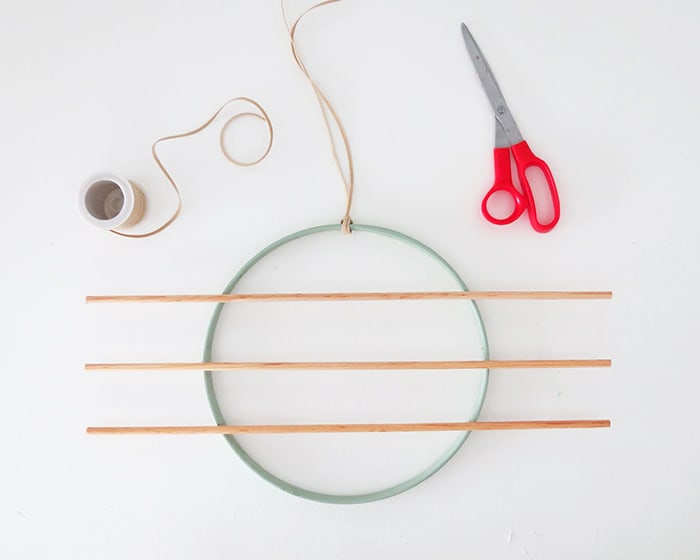
To hang your earring holder on the wall pass a leather ribbon around the hoop and make a knot. Hang it on the wall with the ribbon.
It looks very nice with the ribbon but I realized that the holder sways a little went I take or place earrings on it. So if you prefer a sturdy way to hang your earring holder on the wall I will suggest you use two small hooks. Adhesive plastique hooks will work fine, you can place them a few inches from each other to hold the top of the hoop.
* * *
Para colgar el organizador en la pared, pasas una cuerdita de piel alrededor del aro y haz un nudo. Cuélgalo en la pared.
Se ve muy bien con la cinta, pero me di cuenta de que el organizador se balancea un poco cuando tomo o pongo aretes. Por lo tanto, si prefiere una forma mas resistente de colgar lo en la pared, te sugiero que uses dos pequeños ganchos. Los ganchos de plásticocon adhesivo funcionarán muy bien, puede colocarlos a unos centimetros uno del otro para sostener la parte superior del aro.
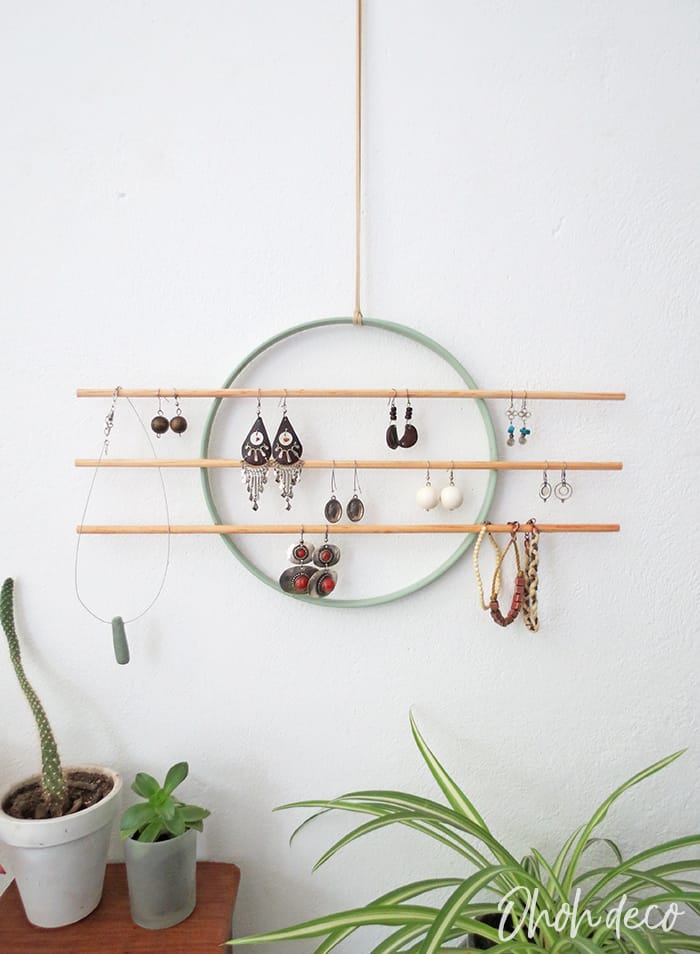
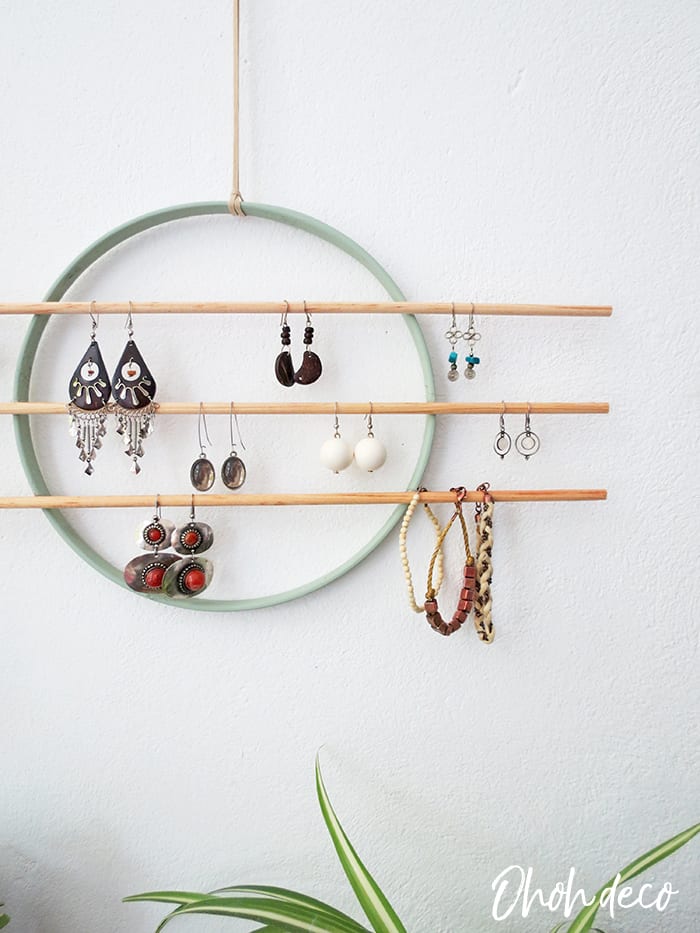
I love how it turns out! And I’m super happy to be able to find any of my earrings in a second. I only displayed a few pairs to take the pictures. I just finished organizing them and all thee dowels are completely covered by earrings, 42 pairs if you wonder (and I may add some new DIY earrings pretty soon). Seriously this jewelry holder is so easy to make, you have to give it a try.
Tell me: Which color would you like to paint the hoop? Where would you like to hang it?
And if you are looking for more earrings storage idea, I’m pretty sure you would love this wire earring holder Cassie made!
* * *
¡Me encanta el resultado! Y estoy súper feliz de poder encontrar cualquier de mis aretes en un segundo. Si me preguntas, solo colgue unos pares para tomar las fotos. Acabo de terminar de arreglar y el organizador están completamente cubierto por aretes, 42 pares en total (y tengo que agregar algunos aretes que hice). En serio, este porta joyas es tan fácil de hacer, tienes que intentar.
Dime: ¿De qué color te gustaría pintar el aro? ¿Dónde te gustaría colgarlo?
Want to remember this? Pin this DIY jewelry wall organizer in your favorite Pinterest board