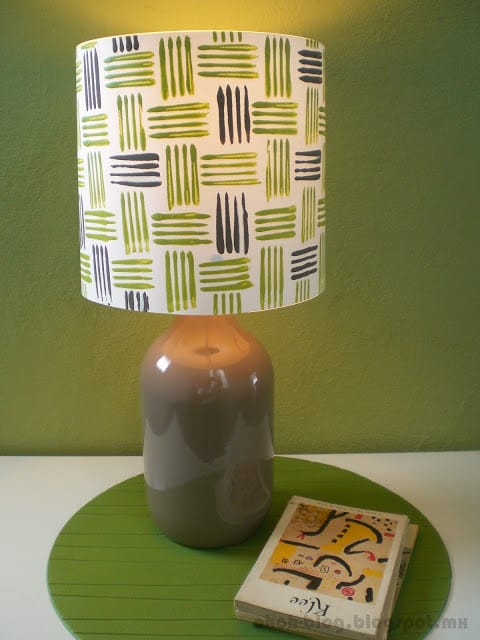
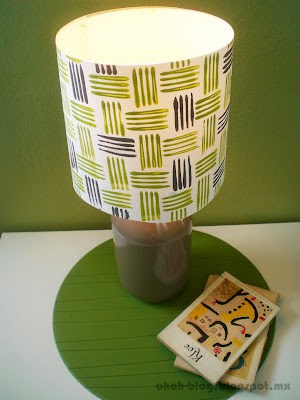
Another version of the classic lamp made with a bottle. I have seen several DIY painting on glass on blogs lately. This gives me the idea to paint the bottle.
I just put acrylic paint in the bottle and turned it on itself to spread out the paint everywhere. Then I left drained it a few hours, and let it dry a few days. I don’t know if it will hold over time, but for now, it looks nice.
[ This post probably contains affiliates links, our full disclosure policy is really boring, but you can read it HERE ]
RELATED: How to make a lampshade with recycled materials
RELATED: DIY paper wall lamp
Otra versión de la clásica lámpara hecha con una botella. He visto a muchos DIY de pintura sobre vidrio en los blogs últimamente. Esto me dio la idea de pintar la botella.
Puse pintura acrílica dentro la botella y la gire sobre sí misma para extender la pintura por todas partes. Después dejé la botella drenarse unas cuantas horas, y la deje secar unos días. No sé como la pintura quedara después de un tiempo, pero por ahora, se ve bien.
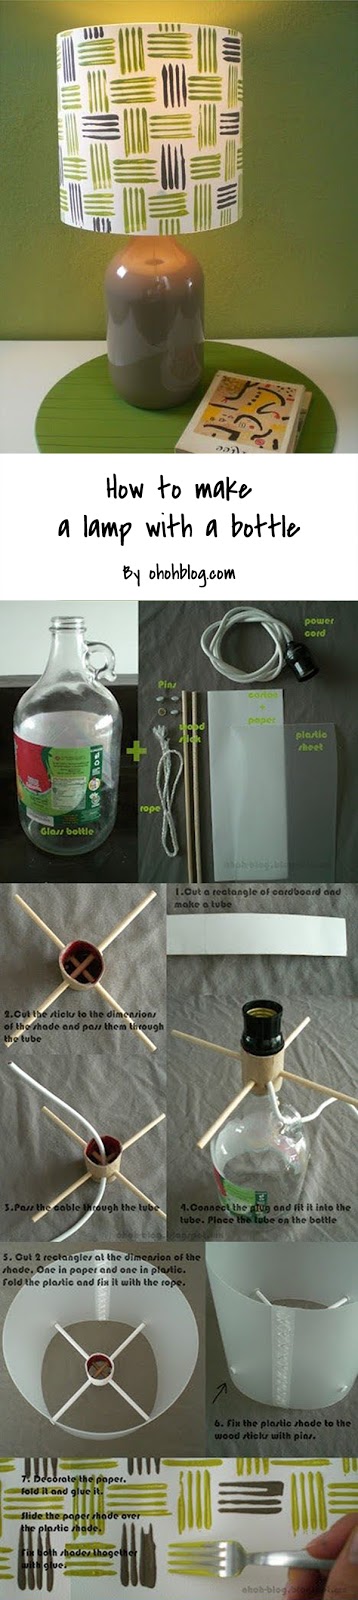
How to make a DIY lamp with a bottle
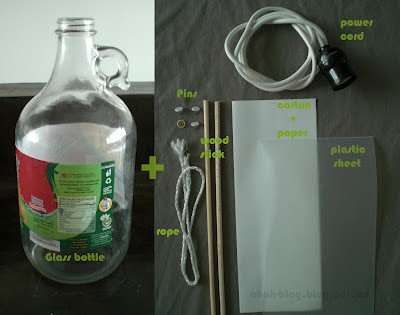
Let starts with the material you need to make this project:
- A clean glass bottle
- Electrical cord cable
- Socket
- A wire plug
- A lightbulb (low energy or LED)
- Craft dowels
- 4 thumb tacks
- Cardstock (or plastic sheet)
- Thin cardboard
Vamos a empezar con el material que van a necesitar:
- Una botella de vidrio limpia
- Un cable con soquet
- Un enchufe
- Una bombilla (de LED or ahoradora)
- Palillos de madera
- 4 Chinches
- Cartulina (o hoja de plastico)
- Carton delgado
Follow the steps below to build your bottle lamp:
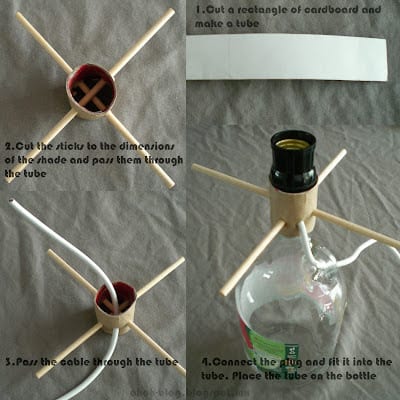
1- Roll a piece of cardboard, so it fits around the bottleneck.
2- Cut two dowels at the dimension you like for your lampshade. Mine are 8 inches. Make holes through the cardboard tube you just made, and pass the dowels through it. Dowels must be centered and form a cross shape. Add some glue if necessary to hold the dowels within the tube.
3- Make another hole in the cardboard tube and pass the wire through it. The socket must fit on top of the tube. Add some glue to hold them together. (If you choose the electrical kit, make a notch in the tube to slide the cable and then glue the tube together with insulating tape.)
4- Place the tube on the bottleneck. Again add some glue.
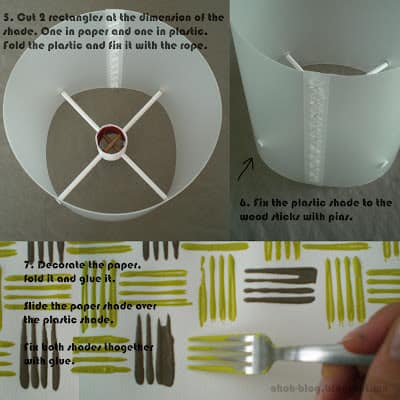
5- Let’s make the lampshade. You can make it with two layers (one plastic and one paper) as I did. Or just use one layer of cardstock to make your lampshade. It will hold. You can have a look at this large DIY lampshade if you have any doubt.
Cut a rectangle of cardstock, bed it to make a cylinder, and glue the end together.
6- Slide the dowels inside the cylinder and fix both with push pins. Just push the pins into the dowels ends.
7- Glue some nice patterned paper on top of the plastic shade.
1- Enrolles un trozo de cartón para que se ajuste alrededor del cuello de la botella.
2- Cortas dos palillos en la dimensión que quieras para tu pantalla. Los míos son de 20 cm. Haz agujeros a través del tubo de cartón que acabas de hacer y pasa los palillos a través de él. Los palos deben estar centrados y formar una cruz. Agregues un poco de pegamento si es necesario para mantener los dentro del tubo.
3- Haz otro agujero en el tubo de cartón y pasa el cable a través de él. El enchufe debe encajar en la parte superior del tubo. Agregues un poco de pegamento para mantenerlos juntos.
4- Coloques el tubo en el cuello de la botella. Nuevamente agregues un poco de pegamento.
5- Ahora toca hacer la pantalla de la lámpara. Puedes hacerlo con dos capas (una de plástico y otra de papel) como hice. O simplemente usar una capa de cartulina para hacer tu pantalla. Puedes echar un vistazo a esta gran pantalla que hice si tienes alguna duda.
Cortas un rectángulo de cartulina, colócalo para formar un cilindro y pega los extremos.
6- Deslice los palillos dentro del cilindro y fíjalos con chinches. Simplemente empuje los chinches en los extremos de los palos.
7- Pega un bonito papel estampado sobre la pantalla de plástico.
Et voila! A new DIY table lamp made with a glass bottle.
RELATED: 18 DIY lighting ideas
RELATED: DIY paper lamp
Want to remember it? Save this DIY lamp with a bottle in your favorite Pinterest Board.
You will find all the tutorials featured in the video on my “Best DIY” page.
Warning: Be careful when you work with electric power to make the connections correctly. Only use LED light bulbs. Do not hesitate to ask for professional help. Ohoh deco cannot, in any case, be held responsible for problems or accidents related to the execution of this tutorial.
Amaryllis

ama… this is so nice!!
Thanks Patti!….I'm sure people will think I'm paying you to comment!
so creative..
So useful project!
!Preciosa lampara! Nunca he pensado en poner el color en el interior de la botella, es maravilloso… y la tecnica de los tenedores: ¡magnifica! Muy buena realización, cierto.
tanika
Gracias! Solo hay que usar una pintura especial para vidrio. Porque el acrílico que puse no quedo bien al final!
SIMPLY AMAZING!! lo acabo de encontrar y es algo que voy a hacer para mi nuevo apt.
Great idea! What paint did you use to decorate the plastic sheet?
Thanks! I didn't paint on plastic. I paint on paper with acrylic and slide the paper sheet around the plastic one!
Oh, thank you 🙂
Hello Ama, I am a little confused. On pictures 1-4 the tube that was created from cardboard and the wooden sticks are attached to the lamp, then on pictures 5 and 7 the tube and the sticks are attached to the lampshade. I actually have a project in college where we have to make a lamp and this would be a fantastic idea for my lamp, so I am in need of a little clarity.
Also in your explanation of the materials that are needed you didnt mention the socket that the light bulb screws into. Was there any electrical wiring involved with attaching the power cord to that socket? I have never made a lamp before so forgive me for my ignorance.
The cardboard tube fits over the neck of the bottle, I put this photo for a better understanding (not very useful;).
So the steps are:
1. Make the tube
2. pass the stick through the tube
3. pass the cable through the tube and connect it to the plug socket (you must open the plug socket and screw the wires on metallic lugs).
4. fix the lampshade on the wood with push pins and glue
5. assemble and glue the lampshade on the neck of the bottle.
That's it! I hope this is clearer! Have a nice day!
Yes! Thank you ,that was very helpful. I am sure I will get an A when I do make the lampshade for a grade in my lighting class! I appreciate you taking the time to explain that to me. You are very creative. Thank you!!
This looks great. We will be moving soon, and I want some new decor on the cheap, and this is so easily customizable. How did you colour the bottle though?
With acrylic paint….but it didn't work! The paint fell to the bottom! I'll have to try with special paint for glass! Let me know if you find a better solution!
WOW!!! In your blog is so much great projects that I want to try…oh my…why did I founded your blog? 🙂
hahaha!!! Thanks Neda..and have fun crafting 😉
Where did you get the plastic sheet?
At Lumen store (lumen.com.mx), you must find it on any art supply store.
Thanks sooo much!
Wow. I really loved your creativity. The lamp which you have made is really looking very different. I think its a kind of lamp which i have never seen. The method which you have told to make this lamp is sounding easy. I will definitely try this in my home. Click Here
I’am so happy to receive the lamp tutorial, I was in hobby lobby 2 days ago looking for an idea for a lamp base. I want to make one with the materiAls from a broken lamp. Will let you know outcome!
Hello Kathy, I’m so glad it helps. Please let me know how your lamp turns out.
I continuously continue coming to your website once more simply in case you have posted new contents.
bubblegum casting
Wow. Love all your projects.
Hi. I am brazilian. And loving your idea and your blog
Thanks Raquel! Nice to hear about brazilian readers!
Your stuff are more than wow! And also the best way to make understand the things mentioned in it paper lamp shade idea is awesome.
Is there not a fire hazard with wood, card and plastic? Bulbs can create a lot of heat. How do you make sure it is fire proof as well as beautiful? And it is really beautiful!
For all my lighting projects, I use energy saving bulb or LED bulb. They don't heat and are much safer…and ecological.