Doilies are an affordable and versatile material for crafting festive Christmas decorations with paper.
Their delicate lace-like patterns add a touch of elegance to any holiday decor.
Here are five creative ideas to transform simple paper doilies into charming Christmas decorations.
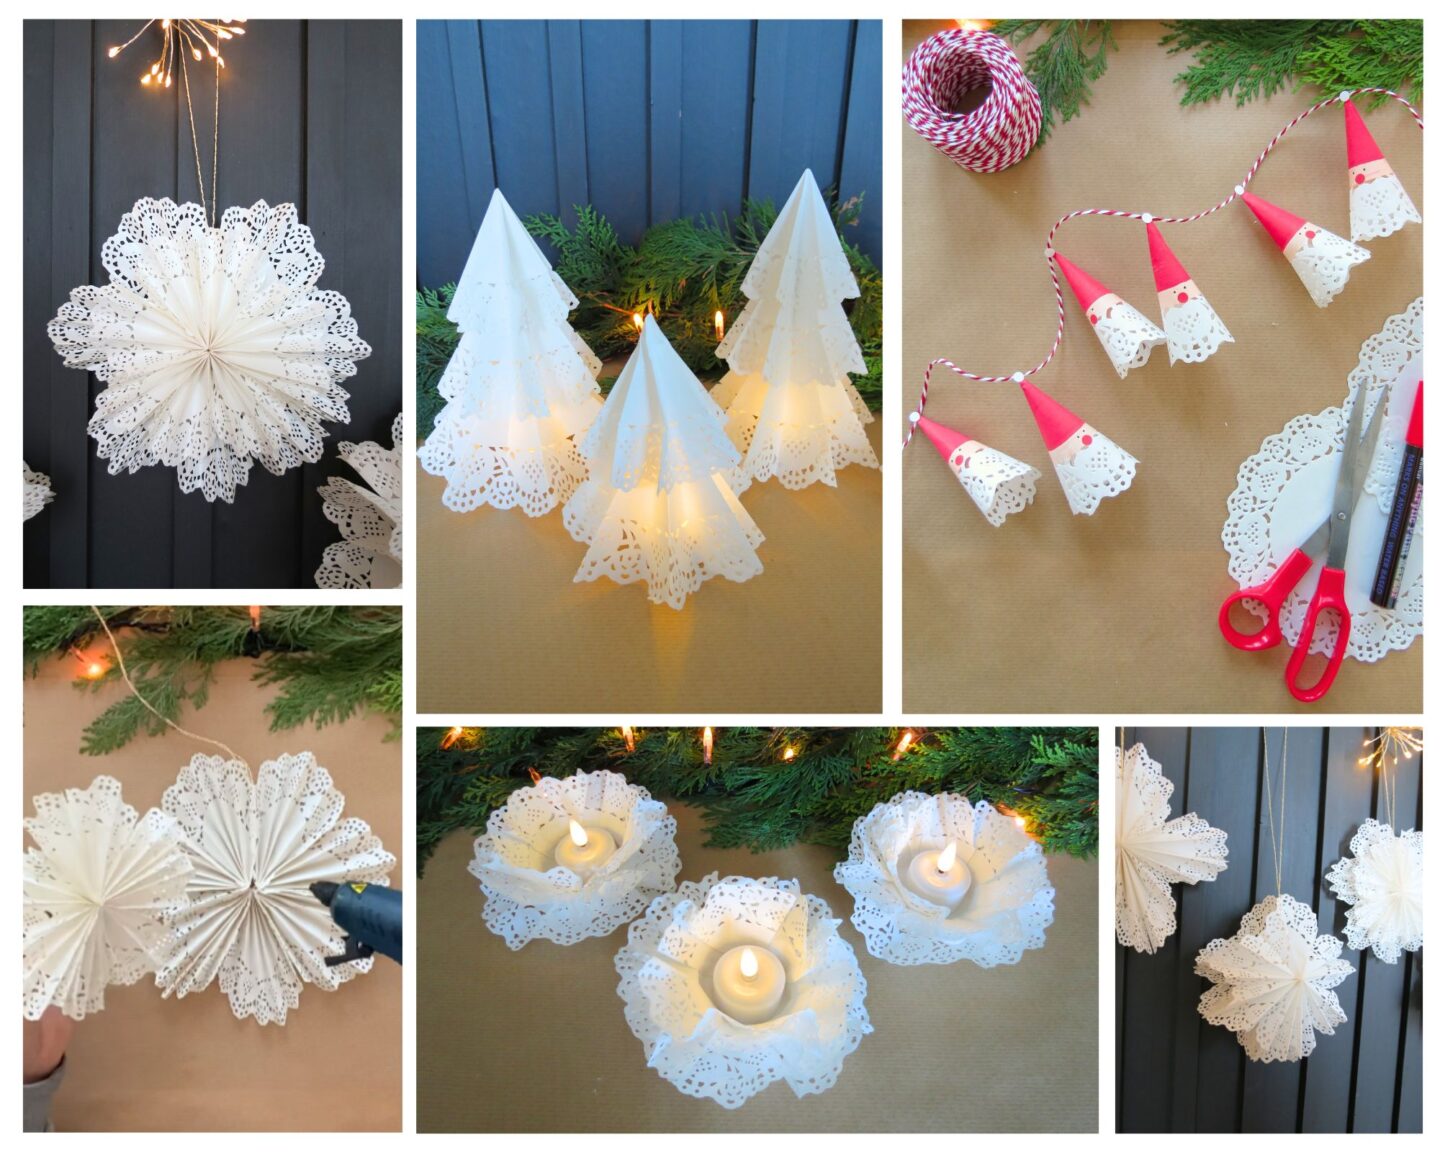
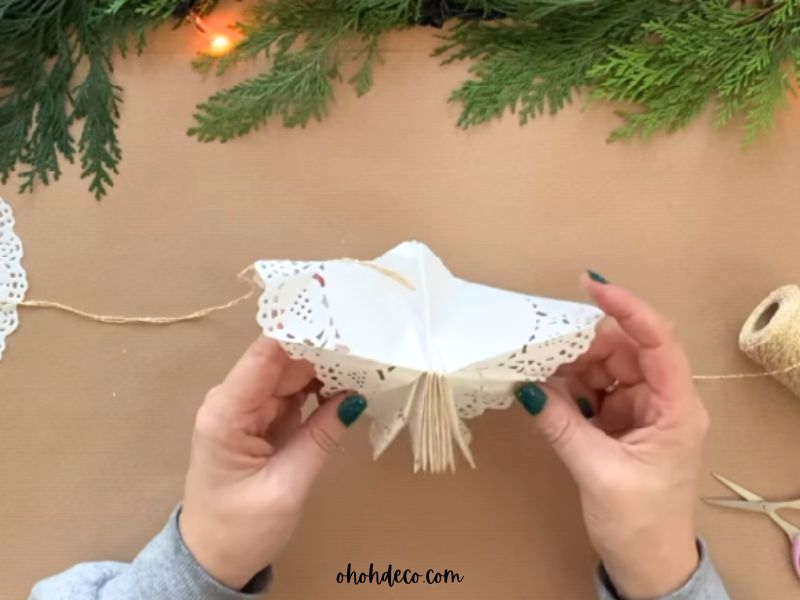
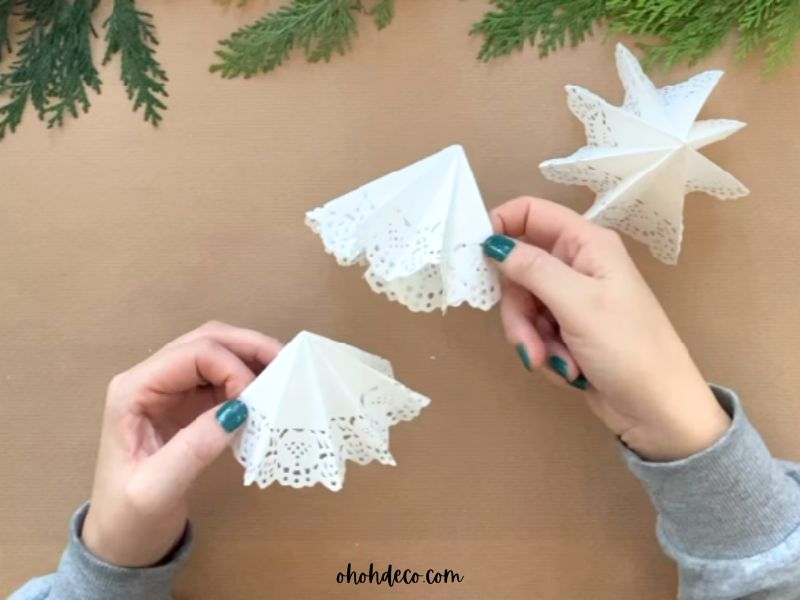
1. Paper Doilies Snowflakes
Paper doily snowflakes are a classic and simple decoration that instantly brings winter charm to any space.
Materials:

.
- Instructions:
- Fold a paper doily in half, then fold each side to the central pleat.
- Fold the doily in half again to form a small paper pocket.
- Repeat the previous folding step with all the doilies; you will need 7 pieces to make the snowflake.
- Glue all the folded doilies on top of each other. Apply glue to the center and along the fold.
- Cut a piece of string, fold it in half, and glue both ends to the doily.
- Apply some more glue and open the snowflake to fix the last two sides together.
- Arrange the fold and hand your beautiful paper snowflake where yoy like.
Where to Hang Your DIY Paper Doily Snowflakes:
- Windows: Let natural light shine through the delicate patterns for a frosty, magical effect.
- Ceilings: Hang them at different lengths with clear thread to create a floating snowflake display.
- Christmas Tree: Use them as lightweight ornaments for a vintage-inspired look.
- Walls or Mirrors: Arrange them in clusters to form a snowy backdrop for holiday photos.
- Mantel or Door Frames: String several together to make a charming garland.
With a few paper doilies and a bit of imagination, you can fill your home with the cozy sparkle of a handmade winter wonderland.
RELATED: From Trash to Treasure: How to Transform Toilet Paper Rolls into Delicate Snowflake Ornaments

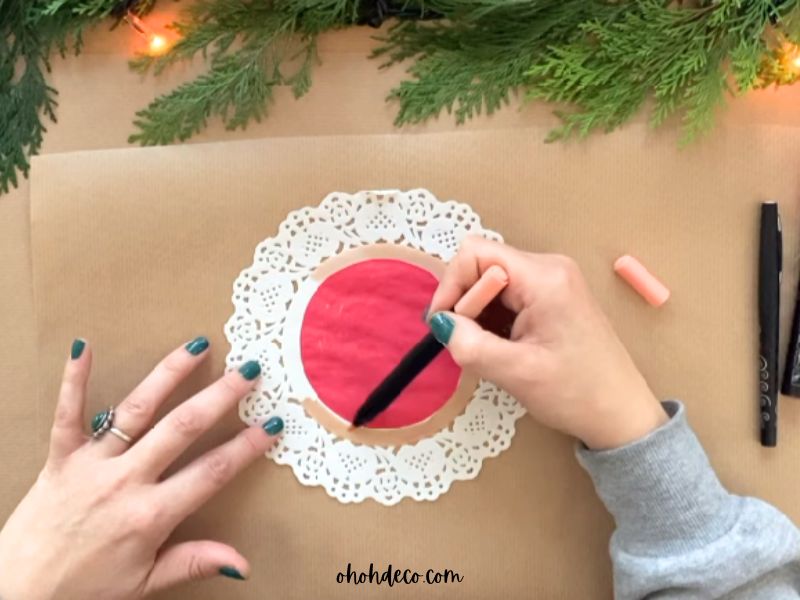
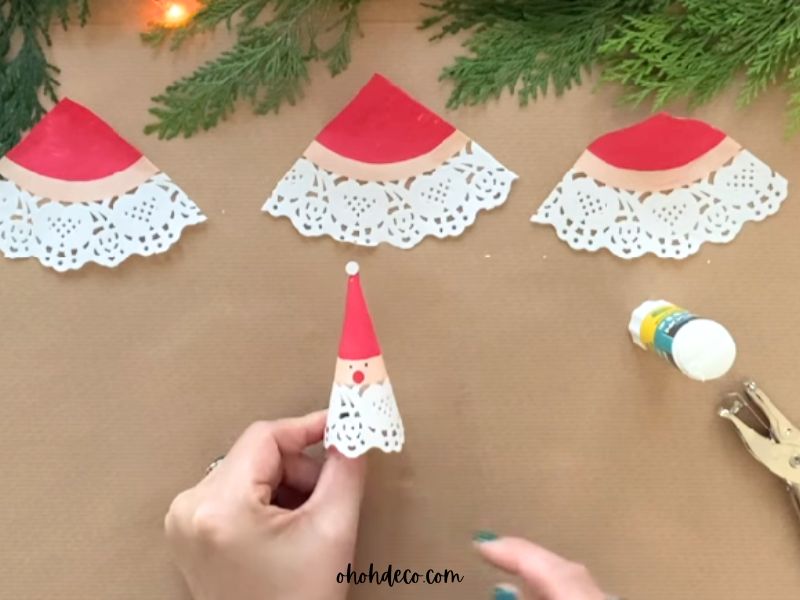
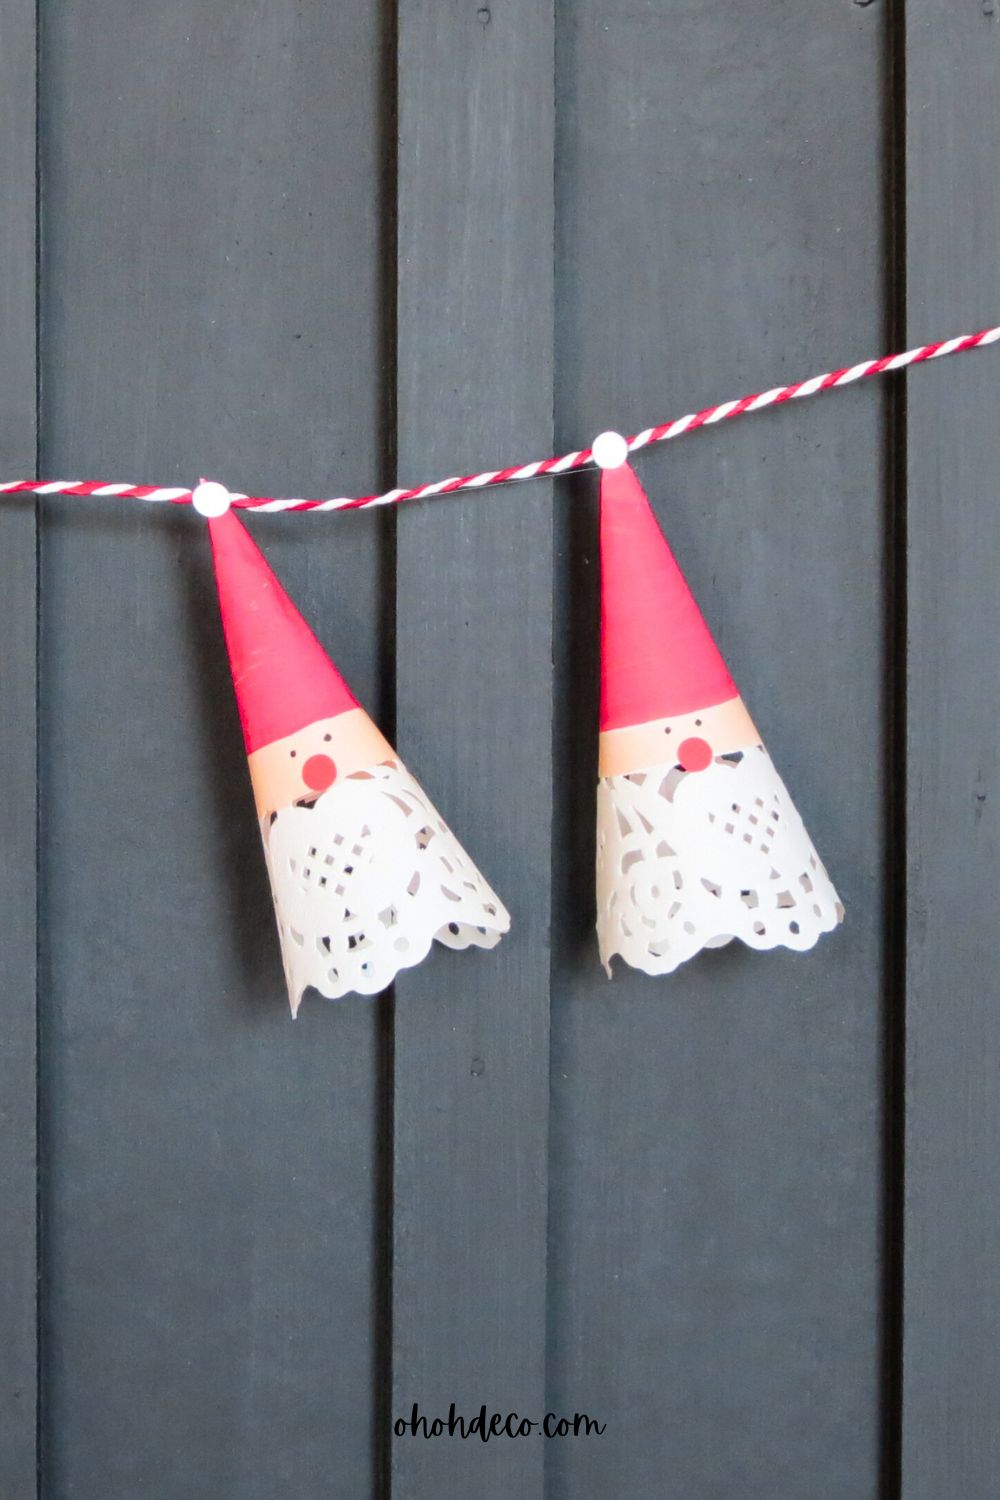
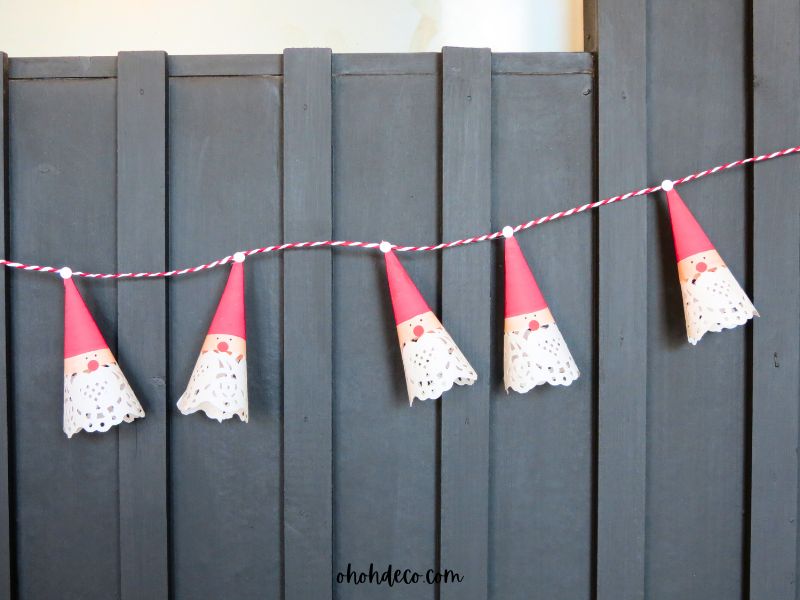
2. Santa Garland or Santa Ornament
Create a cheerful Santa-themed garland or individual ornaments using paper doilies.
Materials:
.
- Instructions:
- Draw a red circle at the center of the doily and color it red.
- Color the gap between the red circle and the edge of the lace with beige, brown, or any color you like for Santa’s face.
- Fold the doily in 4, open it, and cut following the pleats.
- Draw eyes and glue a red nose on everyone of the 4 paper pieces.
- Roll each piece on itself and hold adding glue on the edges.
- Finish the Santa by gluing a paper pom pom on top of the hat.
- Make as many Santas as you like.
- To use the Paper Santas as an ornament, cut a piece of string, fold it, and fix both ends on the tip of the hat.
- To make a Santa garland, cut a large piece of string and glue the Santas next to each other along the string.
A DIY Santa garland made out of paper is a cheerful and festive way to bring the spirit of Christmas into your home.
Its playful design is perfect for both kids and adults to enjoy crafting together and turning simple materials into a joyful decoration.
Whether you hang it across a mantel, along a staircase, or above a doorway, this handmade decoration instantly brightens the room with holiday charm.
RELATED: Create a DIY Santa Ornaments from Egg Cartons
.
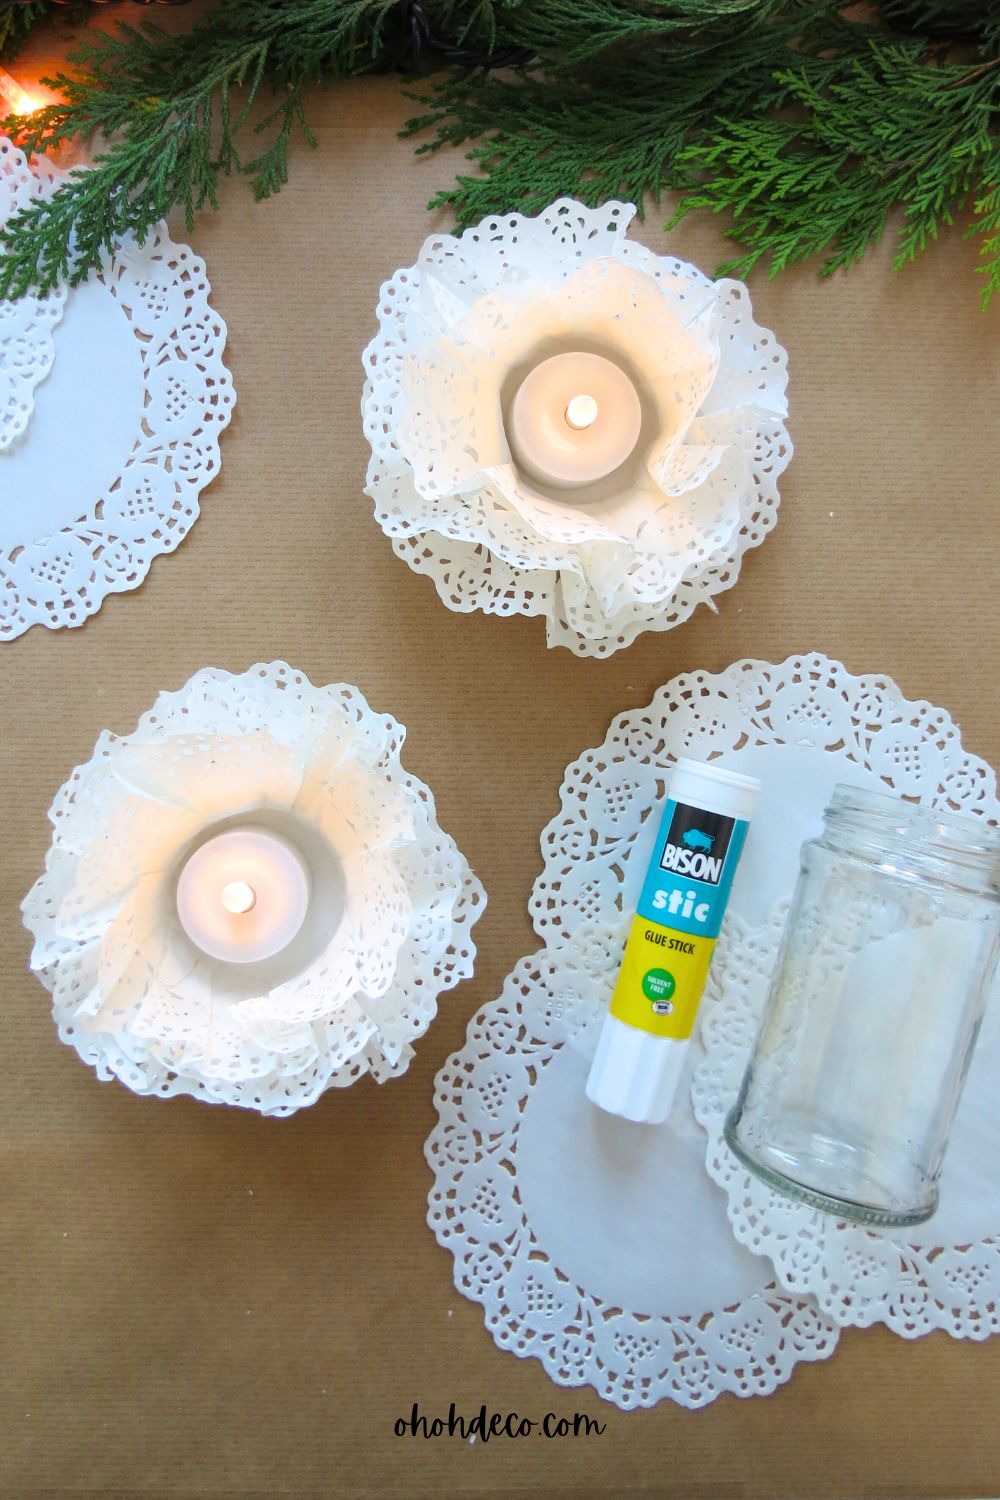
3. Candle Votive with Paper Doilies
Creating a simple candle votive with paper doilies is an elegant and affordable way to brighten a festive table during the holiday season.
The delicate lace patterns of paper doilies cast beautiful shadows when illuminated, adding a warm and cozy glow to any gathering.
Materials:
- Three paper doilies
- Glass jar or any small circular container
- Glue
- String
- LED candle

Instructions:
- Take a jar or any container with a diameter slightly larger than the LED tea light candle.
- Center the doily on top of the jar and wrap the edges along the side of the jar.
- Add glue to the center of the paper
- Place a second doily above the first one and press the edges along the jar side.
- Repeat with the third doily.
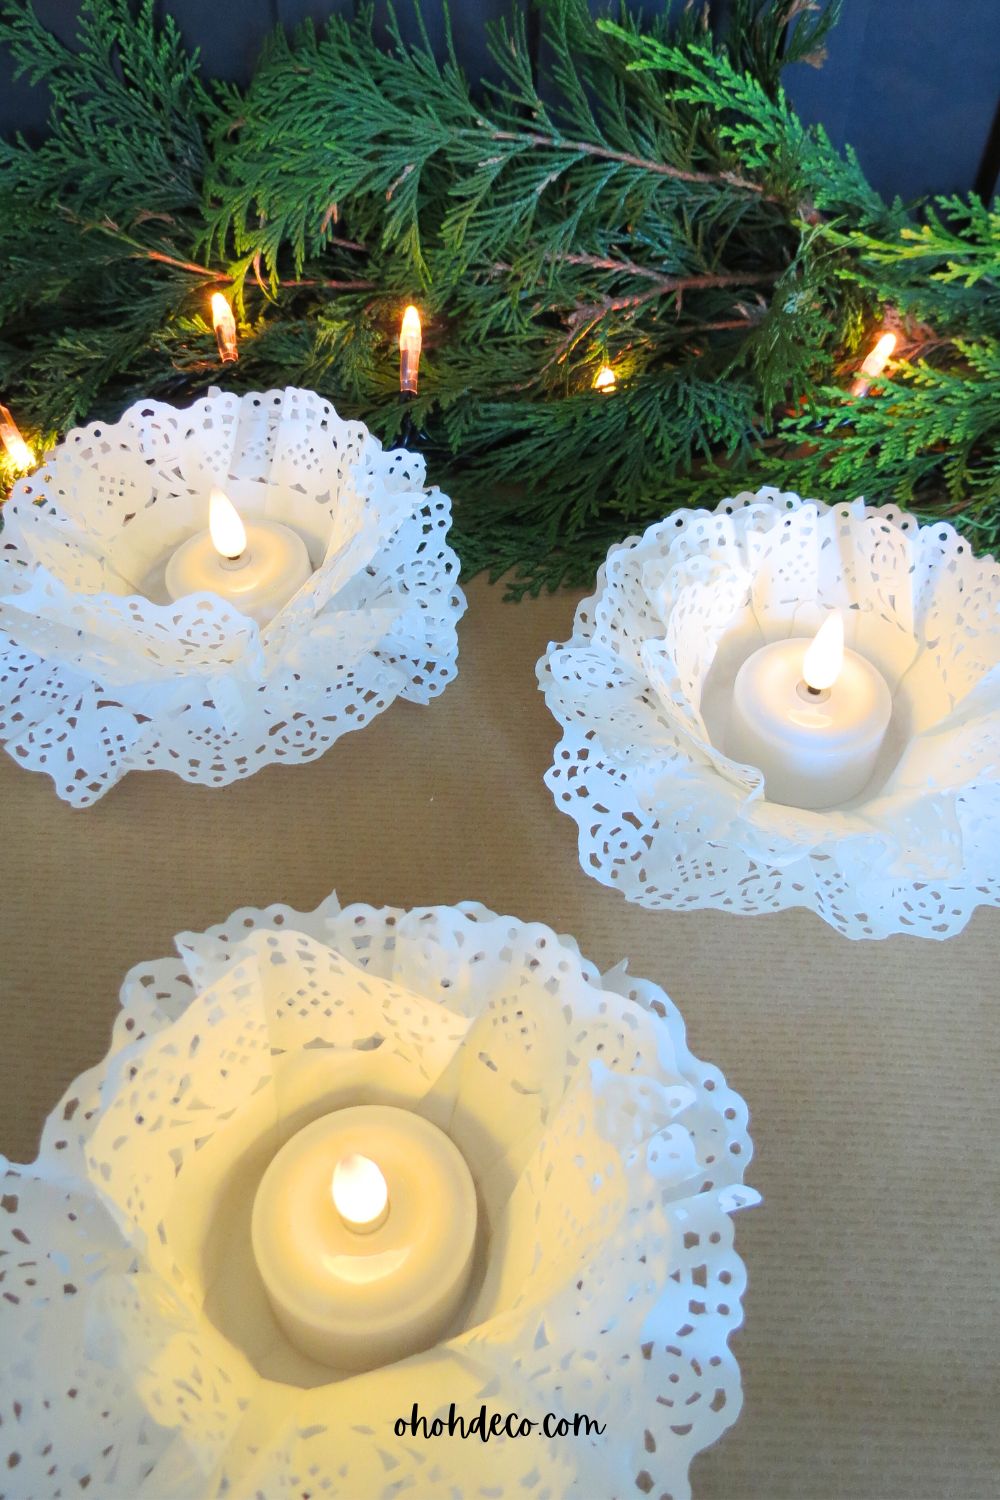
- Wrap a piece of string around the top of the jar to hold the doilies in shape.
- Remove the doilies, turn them over, and shape them nicely.
- Place a battery-operated candle inside to create a soft, glowing effect.
- Arrange several votives together for a cozy holiday centerpiece.
The intricate lace patterns of the doilies create a gentle play of light that feels both elegant and inviting. When you group several votives, they transform into a stunning centerpiece that radiates warmth and coziness.
This simple DIY project makes your holiday table sparkle with comfort and joy.
RELATED: The easy way to make DIY concrete candle holder
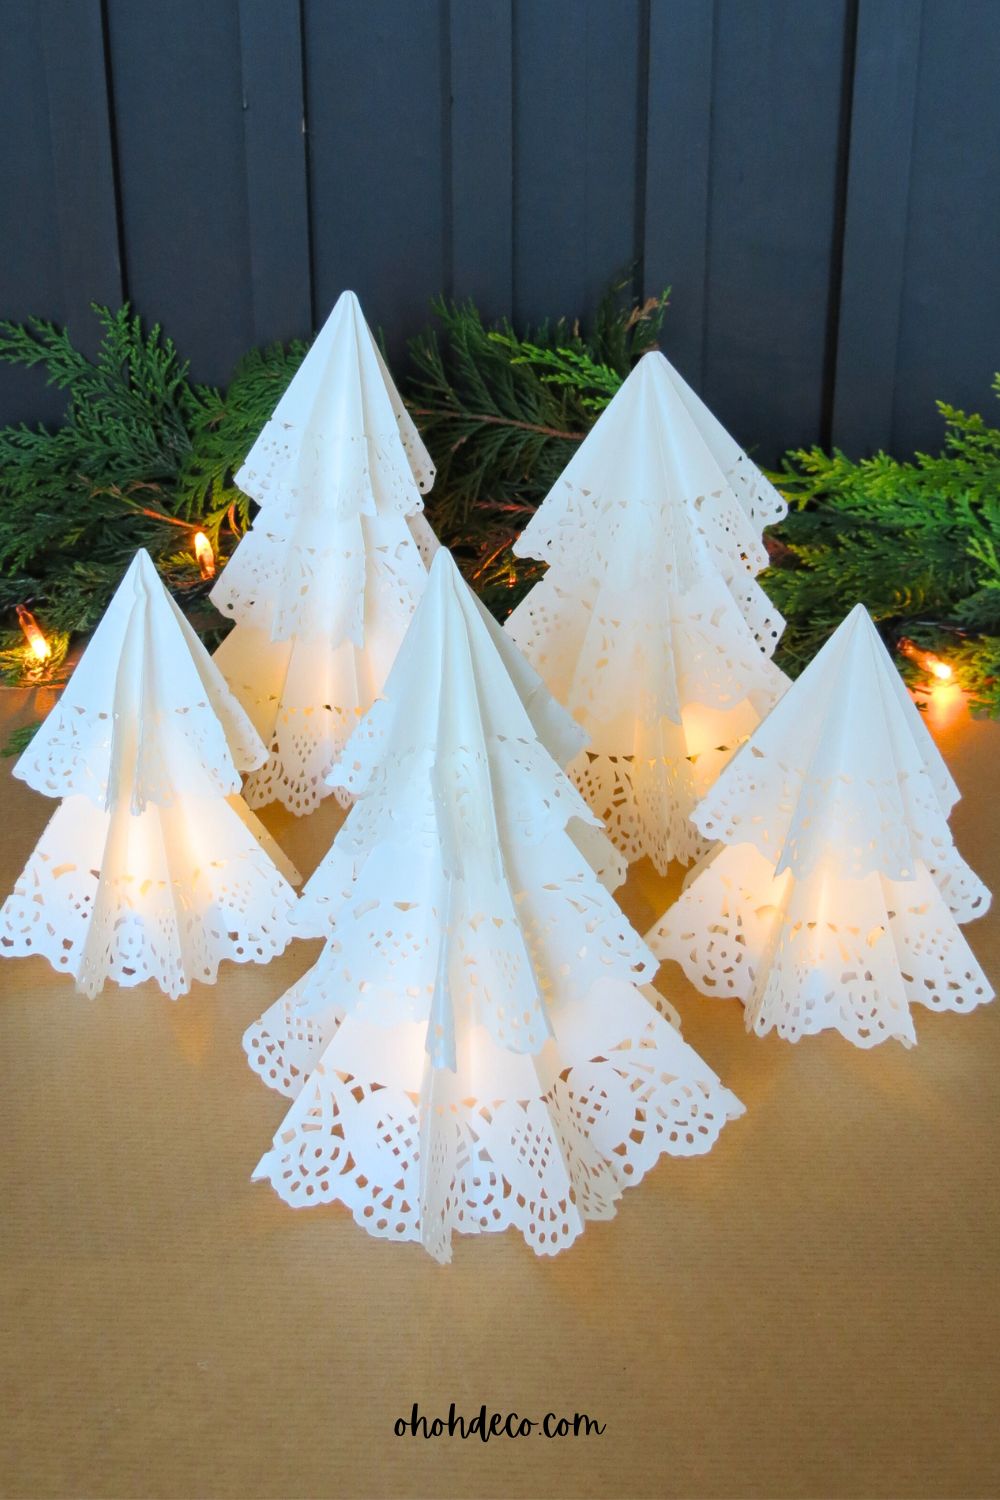
4. Mini Christmas Tree with Paper Doilies
Creating a mini Christmas tree with paper doilies is a simple and delightful craft that adds a touch of winter wonder to your home.
The delicate lace patterns of the doilies give the tree a soft, snowy look, perfect for adding festive charm to any room.
Whether displayed on a mantel, windowsill, or as part of a holiday centerpiece, this simple DIY project captures the magic of the season with elegance and creativity.
Materials:
- Paper doilies in various sizes
- Glue
- LED tea candle (optional)

.
Instructions:
- You will need a small, a medium, and a large doily to make a mini tree.
- Fold each doily in half, then in half again, then again and again (4 times) to form a cone shape.
- Open the doily and work on the folds. You need to have alternating folds, one facing outwards and one facing inwards.
- Stack the medium cone on top of the large one, and verify that the folds fit neatly into each other. Slightly separate the two cones and glue each layer in place.
- Place the small cone on top, and repeat step 4.
- If you like, you can decorate with small beads, glitter, or a paper star on top.
This easy-to-make mini Christmas tree crafted from paper doilies is a charming way to bring festive beauty into your home.
For an extra magical touch, place a battery-operated candle inside the tree to let the soft light glow through the lace-like patterns.
This simple addition transforms your handmade tree into a cozy, enchanting decoration that brightens any holiday space.
RELATED: How to craft DIY Mini Christmas Tree
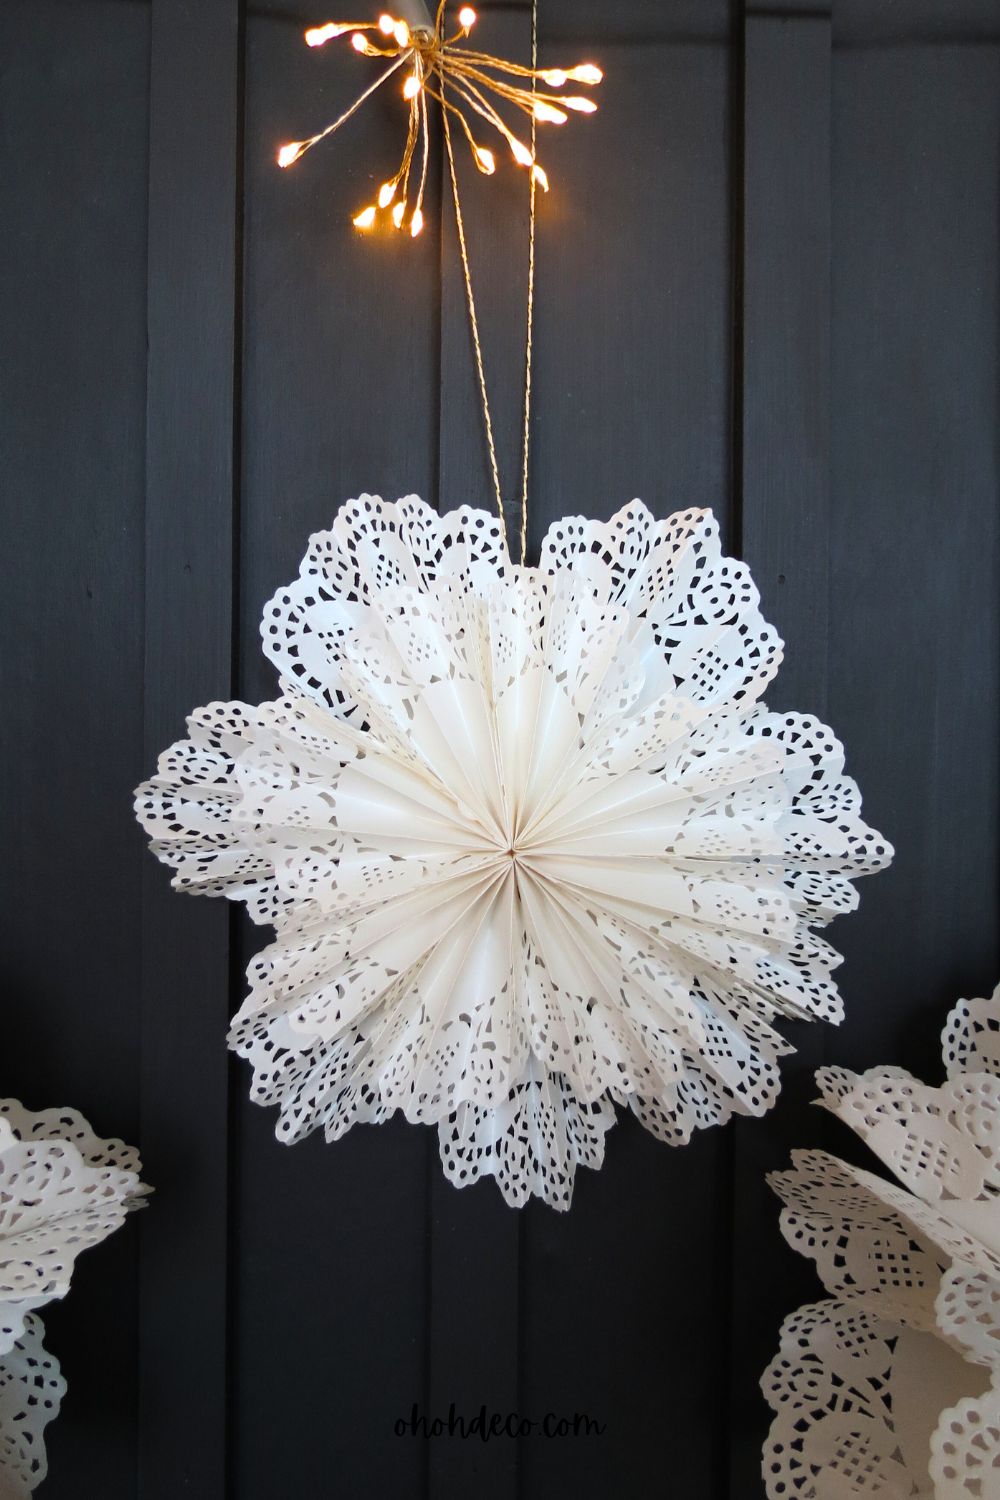
5. Winter Window Snowflake Decorations
Create beautiful paper snowflakes using paper doilies for a delicate and wintry look. Have fun mixing these snowflakes with your other paper doily creations to fill your home with a magical winter atmosphere.
Materials: Paper doilies, scissors, and clear tape.
.
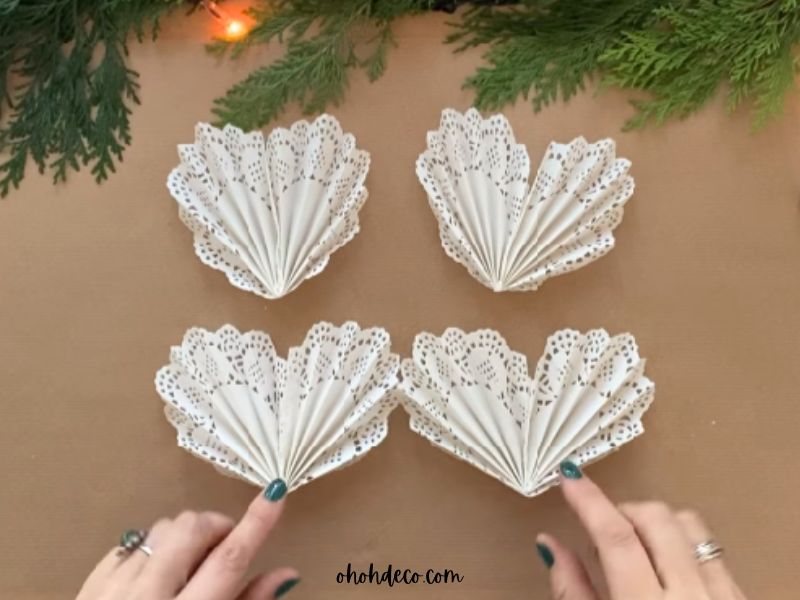
Instructions:
- Take four doilies and fold them into an accordion. Then fold each accordion in half.
- Apply glue on the side of each piece and stack them on top of each other.
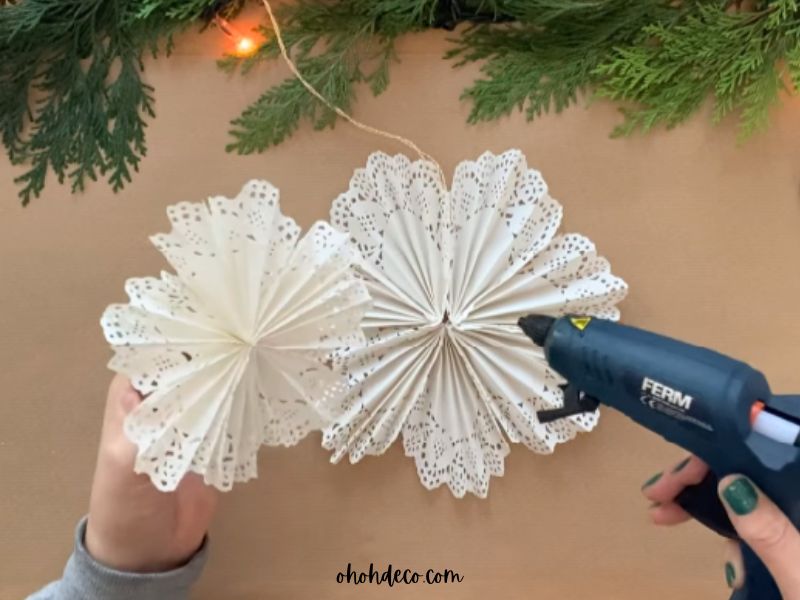
- Cut and glue a piece of string to easily hang the snowflake.
- Add more glue and open the snowflake to fix the last two sides together.
- Combine various sizes of DIY snowflakes for a layered, frosty effect that brightens any room.
RELATED: How to make Paper Christmas Angels
How to make Christmas decorations with Paper doilies: Video tutorial
Watch the video to learn how to make five beautiful Christmas decorations using paper. Each step is explained in detail, making it easy to follow along.
Gather some paper doilies, get creative, and start crafting festive decorations that bring holiday cheer to any space.
Paper doilies offer endless possibilities for crafting festive decorations that capture the spirit of the holidays.
With just a few simple supplies, you can create beautiful snowflakes, elegant table centerpieces, and fun Christmas decorations that add a personal touch to your home.
These creative projects bring warmth, charm, and handmade beauty to the season, making your celebrations feel even more special and inviting.
Want to remember it? Save these 5 Christmas decorations with Paper doilies on your favorite Pinterest board.